Installing a storage interface card

Use this information to install a storage interface card in the blade server.

Note
This section does not apply to the IBM WebSphere DataPower Integration Blade XI50B Type 4195 appliance.

The storage interface card controls the SAS hot-swap storage drives. The following illustrations and installation instructions shows how to install a ServeRAID-MR10ie controller into the CIOv expansion connector of the blade server. The illustrations and installation instructions are similar for other CIOv storage interface cards.

Note
The backup-battery will be installed in DIMM connector seven and might affect how much memory is recognized by the blade server. Review the tables in Installing a memory module to make sure that your memory configuration will not be affected.
Graphic illustrating how to install a CIOv storage interface card.
Attention
Before you install a ServeRAID-MR10ie controller in the blade server, make sure the PCIe speed is set to Gen1. You can configure the PCIe speed in the Setup utility by selecting System Settings and Devices and I/O Ports.

To install a storage interface card, complete the following steps.

  1. Locate the CIOv expansion connector (see Blade server connectors).
  2. Touch the static-protective package that contains the storage interface card to any unpainted metal surface on the BladeCenter unit or any unpainted metal surface on any other grounded rack component; then, remove the storage interface card from the package.
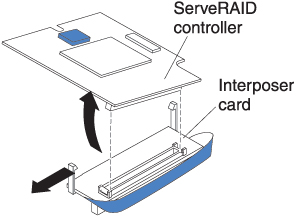
  3. If an interposer card is installed on the storage interface card, remove it.
    Graphic illustrating how to remove an interposer card from the CIOv storage interface card.
    1. If the interposer has a pull strap, move the pull strap away from the storage interface card. If the pull strap surrounds the storage interface card, the pull strap will interfere with the removal of the interposer card.
    2. Press out on the plastic latch that holds the interposer card to the storage interface card and simultaneously lift up on the controller, as shown.
    3. Separate the interposer card from the storage interface card and store the interposer card in a safe place.
  4. Install the backup-battery cable to the storage interface card.
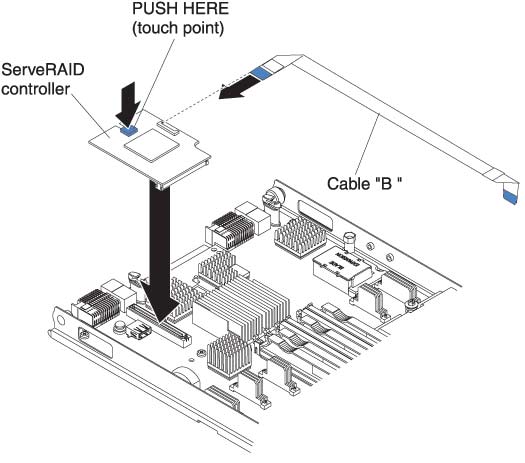
    1. If you are installing a ServeRAID-MR10ie controller, select cable "B" from the packaging.
    2. Locate the end of the cable marked “EXPANSION CARD”; then, with the blue side of the cable end facing up, carefully insert the cable end into the cable connector on the ServeRAID controller.

      Graphic illustrating how to install the ServeRAID controller and cable.
  5. Orient the connector on the storage interface card with the CIOv expansion connector on the system board; then, press the storage interface card into the CIOv expansion connector.
  6. Firmly press on the indicated locations to seat the storage interface card.
    Note
    For device-driver and configuration information to complete the installation of the expansion card, see the documentation that comes with the storage interface card.
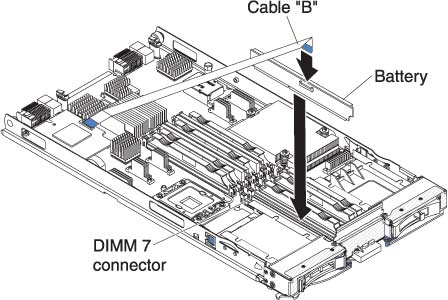
  7. Install the backup battery for the storage interface card into DIMM connector seven (see Blade server connectors and Installing a memory module).

    Graphic illustrating how to install the backup battery and cable.
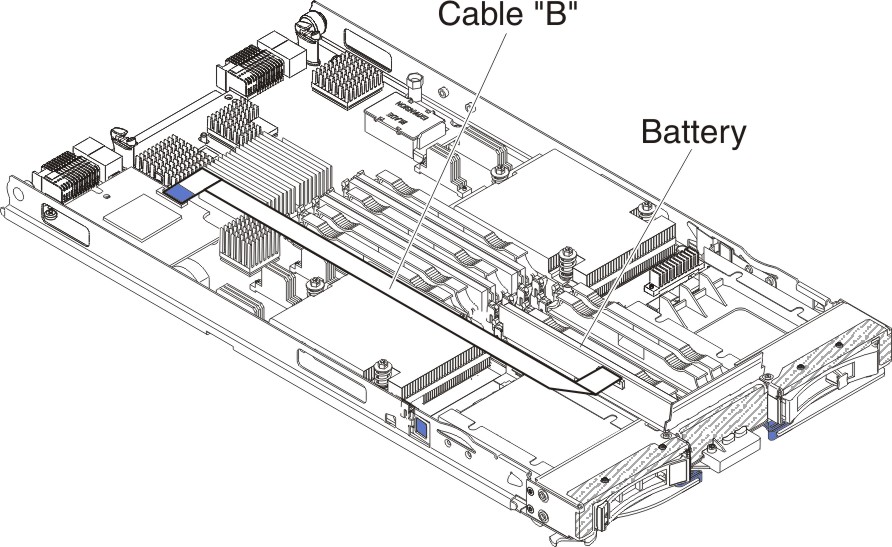
  8. Install the backup-battery cable to the backup battery. The side of the cable with the blue touchpoint should be oriented towards the center of the blade server.
  9. Orient the backup-battery cable so that it lays flat over the top of the heat sink for microprocessor two.

    Graphic illustrating how to install the backup battery and cable.
  10. If you removed an optional expansion unit, reinstall it (see Installing an optional expansion unit).
  11. Install the cover onto the blade server (see Closing the blade server cover).
  12. Install the blade server into the BladeCenter unit (see Installing the blade server in a BladeCenter unit).