Enable Intel® On Demand
A processor is equipped with various computing capabilities. Basic capabilities are available at the initial processor installation, while others remain inactivated. As development environment and tasks evolve, computing demands may accelerate and require leverage of the previously inactivated processor capabilities. In such cases, user can select desired processor capabilities and activate them through Intel On Demand feature—a feature that allows user to customize processor capabilities according to environment and tasks at hand. The following section specifies system hardware and software requirement, Intel On Demand enabling and transferring procedures, and list of processor capabilities.
This documentation includes the following sections:
Procedures for Enabling Intel On Demand Features
Procedures for Transferring Intel On Demand Features
Supported processor
Intel On Demand is only supported by Intel On Demand capable processors. For more information on Intel On Demand capable processors supported by SR630 V3, see SR630 V3 Product Guide.
Installation tool
Intel On Demand can be installed via Lenovo XClarity Controller (XCC) and Lenovo XClarity Essentials OneCLI (LXCE OneCLI). After confirming that your processor supports Intel On Demand, you also need to make sure the XCC and LXCE OneCLI installed in your system supports installing Intel On Demand.
Check if Lenovo XClarity Controller (XCC) supports installing Intel On Demand (two methods provided):
Via XCC WebGUI
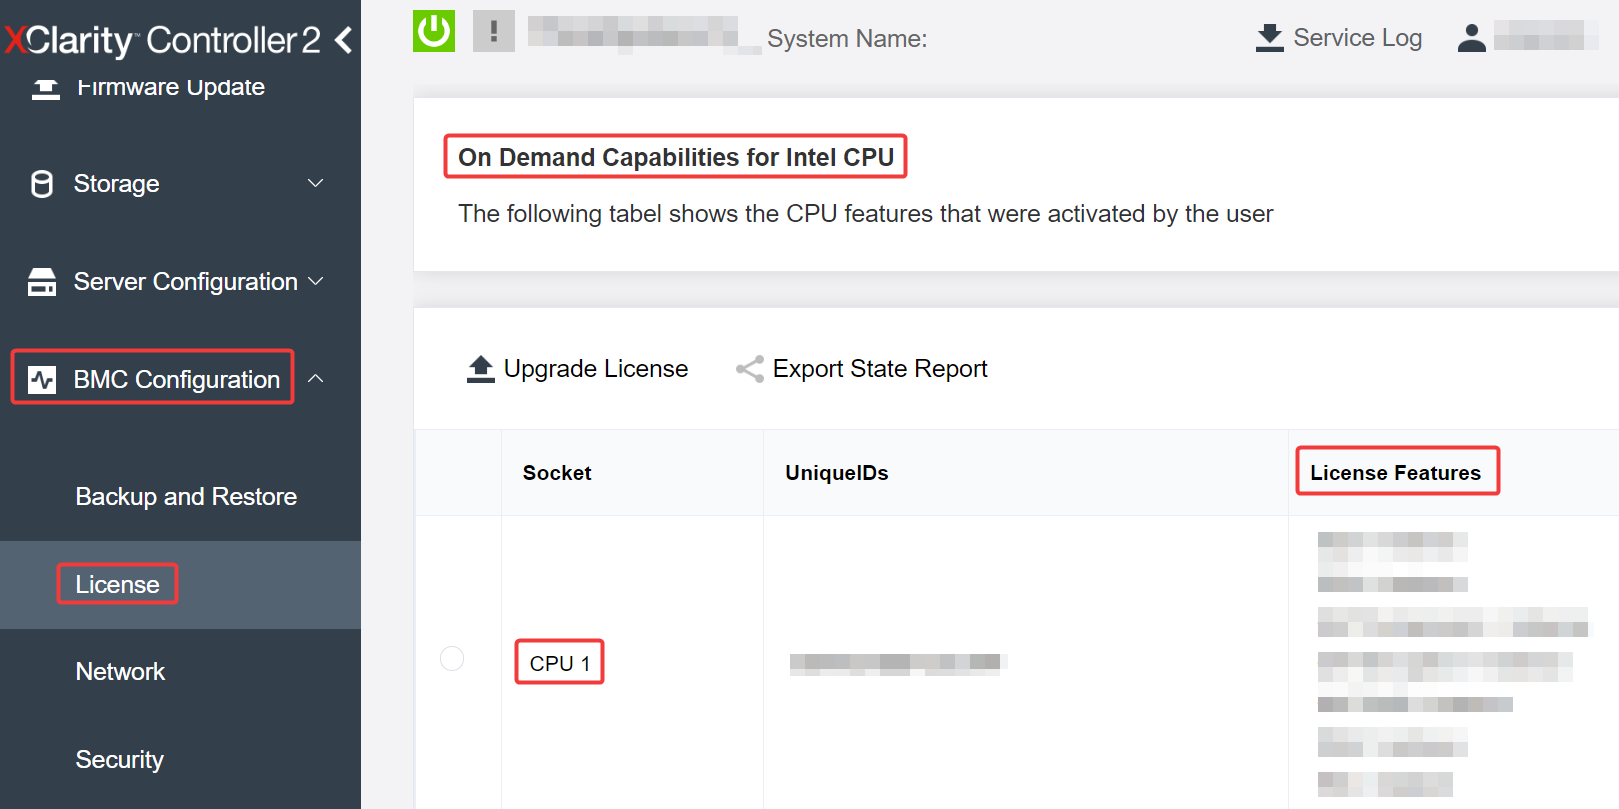
Go to , if there is a section named On Demand Capabilities for Intel CPU in the page, it indicates that current XCC supports installing Intel On Demand, otherwise you need to update XCC firmware to the latest version to ensure it supports installing Intel On Demand.Figure 1. On Demand Capabilities for Intel CPU in XCC Web GUI
Via XCC REST API
- Use the GET method with the following Request URL:
GET https://bmc_ip/redfish/v1/LicenseService/Licenses/ In the response JSON object, the Members field includes the API such as /redfish/v1/LicenseService/Licenses/CPUX_OnDemandCapability, where X is the CPU numbering, it indicates that current XCC supports installing Intel On Demand, otherwise you need to update XCC firmware to the latest version to ensure it supports installing Intel On Demand.
For example:"Members": [
{
"@odata.id": "/redfish/v1/LicenseService/Licenses/CPU1_OnDemandCapability"
},
{
"@odata.id": "/redfish/v1/LicenseService/Licenses/CPU2_OnDemandCapability"
},
]
Check if LXCE OneCLI supports installing Intel On Demand
LXCE OneCLI version must be at 4.2.0 or above.
Enabling Intel On Demand Features
Select the Intel On Demand features that meets your workload needs, see Intel On Demand Features.
After completing ordering the features, you will receive Authorization Code via e-mail.
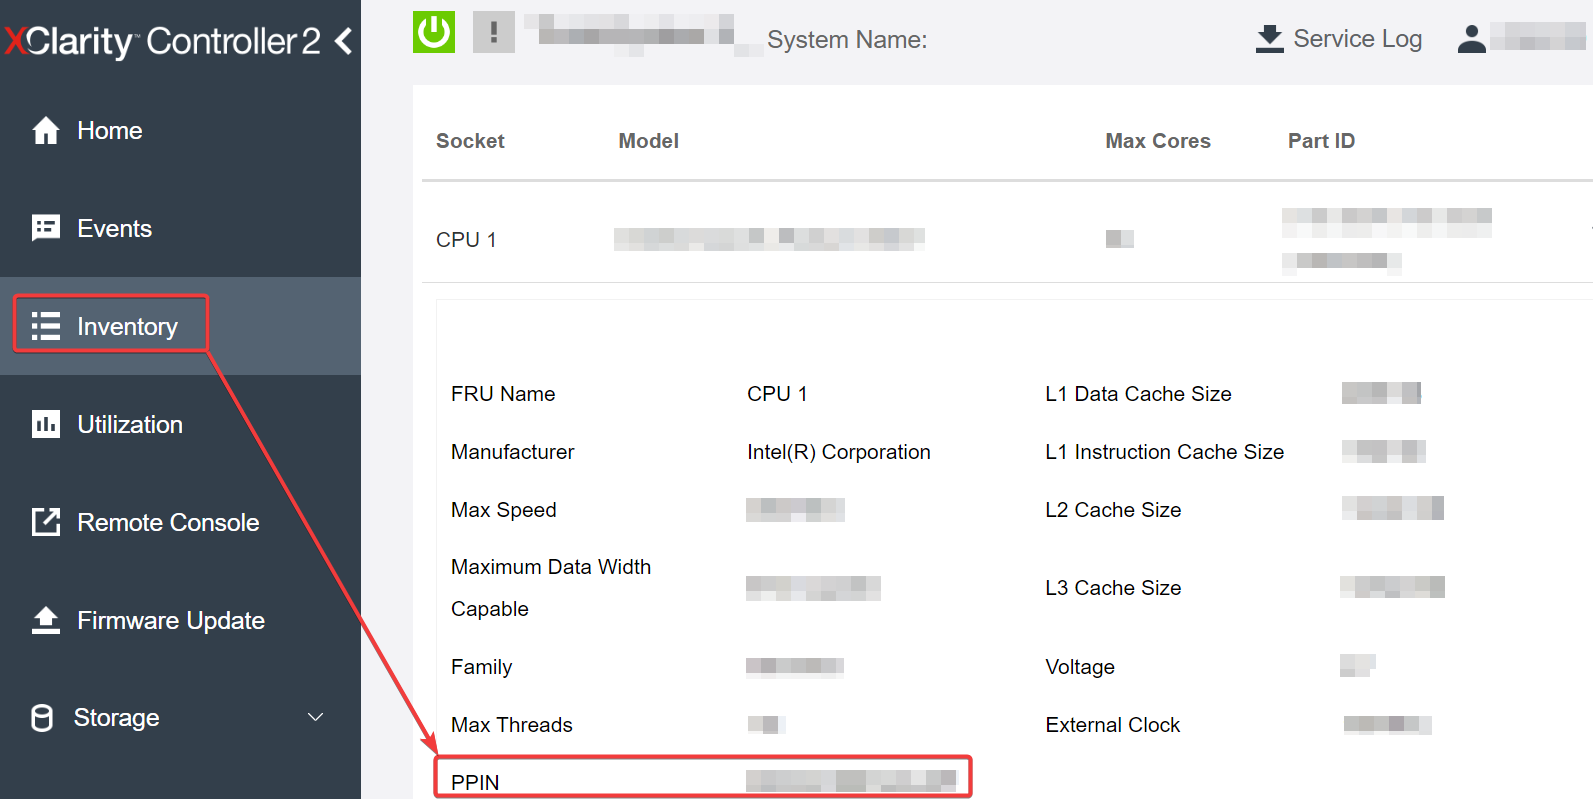
PPIN is a mandatory information for enabling the features. Read the PPIN of the processor that is to be installed with the features. See Reading PPIN.
Go to Lenovo Features on Demand website and input the Authorization Code to acquire the Activation Key.
In the website, input Machine Type, Machine serial number, and PPIN.
The website will generate the Activation Key. Download the Activation Key.
Install the features to the processor with the Activation Key via XCC or LXCE OneCLI. See Installing Intel On Demand to processor.
NoteIf more than one Activation Keys are acquired, it is mandatory to install them in the sequential order they were acquired. For example, start with installing the first acquired key, and proceed with the second acquired key, and so on.AC cycle the server.
(Optional) Upload Intel On Demand State Report. See Acquiring and uploading Intel On Demand State Report.
The State Report represents the current configuration state of the Intel On Demand capable processors. Lenovo accepts State Reports from customers to calibrate the current state of the Intel On Demand capable processors.
To see the features installed in a processor, see Checking the Intel On Demand features installed in a processor.
For reference, see Using Lenovo Features on Demand.
Transferring Intel On Demand Features
After replacing a processor, you may need to transfer the features from the defective processor to the new processor. Complete the following steps to transfer features to new processor.
Before removing the defective processor from the system, read the PPIN of the defective processor. See Reading PPIN.
After installing the new processor, read the PPIN of the new processor. See Reading PPIN.
Go to Lenovo Features on Demand website and input the PPIN of the defective processor. (Input PPIN in the UID section.)
Select the features to be transferred.
Input the PPIN of the new processor.
The website will generate the new Activation Key. Download the new Activation Key. See Installing Intel On Demand to processor.
Install the features to the new processor with the new Activation Key via XCC or LXCE OneCLI.
AC cycle the server.
(Optional) Upload Intel On Demand State Report. See Acquiring and uploading Intel On Demand State Report.
The State Report represents the current configuration state of the Intel On Demand capable processors. Lenovo accepts State Reports from customers to calibrate the current state of the Intel On Demand capable processors.
To see the features installed in a processor, see Checking the Intel On Demand features installed in a processor.
For reference, see Using Lenovo Features on Demand.
Reading PPIN
Protected Processor Inventory Number, or PPIN, is a mandatory information for enabling Intel On Demand. PPIN can be read via XCC Web GUI, XCC REST API, and LXCE OneCLI. See the following for more information.
- Use the GET method with the following Request URL:
For example:GET https://bmc_ip/redfish/v1/Systems/1/ProcessorsGET https://bmc_ip/redfish/v1/Systems/1/Processors In the response JSON object, the Members field shows reference link to an element of processor resource.
For example:"Members":[
{
@odata.id: "/redfish/v1/Systems/1/Processors/1"
},
{
@odata.id: "/redfish/v1/Systems/1/Processors/2"
}
],- Select the processor you need to read the PPIN from. Use the GET method with the following Request URL, where x is the CPU numbering:
For example, to read Processor 1 PPIN, see the following:GET https://bmc_ip/redfish/v1/Systems/1/Processors/xGET https://bmc_ip/redfish/v1/Systems/1/Processors/1 In the response JSON object, the ProcessorId field shows the ProtectedIdentificationNumber field, which is the PPIN info of the requested CPU.
For example:
"ProcessorId":{
  "ProtectedIdentificationNumber":"1234567890xxxyyy"
},
OneCli.exe fod showppin -b XCC_USER:XCC_PASSW0RD@XCC_HOST
Machine Type: 7D75
Serail Number: 7D75012345
FoD PPIN result:
======================================
|   Socket ID   |        PPIN        |
|  Processor 1  |  1234567890xxxyyy  |
|  Processor 2  |  9876543210zzzyyy  |
======================================
Installing Intel On Demand to processor
Install Intel On Demand features to the processor with the Activation Key downloaded from the Lenovo Features on Demand website via XCC Web GUI, XCC REST API or LXCE OneCLI.
- Open XCC Web GUI, go to to upload the Activation KeyFigure 3. Uploading Activation Key via XCC Web GUI
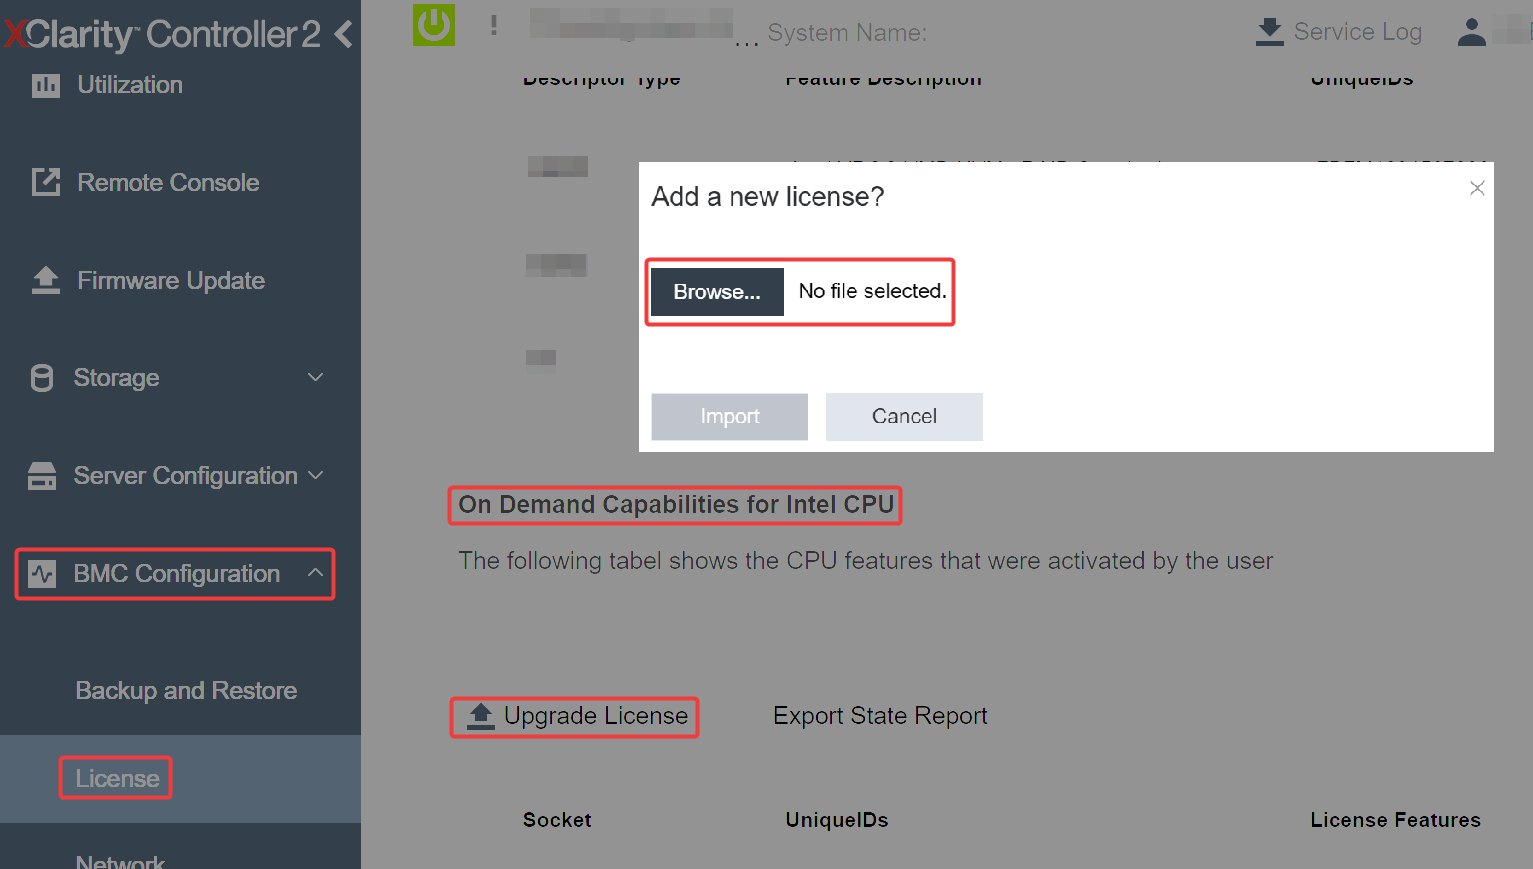
If the installation is successful, the Web GUI will show a pop-up window with the message “License key upgraded successfully. The features will be activated on the processor after system power cycle”.
Otherwise, see Enable Intel® On Demand Troubleshooting.
- Use the POST method with the following Request URL:
POST https://bmc_ip/redfish/v1/LicenseService/Licenses - Transfer Activation Key to base64 string at first and fill it into the LicenseString field as POST data.
{
    "LicenseString": ""
}
If the installation is successful, XCC REST API show the message “License key upgraded successfully. The features will be activated on the processor after system power cycle”.
Otherwise, see Enable Intel® On Demand Troubleshooting.
OneCli.exe fod install --keyfile <key_file>
Successfully install key
Failed to install key
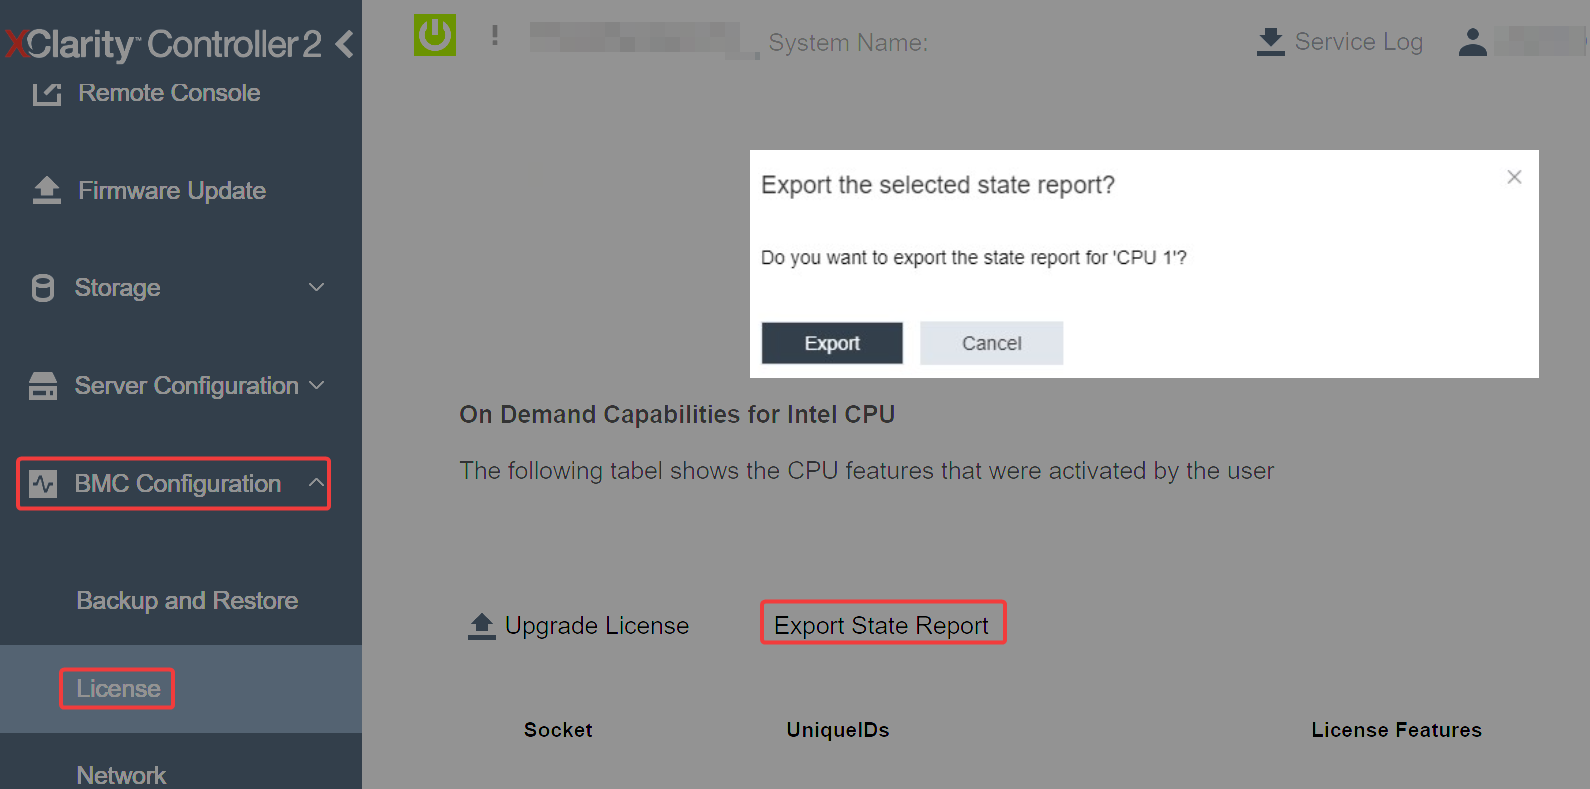
Acquiring and uploading Intel On Demand State Report
After completing enabling or transferring Intel On Demand, acquire and upload the State Report via XCC Web GUI, XCC REST API, and LXCE OneCLI. See the following for more information.
- Open XCC Web GUI, go toFigure 4. Export State Report via XCC Web GUI
Upload State Report via
On Demand Feedback
section in Lenovo Features on Demand website.
- Use the GET method with the following Request URL to retrieve CPU State Report API, where X is the CPU numbering:
For example, to retrieve CPU 1 State Report API, see the following:GET https://bmc_ip/redfish/v1/LicenseService/Licenses/CPUX_OnDemandCapabilityGET https://bmc_ip/redfish/v1/LicenseService/Licenses/CPU1_OnDemandCapability - In the response JSON object, the response of the target field of the LenovoLicense.ExportStateReport field is the CPU State Report API, where X is the CPU numbering:
In the following example, the response of the target field is the CPU 1 State Report API. Copy the CPU 1 State Report API."Actions": {
"Oem": {
"#LenovoLicense.ExportStateReport": {
"title": "ExportStateReport",
"target": "/redfish/v1/LicenseService/Licenses/CPUX_OnDemandCapability/Actions/Oem/LenovoLicense.ExportStateReport"
}
}
},"Actions": {
"Oem": {
"#LenovoLicense.ExportStateReport": {
"title": "ExportStateReport",
"target": "/redfish/v1/LicenseService/Licenses/CPU1_OnDemandCapability/Actions/Oem/LenovoLicense.ExportStateReport"
}
}
}, Retrieve the State Report.
- Use the POST method with the following Request URL with CPU State Report API to retrieve the State Report, where X is the CPU numbering:
For example, to retrieve CPU 1 State Report, see the following:POST https://bmc_ip/redfish/v1/LicenseService/Licenses/CPUX_OnDemandCapability/Actions/Oem/LenovoLicense.ExportStateReportPOST https://bmc_ip/redfish/v1/LicenseService/Licenses/CPU1_OnDemandCapability/Actions/Oem/LenovoLicense.ExportStateReport - Use an empty JSON object as POST data. When using API tool such as Postman, fill an empty JSON object in , fill a NULL object ‘{}’ in a JSON file.
In the response, retrieve the State Report in the stateReports field.
{
    "stateReports": [
        {
            "syntaxVersion": "1.0",
            "timestamp": "",
            "objectId": "",
            "hardwareComponentData": [
                {
                    "hardwareId": {
                        "type": "PPIN",
                        "value": ""
                    },
                    "stateCertificate": {
                        "pendingCapabilityActivationPayloadCount": ,
                        "value": ""
                    },
                    "hardwareType": "CPU"
                }
            ]
        }
    ]
}
Upload State Report via
On Demand Feedback
section in Lenovo Features on Demand website.
- Acquire State Report with the following command:
OneCli.exe fod exportreport -b XCC_USER:XCC_PASSWORD@XCC_HOST Upload State Report with the following command:
Where:OneCli.exe fod uploadreport --file CPU1_xxxxxx_StateReport.json --kmsid KMS_USER:KMS_PASSWORDCPU1_xxxxxx_StateReport.json is the file name downloaded from the fod exportreport command in Step 1.
KMS_USER and KMS_PASSWORD are your ID and password on the Lenovo Features on Demand website.
Checking the Intel On Demand features installed in a processor
- Use the GET method with the following Request URL to retrieve Intel On Demand features installed on CPU X, where X is the CPU numbering:
For example, to retrieve Intel On Demand features installed on CPU 1, see the following:GET https://bmc_ip/redfish/v1/LicenseService/Licenses/CPUX_OnDemandCapabilityGET https://bmc_ip/redfish/v1/LicenseService/Licenses/CPU1_OnDemandCapability - In the response JSON object, the FeatureList field contains the Intel On Demand features installed in this processor.
   "Oem": {
    "Lenovo":{
       "FeatureList":[]
       "@odata.type":""
    }
  },
- Check installed features with the following command:
OneCli.exe fod report -b XCC_USER:XCC_PASSWORD@XCC_HOST - The output shows all license, including Intel On Demand features. For example:
                                     FoD Reports result:
===========================================================================================================
| Feature | Key                     | Status         | Description                  | User      | Expired |
| Type    | ID                      |                | Feature List                 | Reminding | Date    |
|----------------------------------------------------------------------------------------------------------
| N/A     | CPU1_OnDemandCapability | StandbyOffline | DSA 4 instances,             | N/A       | N/A     |
|         |                         |                | IAA 4 instances              |           |         |
-----------------------------------------------------------------------------------------------------------
| N/A     | CPU2_OnDemandCapability | Enabled        | DSA 4 instances,             | N/A       | N/A     |
|         |                         |                | IAA 4 instances              |           |         |
-----------------------------------------------------------------------------------------------------------
| 004a    | XCC2_Platinum           | Enabled        | Lenovo XClarity Controller 2 | N/A       | N/A     |
|         |                         |                | Platinum Upgrade             |           |         |
===========================================================================================================
Succeed.
Intel On Demand Features
Intel On Demand features are listed below. Supported features vary by product, for more information, see SR630 V3 Product Guide.
Intel Quick Assist Technology (Intel QAT)1
Intel® QAT which helps free up processor cores by offloading encryption, decryption, and compression so systems can serve a larger number of clients or use less power. With Intel QAT, 4th gen Intel Xeon Scalable processors are the highest performance CPUs that can compress and encrypt in a single data flow.
Intel Dynamic Load Balancer (Intel DLB)2
Intel DLB is a hardware managed system of queues and arbiters connecting producers and consumers. It is a PCI device envisaged to live in the server CPU uncore and can interact with software running on cores, and potentially with other devices.
Intel Data Streaming Accelerator (Intel DSA)1
Intel DSA drives high performance for storage, networking, and data-intensive workloads by improving streaming data movement and transformation operations. Designed to offload the most common data movement tasks that cause overhead in data center-scale deployments, Intel DSA helps speed up data movement across the CPU, memory, caches, all attached memory, storage, and network devices.
Intel In Memory Accelerator (Intel IAA)1
Intel IAA helps run database and analytics workloads faster, with potentially greater power efficiency. This built-in accelerator increases query throughput and decreases the memory footprint for in-memory database and big data analytics workloads. Intel IAA is ideal for in-memory databases, and source databases.
Intel Software Guard Extensions (Intel SGX) 512 GB3
Intel® SGX offers hardware-based memory encryption that isolates specific application code and data in memory. Intel SGX allows user-level code to allocate private regions of memory, called enclaves, which are designed to be protected from processes running at higher privilege levels.
1Achieve Performance Advantage with Intel oneAPI, AI Tools, and 4th Gen Intel® Xeon® Scalable Processors Featuring Built-in Accelerator Engines, (n.d.). Intel. https://www.intel.com/content/www/us/en/developer/articles/technical/performance-advantage-with-xeon-and-oneapi-tools.html
2Intel® Dynamic Load Balancer, (2023, May 23) Intel. https://www.intel.com/content/www/us/en/download/686372/intel-dynamic-load-balancer.html
3Intel® Software Guard Extensions (Intel® SGX), (n.d.) Intel. https://www.intel.com/content/www/us/en/architecture-and-technology/software-guard-extensions.html