Después de actualizar el conmutador Lenovo TOR, asegúrese de que el conmutador esté completamente funcional, según la configuración de la solución.
Además de comparar la configuración en ejecución del conmutador para el archivo de configuración de copia de seguridad que se guardó antes de actualizar el firmware, los siguientes procedimientos sugeridos para la validación ayudan a asegurarse de que:
El NOS de conmutador se actualiza y se configura para arrancar en él
vLAG ISL esté intacto y operativo
Las conexiones BGP están activas y las sesiones se establecen
El VRRP y maestro de copia de seguridad están activos y reenviando
Todos los enlaces están activos y se asignan direcciones IP
Los ACL se encuentran en su lugar y los contadores aumentan
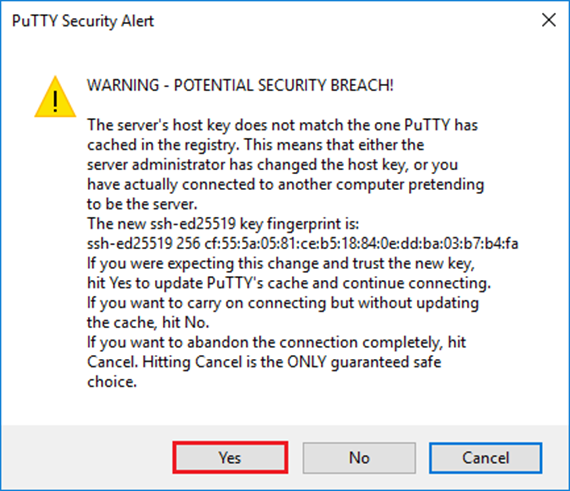
Lleve a cabo las siguientes tareas para asegurarse de que el conmutador TOR actualizado esté funcionando correctamente antes de continuar. Utilice PuTTY en el HLH para conectar con el conmutador TOR. Seleccione
Sí en la Alerta de seguridad PuTTY que se muestra.
Figura 1. Aviso de seguridad PuTTY
Para comprobar que la actualización NOS del conmutador Lenovo TOR se haya aplicado, escriba el siguiente comando:
| Ejemplo |
|---|
Lenovo-TOR1#show version
Lenovo Networking Operating System (NOS) Software
Technical Assistance Center: http://www.lenovo.com
Copyright (C) Lenovo, 2016.  All rights reserved.

Software:
  Bootloader version: 10.8.1.0
  System version: 10.8.1.0
  System compile time: Jul 18 17:06:53 PDT 2018
Hardware:
  NE2572 ("48x25GE + 6x100GE")
  Intel(R) Celeron(R) CPU with 8192 MB of memory

  Device name: Lenovo-TOR1
  Boot Flash: 16 MB

Kernel uptime is 0 day(s), 0 hour(s), 6 minute(s), 46 second(s)

Last Reset Reason: Power Cycle
Lenovo-TOR1#

2019-01-09T23:18:00.924+00:00 Lenovo-TOR1(cnos:default) %VLAG-5-OS_MISMATCH: vLAG OS version mismatch,
local OS version is 10.8.x.x peer OS version is 10.6.x.x
2019-01-09T23:18:10.924+00:00 Lenovo-TOR1(cnos:default) %VLAG-5-OS_MISMATCH: vLAG OS version mismatch,
local OS version is 10.8.x.x peer OS version is 10.6.x.x
|
También puede ver mensajes informativos que se muestran periódicamente, como se muestra al final del ejemplo anterior, lo que indica una discrepancia de SO entre los dos conmutadores TOR. Esto se espera en este punto del proceso. Estos mensajes deberían dejar de aparecer una vez se actualice el segundo conmutador TOR.
Para verificar que el conmutador TOR está configurado para arrancar en la nueva imagen de firmware (que es ahora la imagen activa), introduzca el siguiente comando:
| Ejemplo |
|---|
Lenovo-TOR1#show boot
Current ZTP State: Enable
Current FLASH software:
  active image: version 10.8.1.0, downloaded 00:33:35 PST Thu Jan 10 2019
  standby image: version 10.6.1.0, downloaded 18:24:35 PST Fri Jan 12 2018
  Grub: version 10.8.1.0, downloaded 23:09:14 PST Wed Jan  9 2019
  BIOS: version 020AB, release date 02/14/2018
  Secure Boot: Enabled
  ONIE: version unknown, downloaded unknown
Currently set to boot software active image
Current port mode:
        Port Ethernet1/37 is set in 10G mode
        Port Ethernet1/38 is set in 10G mode
        Port Ethernet1/39 is set in 10G mode
        Port Ethernet1/40 is set in 10G mode
        Port Ethernet1/45 is set in 10G mode
        Port Ethernet1/46 is set in 10G mode
        Port Ethernet1/47 is set in 10G mode
        Port Ethernet1/48 is set in 10G mode
Next boot port mode:
        Port Ethernet1/37 is set in 10G mode
        Port Ethernet1/38 is set in 10G mode
        Port Ethernet1/39 is set in 10G mode
        Port Ethernet1/40 is set in 10G mode
        Port Ethernet1/45 is set in 10G mode
        Port Ethernet1/46 is set in 10G mode
        Port Ethernet1/47 is set in 10G mode
        Port Ethernet1/48 is set in 10G mode
Currently scheduled reboot time: none
|
Para comprobar que todos los enlaces están activos y se asignan las direcciones IP, ejecute el siguiente comando:
| show interface brief | include up |
| Ejemplo |
|---|
Lenovo-TOR1#show interface brief | include up
Ethernet1/1     7      eth  trunk  up      none             25000    --
Ethernet1/2     7      eth  trunk  up      none             25000    --
Ethernet1/3     7      eth  trunk  up      none             25000    --
Ethernet1/4     7      eth  trunk  up      none             25000    --
Ethernet1/40    --     eth  routed up      none             10000    --
Ethernet1/43    --     eth  routed up      none             25000    --
Ethernet1/44    --     eth  routed up      none             25000    --
Ethernet1/47    --     eth  routed up      none             10000    --
Ethernet1/48    --     eth  routed up      none             10000    --
Ethernet1/49    99     eth  trunk  up      none            100000   101
Ethernet1/50    99     eth  trunk  up      none            100000   101
po101           99     eth  trunk  up      none            100000  lacp
mgmt0  management   up     10.30.8.170                       1000  1500
Vlan7           --                 up     --
Vlan107         --                 up     --
loopback0           up         Loopback0_Rack1_TOR1
|
El estado de las interfaces Ethernet de 1/5 a 1/16 dependen del número de nodos en la unidad de escala. El ejemplo anterior procede de una solución SXM4400 de 4 nodos.
Para verificar que la vLAG ISL esté intacta y operativa, ejecute el siguiente comando:
| Ejemplo |
|---|
Lenovo-TOR1#show vlag information
  Global State:            enabled
  VRRP active/active mode: enabled
  vLAG system MAC:         08:17:f4:c3:dd:63
  ISL Information:
    PCH     Ifindex     State       Previous State
    -------+-----------+-----------+---------------------------------
    101     100101      Active      Inactive

  Mis-Match Information:
                   Local                      Peer
    -------------+---------------------------+-----------------------
    Match Result : Match                      Match
    Tier ID      : 100                        100
    System Type  : NE2572                     NE2572
    OS Version   : 10.8.x.x                   10.8.x.x

  Role Information:
                   Local                      Peer
    -------------+---------------------------+-----------------------
    Admin Role   : Primary                    Secondary
    Oper Role    : Secondary                  Primary
    Priority     : 0                          0
    System MAC   : a4:8c:db:bb:0b:01          a4:8c:db:bb:0c:01

  Consistency Checking Information:
    State             : enabled
    Strict Mode       : disabled
    Final Result      : pass
|
Para comprobar que las conexiones BGP estén activas y se establezcan las sesiones, ejecute el siguiente comando:
| Ejemplo |
|---|
Lenovo-TOR1#show ip bgp summary
BGP router identifier 10.30.8.152, local AS number 64675
BGP table version is 74
2 BGP AS-PATH entries
0 BGP community entries
8  Configured ebgp ECMP multipath: Currently set at 8
8  Configured ibgp ECMP multipath: Currently set at 8

Neighbor       V     AS MsgRcv MsgSen TblVer InQ OutQ Up/Down State/PfxRcd
10.30.8.146    4  64675    72     74     74    0    0 01:09:14       5
10.30.8.158    4  64675    74     74     74    0    0 01:09:15      33
10.30.8.162    4  64675    74     74     74    0    0 01:09:24      33
10.30.29.12    4  64719   235    215     74    0    0 01:09:17      25
10.30.29.13    4  64719   235    214     74    0    0 01:09:17      25

Total number of neighbors 5

Total number of Established sessions 5
|
Tenga en cuenta que el ejemplo anterior proviene de una solución estáticamente enrutada. Una solución que utiliza el enrutamiento dinámico también incluye dos sesiones BGP para los conmutadores de borde, con un total 7 de sesiones.
Para asegurarse de que el maestro y la copia de seguridad de VRRP estén activos y reenviando, ejecute el siguiente comando en cada conmutador TOR:
| Ejemplo |
|---|
Lenovo-TOR1#show vrrp vlag
   Flags: F - Forwarding enabled on Backup for vLAG
   vLAG enabled, mode: vrrp active
   Interface     VR  IpVer Pri Time    Pre  State   VR IP addr
------------------------------------------------------------------
(F)Vlan7         7   IPV4  100 100  cs  Y   Backup  10.30.29.1
(F)Vlan107       107 IPV4  100 100  cs  Y   Backup  10.30.28.1


Lenovo-TOR2#show vrrp vlag
   Flags: F - Forwarding enabled on Backup for vLAG
   vLAG enabled, mode: vrrp active
   Interface     VR  IpVer Pri Time    Pre  State   VR IP addr
------------------------------------------------------------------
   Vlan7         7   IPV4  100 100  cs  Y   Master  10.30.29.1
   Vlan107       107 IPV4  100 100  cs  Y   Master  10.30.28.1
|
Para comprobar que los ACL se encuentran en su lugar y los contadores están aumentando, ejecute los siguientes comandos:
| show ip access-lists summaryshow ip access-lists |
| Ejemplo |
|---|
Lenovo-TOR-1#show ip access-lists summary
IPV4 ACL Rack01-CL01-SU01-Infra_IN
        statistics enabled
        Total ACEs Configured: 28
        Configured on interfaces:
                Vlan7 - ingress (Router ACL)
        Active on interfaces:
                Vlan7 - ingress (Router ACL)
        Configured and active on VRFs:
IPV4 ACL Rack01-CL01-SU01-Infra_OUT
        statistics enabled
        Total ACEs Configured: 28
        Configured on interfaces:
                Vlan7 - egress (Router ACL)
        Active on interfaces:
                Vlan7 - egress (Router ACL)
        Configured and active on VRFs:
IPV4 ACL Rack01-CL01-SU01-Stor_IN
        statistics enabled
        Total ACEs Configured: 6
        Configured on interfaces:
                Vlan107 - ingress (Router ACL)
        Active on interfaces:
                Vlan107 - ingress (Router ACL)
        Configured and active on VRFs:
IPV4 ACL Rack01-CL01-SU01-Stor_OUT
        statistics enabled
        Total ACEs Configured: 6
        Configured on interfaces:
                Vlan107 - egress (Router ACL)
        Active on interfaces:
                Vlan107 - egress (Router ACL)
        Configured and active on VRFs:
IPV4 ACL UPLINK_ROUTED_IN
        statistics enabled
        Total ACEs Configured: 4
        Configured on interfaces:
                Ethernet1/47 - ingress (Router ACL)
                Ethernet1/48 - ingress (Router ACL)
        Active on interfaces:
                Ethernet1/47 - ingress (Router ACL)
        Configured and active on VRFs:
IPV4 ACL copp-system-acl-authentication
        Total ACEs Configured: 3
        Configured on interfaces:
        Active on interfaces:
        Configured and active on VRFs:
IPV4 ACL copp-system-acl-bgp
        Total ACEs Configured: 2
        Configured on interfaces:
        Active on interfaces:
        Configured and active on VRFs:
...
|
| Ejemplo |
|---|
Lenovo-TOR-1#show ip access-lists
IP access list  Rack01-CL01-SU01-Infra_IN
        statistics per-entry
        500 remark "Permit R01-C01-SU01-INF (10.20.25.0/24)_TO_R01-C01-SU01-INF
(10.20.25.0/24)"
        510 permit any 10.20.25.0/24 10.20.25.0/24 [match=70214264]
        520 remark "Permit R01-C01-SU01-INF (10.20.25.0/24)_TO_azs-hlh-dvm00 (10
.20.3.61/32)"
        530 permit any 10.20.25.0/24 host 10.20.3.61 [match=11180]
        540 remark "Permit R01-C01-SU01-INF (10.20.25.0/24)_TO_R01-C01-SU01-InVI
P (10.20.126.128/25)"
        550 permit any 10.20.25.0/24 10.20.126.128/25
        560 remark "Permit R01-C01-SU01-InVIP (10.20.126.128/25)_TO_R01-C01-SU01
-INF (10.20.25.0/24)"
        570 permit any 10.20.126.128/25 10.20.25.0/24 [match=27814360]
        580 remark "Permit R01-C01-SU01-INF (10.20.25.0/24)_TO_pub-adm-vip (10.2
0.23.0/27)"
        590 permit any 10.20.25.0/24 10.20.23.0/27 [match=80158]
        600 remark "Permit pub-adm-vip (10.20.23.0/27)_TO_R01-C01-SU01-INF (10.2
0.25.0/24)"
        610 permit any 10.20.23.0/27 10.20.25.0/24 [match=76824]
        620 remark "Permit 112 any (0.0.0.0/0)_to_Multicast (224.0.0.18/32)"
        630 permit 112 any host 224.0.0.18 [match=62576]
        640 remark "Permit UDP any_TO_any(BOOTP) port 67"
        650 permit udp any any eq bootps [match=443]
...
|
Una vez que se verifica la convergencia básica del sistema en el conmutador Lenovo TOR actualizado, compruebe la conectividad de la solución con los siguientes pasos:
Use el menú superior de la interfaz del explorador de XClarity Administrator para desplazarse a .
Haga clic en el botón Prueba de conexión ubicado cerca de la parte superior de la interfaz.
En el campo Host, ingrese 8.8.8.8 y luego haga clic en Prueba de conexión.
Aparecerá una ventana de éxito. Haga clic en Cerrar para cerrar esta ventana.
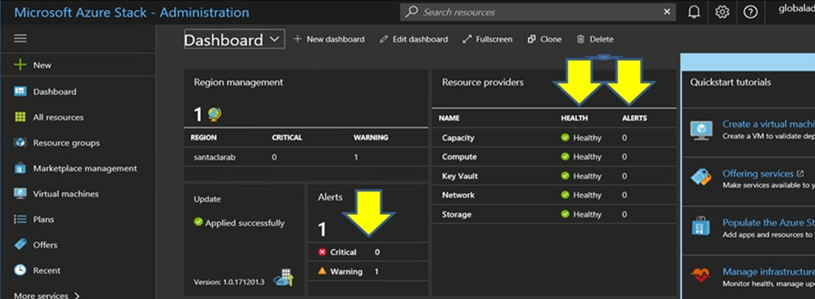
Como paso de verificación adicional, inicie sesión en Portal de administrador de Azure Stack Hub.
Revise el portal Portal de administrador de Azure Stack Hub para confirmar que no haya alertas visibles actualmente.
Figura 2. Comprobación de Portal de administrador de Azure Stack Hub en busca de alertas
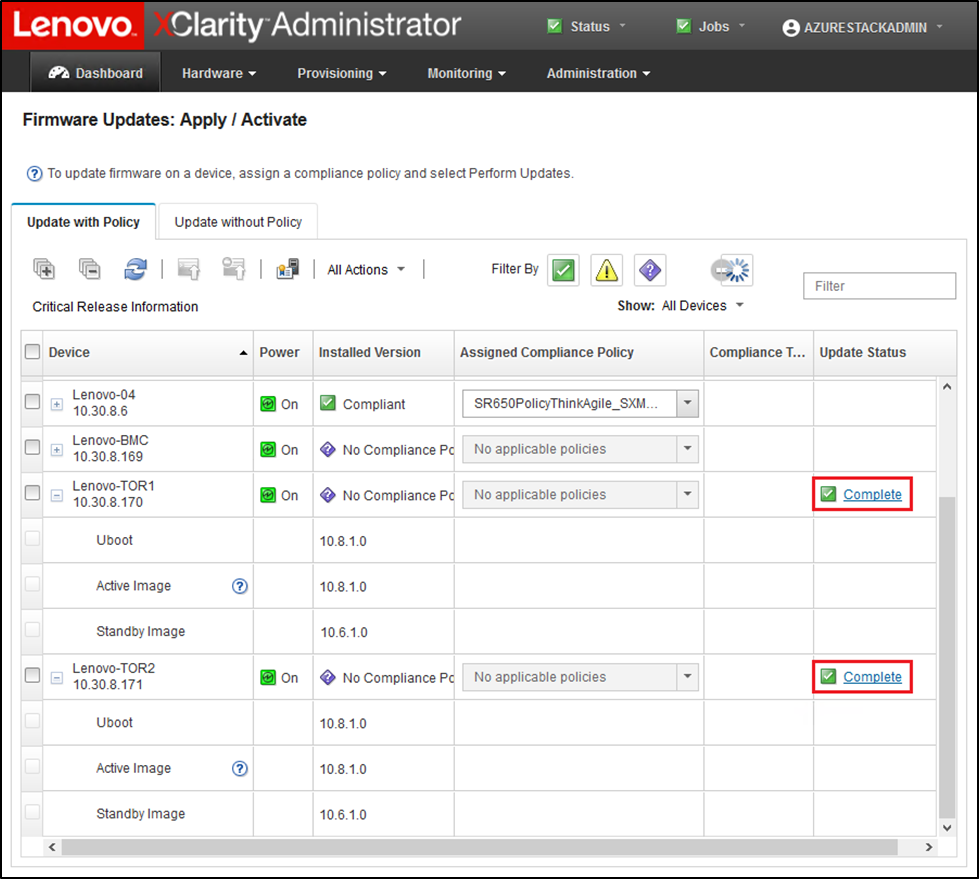
Espere a que el tráfico de red y la capacidad de alcance vuelvan a converger completamente y los sistemas se estabilicen. Además, revise el Portal de administrador de Azure Stack Hub para asegurarse de que todos los indicadores de estado del componente se muestren como correctos. Una vez que la solución se haya estabilizado, regrese al tema “Actualizar CNOS en los conmutadores TOR” y repita el proceso en el otro conmutador TOR. Una vez que se hayan actualizado ambos conmutadores TOR y sus funciones y estabilidad se hayan verificado, continúe con la actualización del conmutador BMC.
Figura 3. Verifique que las actualizaciones de firmware del conmutador de TOR se hayan completado


