Installing a simple-swap fan
Use this information to install a simple-swap fan into the server.
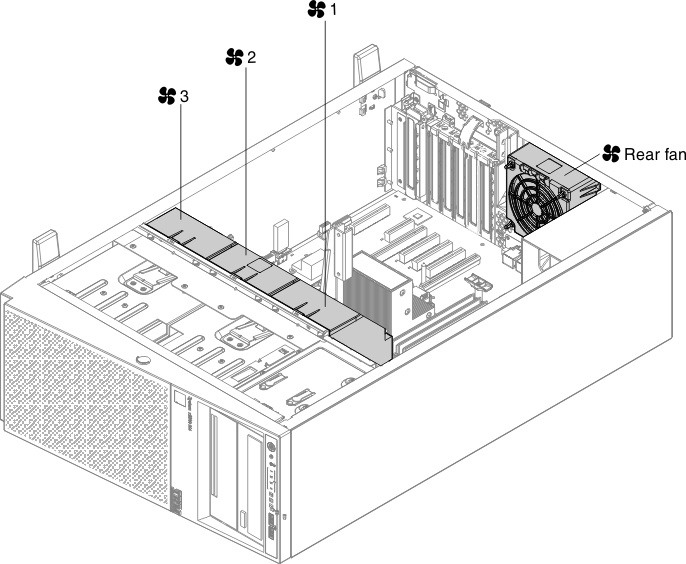
The server comes with one 92mm x 92mm x 38mm simple-swap fan (fan 2) in the fan assembly. The following instructions can be used to install any simple-swap fan in the server.
Note
- When you install the second microprocessor, you must also install fan 3. The fan filler can only be removed when fan 3 is installed. Otherwise, the fan filler must be installed for proper cooling.
- You can order the one additional fan for redundant cooling.
When more than 2 PCI-e adapters have been installed on the system, it is necessary to follow the fan configuration instruction as the table below.
Table 1. Fan configuration instruction Fans Conditions 2 and Rear fan Standard for all systems 3 - When the second microprocessor is populated, the fan is included in the second microprocessor kit, P/N: 00D2581 ~ 00D2589. Or,
- When more than 2 PCI-e adapters have been installed on the system, the fan (P/N: 00D2593) must also be populated. Or,
- When Lenovo 1.2TB/785GB/365GB High IOPS MLC Mono adapters have been installed on the system, the fan (P/N: 00D2593) must also be populated.
1 Optional redundant fan (P/N: 00D2593) AttentionWhen fan 3 is installed and 16 GB 1.5V / 32 GB 1.35V DIMMs are installed, fan 1 must also be populated.
To install a simple-swap fan, complete the following steps:
- Read the safety information that begins on page Safety and Installation guidelines.
- Turn off the server (see Turning off the server) and all attached peripheral devices. Disconnect all power cords; then, disconnect all external cables as necessary to replace the device.
- Carefully turn the server on its side so that it is lying flat, with the cover facing up.AttentionDo not allow the server to fall over.
- Unlock and remove the left-side cover (see Removing the left-side cover).
- Remove the air baffle (see Removing the air baffle) if necessary.
- Touch the static-protective package that contains the simple-swap fan to any unpainted metal surface on the server; then, remove the fan from the package.
- Slide the fan down directly into the server. (see step 1 in the following illustration).
- Align the release latches of the fan and make sure the fan is firmly seated on the right position. (see step 2 and 3 in the following illustration).

- Connect the fan power cable on the system board. (see Internal Cable Routing and Connectors).
If you have other devices to install or remove, do so now. Otherwise, go to Completing the installation.
Give documentation feedback