Installing drives
The followings are illustrations of the server and the location of the drive bays. Your hardware might differ, depending on the model.
Note
If the server is configured for RAID operation using a ServeRAID adapter, you might have to reconfigure your disk arrays after you install drives. See the ServeRAID adapter documentation for additional information about RAID operation and complete instructions for using the ServeRAID adapter.
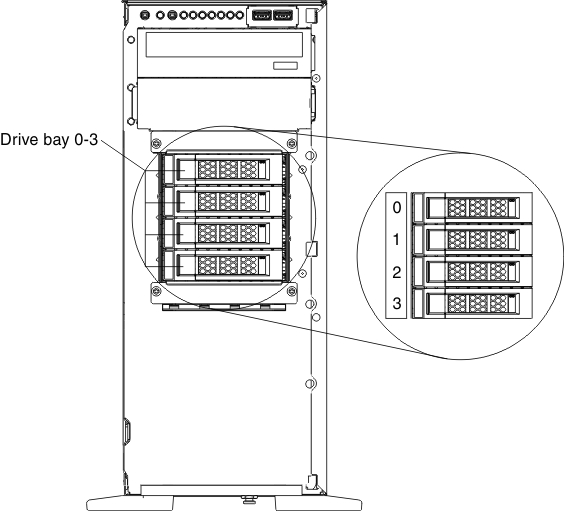
The following illustrations show the location of the drive bays in the 2.5-inch and 3.5-inch hard disk drive server models.
- The server with eight 2.5-inch hard disk drives:

- The server with sixteen 2.5-inch hard disk drives:

- The server with four 3.5-inch hard disk drives:
- The server with eight 3.5-inch hard disk drives:

The following notes describe the type of drives that the server supports and other information that you must consider when you install a drive. To confirm that the server supports the drive that you are installing, see the Lenovo ServerProven website.
- Locate the documentation that comes with the drive and follow those instructions in addition to the instructions in this chapter.
- Make sure that you have all the cables and other equipment that are specified in the documentation that comes with the drive.
- Select the bay in which you want to install the drive.
- The server supports one optional ultra-slim SATA CD-RW/DVD-ROM optical drive.
- The server can support up to eight 2.5-inch hot-swap SAS/SATA drives, four 3.5-inch hot-swap SAS/SATA drives, or four 3.5-inch simple-swap SATA drives.
- You can mix hot-swap SAS and SATA hard disk drives in the same server as long as you do not mix drives on the same array.
- The electromagnetic interference (EMI) integrity and cooling of the server are protected by having all bays and PCI Express slots covered or occupied. When you install a drive, save the EMC shield and filler panel from the bay in the event that you later remove the device.
Give documentation feedback