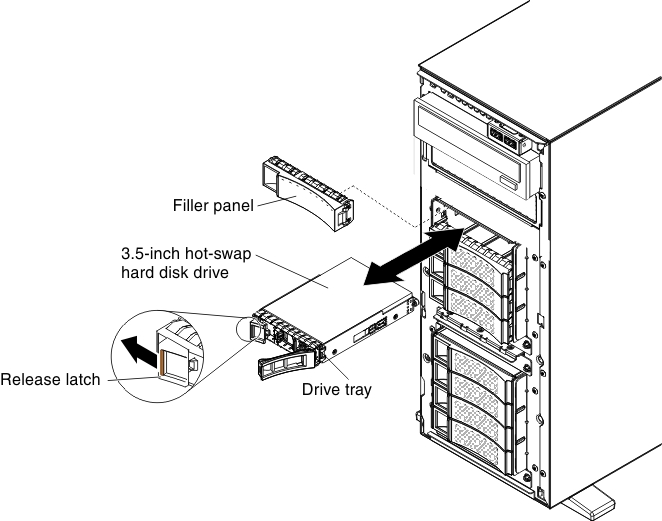
Installing a 3.5-inch hot-swap hard disk drive
Use this information to install a 3.5-inch hot-swap hard disk drive into the server.
Before installing a 3.5-inch hot-swap hard disk drive, read the following information:
- Inspect the drive tray for signs of damage.
- To maintain proper system cooling, do not operate the server for more than 10 minutes without either a drive or a filler panel installed in each drive bay.
- You do not have to turn off the server to install hot-swap drives in the hot-swap drive bays.
To install a 3.5-inch hot-swap hard disk drive, complete the following steps.
- Read the safety information that begins Safety and Installation guidelinesAttentionStatic electricity that is released to internal server components when the server is powered-on might cause the server to halt, which might result in the loss of data. To avoid this potential problem, always use an electrostatic-discharge wrist strap or other grounding system when you work inside the server with the power on.
- Unlock the left-side cover.NoteYou must unlock the left-side cover to open or remove the bezel. When you lock the left-side cover, it locks both the cover and the bezel.
- Open the bezel (see Removing the bezel).
- Remove the filler panel, if one is present.
- Touch the static-protective package that contains the disk drive to any unpainted metal surface on the server; then, remove the disk drive from the package.
- Make sure that the tray handle is open; then, install the hard disk drive into the hot-swap bay.
- Align the drive assembly with the guide rails in the bay; then, carefully slide the drive assembly into the drive bay until the drive snaps into place.
- Rotate the drive tray handle to the closed position.
- Check the hard disk drive status indicator to make sure that the hard disk drive is operating correctly.
After you replace a failed hard disk drive, the green activity LED flashes as the disk spins up. The yellow LED turns off after approximately 1 minute. If the new drive starts to rebuild, the yellow LED flashes slowly, and the green activity LED remains lit during the rebuild process. If the yellow LED remains lit, see Troubleshooting for more information.
NoteYou might have to reconfigure the disk arrays after you install hard disk drives. See the RAID documentation on the Lenovo website atthe Lenovo Support Portal for information about RAID adapters. - Close the bezel.
- Lock the left-side cover.
If you have other devices to install or remove, do so now. Otherwise, go to Completing the installation.
Give documentation feedback