
Replacing a fixed power supply

Use this information to replace a fixed power supply.

The following notes describe the type of power supply that the server supports and other information that you must consider when you replace a power supply:
Statement 8

CAUTION
Never remove the cover on a power supply or any part that has the following label attached.

Hazardous voltage, current, and energy levels are present inside any component that has this label attached. There are no serviceable parts inside these components. If you suspect a with one of these parts, contact a service technician.

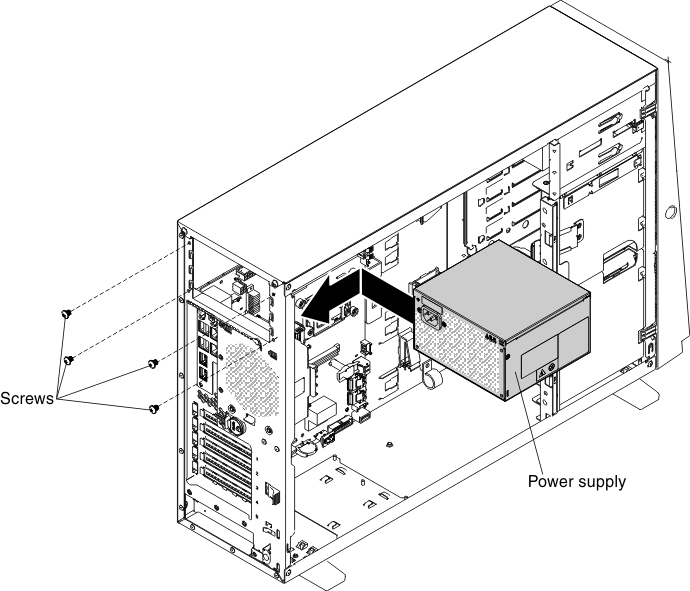
To replace a fixed power supply, complete the following steps:

Note
You must install the fan assembly before removing or installing the power supply.
  1. Read the safety information that begins in Safety and Installation guidelines.
    Attention
    Static electricity that is released to internal server components when the server is powered-on might cause the server to halt, which might result in the loss of data. To avoid this potential problem, always use an electrostatic-discharge wrist strap or other grounding system when you work inside the server with the power on.
  2. Turn off the server (see Turning off the server) and all attached peripheral devices. Disconnect all power cords; then, disconnect all external cables from the server.
  3. Unlock and remove the left side cover (see Removing the left-side cover).
  4. Remove the fan assembly (see Removing the fan assembly).
  5. Remove the air baffle (see Removing the air baffle).
  6. Remove the existing fixed power supply (see Removing a fixed power supply).
  7. Touch the static-protective package that contains the fixed power supply; then, remove the fixed power supply from the package and place it on a static-protective surface.
  8. Put down the new fixed power supply into the position of the server correctly and tighten the 4 screws from the rear side of the server as the illustration showed.

  9. Route the power cord through the handle and cable tie if any, so that it does not accidentally become unplugged.
  10. Connect one end of the power cord for the new power supply into the connector on the back of the power supply; then, connect the other end of the power cord to a properly grounded electrical outlet.
    Note
    If the server has been turned off, you must wait approximately 3 minutes after you connect the server power cord to an electrical outlet before the power-control button becomes active.
  11. Make sure that the ac power LED and the dc power LED on the ac power supply are lit, indicating that the power supply is operating correctly. The two green LEDs are to the right of the power-cord connector.
  12. If you are replacing a power supply with one of a different wattage, apply the power information label provided with the new power supply over the existing power information label on the server.
  13. If you are instructed to return the old fixed power supply, follow all packaging instructions, and use any packaging materials for shipping that are supplied to you.

If you have other devices to install or remove, do so now. Otherwise, go to Completing the installation.