
Removing a 2.5-inch disk drive backplane

Use this information to remove a 2.5-inch disk drive backplane.

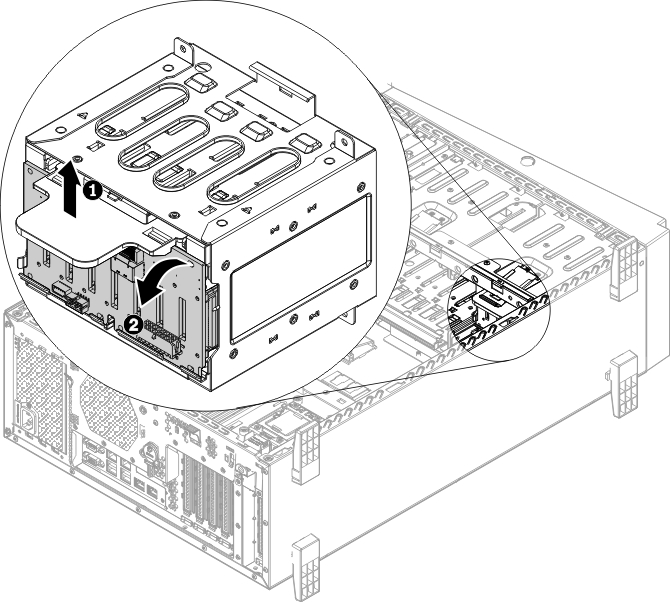
To remove the 2.5-inch disk drive backplane, complete the following steps:

  1. Read the safety information that begins in Safety and Installation guidelines.
  2. Turn off the server (see Turning off the server) and all attached peripheral devices. Disconnect all power cords; then, disconnect all external cables as necessary to replace the device.
  3. Disconnect all external cables and power cords.
  4. Open the bezel from the release point on the left edge of the bezel, and rotate the left side of the bezel away from the server.


  5. Carefully turn the server on its side so that it is lying flat, with the cover facing up.
    Attention
    Do not allow the server to fall over.
  6. Remove the left-side cover (see Removing the left-side cover).
  7. Remove the 2.5-inch hot-swap hard disk drives (see Installing a 2.5-inch hot-swap hard disk drive).
  8. Remove the air baffle (see Removing the air baffle).
  9. Remove the fan assembly (see Removing the fan assembly).
  10. Note where the power, signal, and configuration cables are connected to the 2.5-inch hard disk drive backplane; then, disconnect them (see Internal Cable Routing and Connectors).
  11. Lift up the retention latches that hold the backplane in place; then, grasp the top edge of the backplane and rotate it toward the rear of the server. When the backplane is clear of the drive-cage retention tabs, remove it out from the server.


  12. For removing the remained backplane, repeat step 10 and 11.
  13. If you are instructed to return the drive backplane, follow all packaging instructions, and use any packaging materials for shipping that are supplied to you.