
Removing the 8x1.8-inch hot-swap drive backplane assembly

Use this information to remove the 8x1.8-inch hot-swap drive backplane assembly.

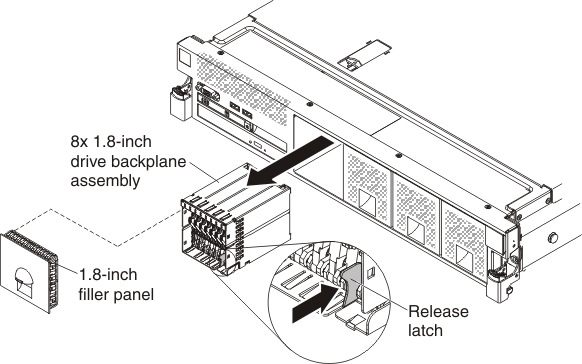
To remove the 8x1.8-inch hot-swap drive backplane assembly, complete the following steps:

  1. Read the safety information and installation guidelines, see Safety and Installation guidelines.
  2. Turn off the server (see Turning off the server) and all attached peripheral devices. Disconnect all power cords; then, disconnect all external cables as necessary to replace the device.
  3. If the server is installed in a rack, slide it out of the rack.
  4. Remove the top cover (see Removing the server top cover).
  5. Remove the fan cage assembly (see Removing the fan cage assembly).
  6. Remove the drive filler panel.
  7. Remove the drives from the drive backplane assembly (see Removing 2.5-inch and 1.8-inch hot-swap drives) and install them in the new backplane assembly.
  8. Disconnect the combination power/configuration cable from the backplane assembly. If SAS signal cables are attached to the drive backplane, disconnect them.
  9. Lift up the spring release latch slightly while pushing the assembly from the back and slide the backplane assembly out the front of the server.

    remove 8x1.8 inch drive backplane

  10. If you are instructed to return the drive backplane, follow all packaging instructions, and use any packaging materials for shipping that are supplied to you.