Installing a GPU adapter in the BladeCenter GPU expansion unit
Use these instructions to install a GPU adapter in the BladeCenter GPU expansion unit installed on a blade server.
Note
This section does not apply to the IBM WebSphere DataPower Integration Blade XI50B Type 4195 appliance.
To install a GPU adapter in the BladeCenter GPU expansion unit, complete the following steps:
- Before you begin, read Safety and Installation guidelines.
- If the blade server is installed in a BladeCenter unit, remove it (see Removing the blade server from the BladeCenter unit for instructions).
- If the expansion unit is installed on a blade server or another expansion unit, remove it (see Removing an optional expansion unit for instructions).
- Remove the blade server cover (see Removing the blade server cover for instructions).
- If an expansion unit is installed over the expansion unit you want to install the adapter in, remove that expansion unit (see Removing an optional expansion unit for instructions).
- If you have not already done so, touch the static-protective package that contains the GPU adapter to any unpainted metal surface of the BladeCenter unit or any unpainted metal surface on any other grounded rack-component for at least 2 seconds.
- Remove the GPU adapter from its static-protective package.
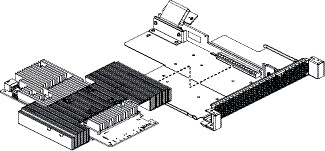
- Connect the GPU adapter to the PCI connector in the expansion-unit riser assembly, as shown in the following illustration.

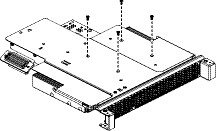
- Carefully turn over the expansion-unit riser assembly, and use a Phillips screwdriver to install the four non-captive retaining screws, as shown in the following illustration.

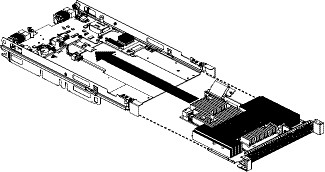
- Turn over the expansion-unit riser assembly and install the riser assembly into the expansion unit system board, as shown in the following illustration.

- Carefully reposition the expansion-unit riser assembly, aligning it with the expansion-unit system-board-assembly rails.
- Firmly slide the assemblies together until the tray-release button securely locks the panels.
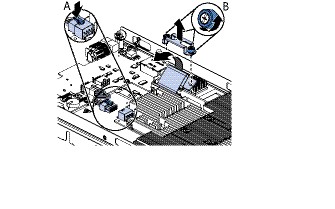
- Connect the auxiliary power cable (A), as shown in the following illustration.

- Connect the cable to the expansion-unit system board. Replace the retention bracket and tighten the screws (B), as shown in the illustration above.
- Install the cover that comes with the expansion unit (see Closing the blade server cover).
- Install the expansion unit (see Installing an optional expansion unit).
- Install the blade server into the BladeCenter unit (see Installing the blade server in a BladeCenter unit).
Give documentation feedback