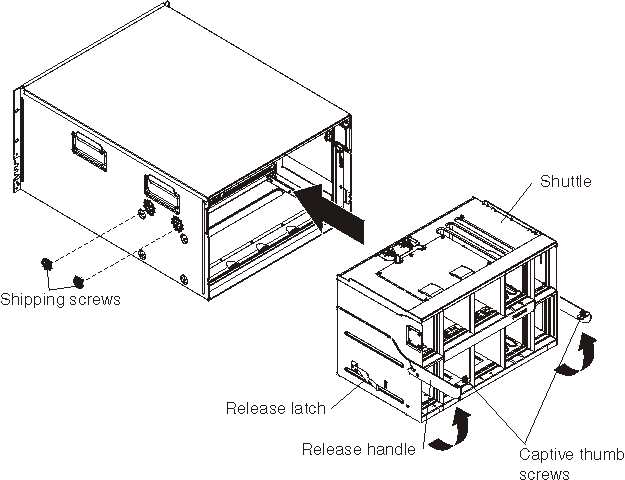
Installing the SPC chassis (shuttle)
The installation of a System Power and Cooling (SPC) chassis (also called a shuttle) should only be performed by a trained service technician.

- If you are installing a new SPC chassis, install the midplane from the removed SPC chassis (see Installing the midplane).
- Open the release handles on the SPC chassis (rotate the handles up).
- Align the SPC chassis with the BladeCenter S chassis and push the SPC chassis frame into the BladeCenter S chassis until it stops.NoteDo not push the SPC chassis using the release handles.
- Push the SPC chassis the remainder of the way into the BladeCenter S chassis until the release handles rotate down.
- Close the release handles completely. The SPC chassis will move back fully into the BladeCenter S chassis.
- Tighten the captive thumbscrews on the release handles.
- Install the left and right shipping brackets on the BladeCenter S chassis and the rack, if they were removed.
- Install the two shipping screws in each side of the chassis, if they were removed.
- Install any of the following modules that were removed from the rear of the BladeCenter S chassis:
- I/O modules (see Installing an I/O module).
- Advanced management module (see Installing an advanced management module).
- Serial pass-thru module (see Installing a serial pass-thru module).
- Fan packs (see Installing a fan module).
- Power supplies (see Installing a power module).
- Push the following components fully into the front of the BladeCenter S chassis to engage the midplane:
- Blade servers (see Installing a blade server).
- Media tray (see Installing the media tray).
- Disk storage modules (see Installing a disk storage module).
- Connect any cables that were disconnected from the modules in the rear of the BladeCenter S chassis.
- Connect the power to the BladeCenter S chassis.
- Restart any blade servers that were shut down. See the documentation that comes with each blade server for detailed instructions.
Related information:
Give documentation feedback