Installing a simple-swap hard disk drive
This procedure applies only to 4U server models with non-hot-swap power supplies.
The 4U server model with non-hot-swap power supplies supports up to four 3.5-inch simple-swap SATA hard disk drives, which are accessible from the front of the server.
Note
Only 3TB or below hard disk drive options are supported by the 4U server model with non-hot-swap power supplies.
You must disconnect all power from the server before you remove or install simple-swap drives. Before you install a simple-swap SATA hard disk drive, read the following information:
Install the drives starting from the top bay to the bottom bay (bay 3, 4, 5, and then 6). The following tables list the IDs of the hard disk drives:
| Drive bay | HDD ID |
|---|---|
| 3 | 0 |
| 4 | 1 |
| 5 | 2 |
| 6 | 3 |
- The simple-swap SATA hard disk drives connect to the SATA 0 through SATA 3 connectors on the system board as follows:
- System board end cable connector 0 connects to the SATA 0 connector on the system board.
- System board end cable connector 1 connects to the SATA 1 connector on the system board.
- System board end cable connector 2 connects to the SATA 2 connector on the system board.
- System board end cable connector 3 connects to the SATA 3 connector on the system board.
- Hard disk drive 0 connects to the SATA 0 connector on the simple-swap hard disk drive backplate.
- Hard disk drive 1 connects to the SATA 1 connector on the simple-swap hard disk drive backplate.
- Hard disk drive 2 connects to the SATA 2 connector on the simple-swap hard disk drive backplate.
- Hard disk drive 3 connects to the SATA 3 connector on the simple-swap hard disk drive backplate.
Note
Under RAID mode:
- In uEFI setup menu:
- Drive 0 indicates hard disk drive 0.
- Drive 1 indicates hard disk drive 1.
- Drive 2 indicates hard disk drive 2.
- Drive 3 indicates hard disk drive 3.
- In MegaRAID Storage Manager utility:
- Slot 0 indicates hard disk drive 0.
- Slot 1 indicates hard disk drive 1.
- Slot 2 indicates hard disk drive 2.
- Slot 3 indicates hard disk drive 3.
Attention
Simple-swap hard disk drives are not hot-swappable. Disconnect all power from the server before you remove or install a simple-swap hard disk drive.
Note
For server models with simple-swap hard disk drives, the server supports onboard software RAID by default. To get advanced hardware RAID, install a supported ServeRAID adapter and the 3.5-inch simple-swap hardware RAID upgrade kit into the server. For installation instructions, see Installing an adapter and Replacing software RAID simple-swap hard disk drive backplate with hardware RAID simple-swap hard disk drive backplate.
To install a simple-swap SATA hard disk drive on 4U server models with non-hot-swap power supplies, complete the following steps.
- Read the safety information in Safety and Installation guidelines.
- Turn off the server and peripheral devices and disconnect all external cables and power cords.
- Remove the bezel (see Removing the bezel).
- Touch the static-protective package that contains the drive to any unpainted metal surface on the server; then, remove the drive from the package and place it on a static-protective surface.
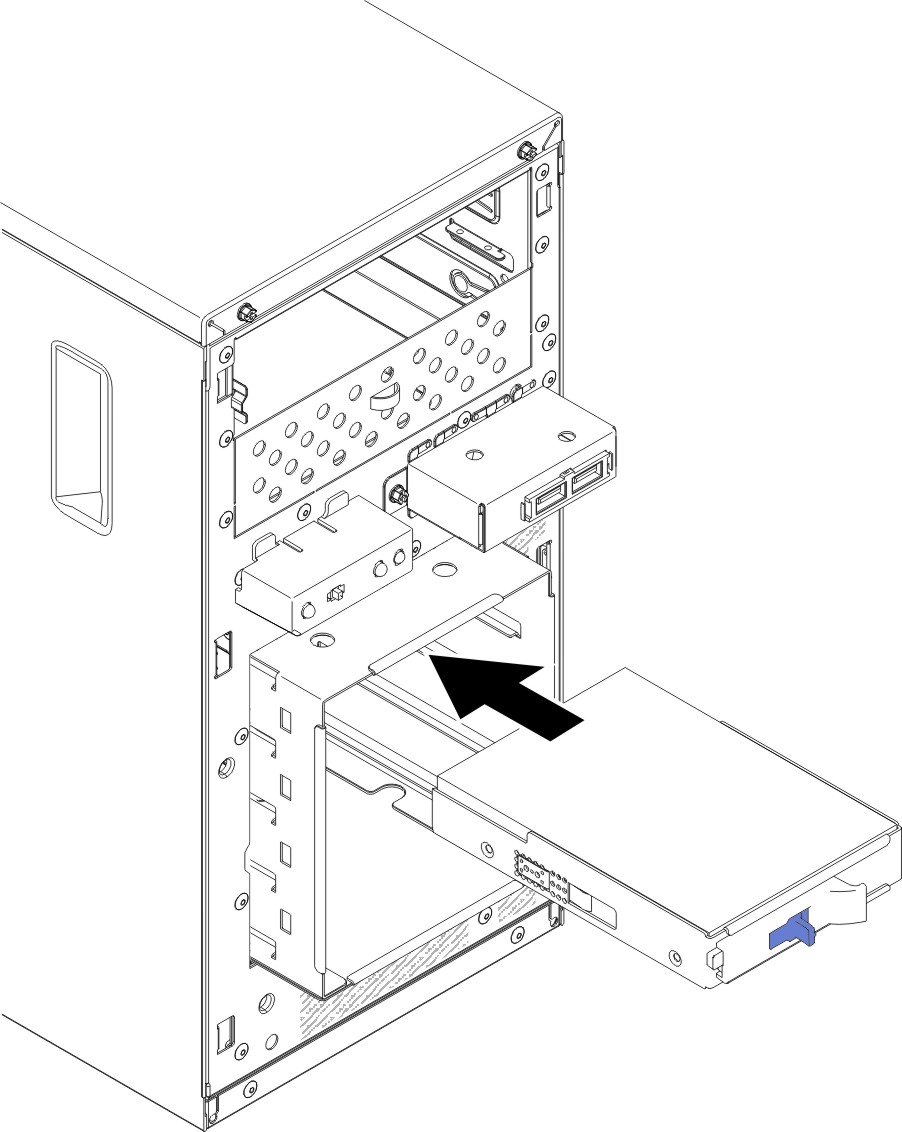
- Align the drive assembly with the guide rails in the bay (the connector end of the drive goes in first).
- Grasp the black drive handle and slide the blue release latch to the right; then, carefully slide the drive assembly into the drive bay until it stops, and release the latch.Figure 1. Simple-swap hard disk drive installation for 4U server model with non-hot-swap power supplies
If you have other devices to install, do so now. Otherwise, go to Completing the installation.
Give documentation feedback