Installing a tape drive
Use this information to install a tape drive
If you are replacing a drive, make sure that:
- You have all the cables and other equipment that is specified in the documentation that comes with the new drive.
- You check the instructions that come with the new drive to determine whether you must set any switches or jumpers on the drive.
- You have removed the drive retainer clip on the side of the old drive and have it available for installation on the new drive.
Note
The half-high LTO Gen 4/Gen 5 SAS tape drive is not supported by some operating systems. For information about the supported operating systems, go to https://lenovopress.com/tips0746 and https://lenovopress.com/tips0826.
To install a tape drive on 4U server models with non-hot-swap power supplies, complete the following steps. For the 5U server model with hot-swap power supplies, please see the next sub-section.
- Read the safety information in Safety and Installation guidelines.
- Turn off the server and peripheral devices, and disconnect the power cords and all external cables.
- Remove the bezel (see Removing the bezel).
- Carefully turn the server on its side so that it is lying flat, with the cover facing up.AttentionDo not allow the server to fall over.
- Remove the side cover (see Removing the side cover).
- Remove the air baffle (see Removing the air baffle).
- Touch the static-protective package that contains the drive to any unpainted metal surface on the server; then, remove the drive from the package and place it on a static-protective surface.
- Set any jumpers or switches on the drive according to the documentation that comes with the drive.
- Stand the server back up in its vertical position.
- Remove the filler from the drive cage, if any is present.
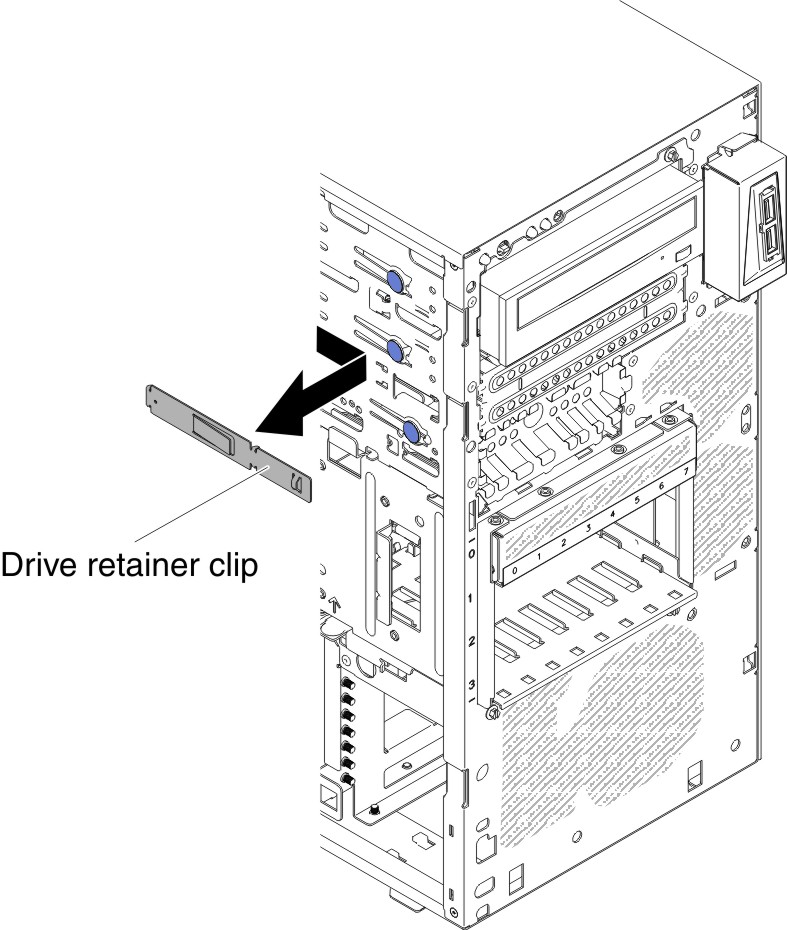
- Remove the drive retainer clip from the side of the drive cage of bay 1 or bay 2. Slide the drive retainer clip to the front to remove it from the drive cage; then, snap the drive retainer clip into the screw holes on the side of the drive.
- Push the drive into the bay.NoteA tape drive can only be installed in bay 1 or bay 2.Figure 1. Tape drive installation for 4U server model with non-hot-swap power supplies

- Carefully turn the server on its side so that it is lying flat, with the cover facing up.AttentionDo not allow the server to fall over.
- Connect one end of the applicable signal cable into the rear of the drive and make sure that the other end of this cable is connected into the applicable connector on the system board.
- Route the signal cable so that it does not block the airflow to the rear of the drives or over the microprocessor and dual inline memory modules (DIMMs).
If you have other devices to install, do so now. Otherwise, go to Completing the installation.
To install a tape drive on the 5U server model with hot-swap power supplies, complete the following steps. For 4U server models with non-hot-swap power supplies, please see the above sub-section.
- Read the safety information in Safety and Installation guidelines.
- Turn off the server and peripheral devices, and disconnect the power cords and all external cables.
- Unlock and remove the side cover (see Removing the side cover).
- Remove the lower bezel (see Removing the lower bezel).
- Remove the upper bezel (see Removing the upper bezel).
- Touch the static-protective package that contains the drive to any unpainted metal surface on the server; then, remove the drive from the package and place it on a static-protective surface.
- Set any jumpers or switches on the drive according to the documentation that comes with the drive.
- Remove the filler from the drive cage, if any is present.
- Slide the drive retainer clip to the front to remove it from the drive cage of bay 2; then, snap the drive retainer clip into the screw holes on the side of the drive.Figure 2. Drive retainer clip installation for 5U server model with hot-swap power supplies
- Push the drive into the bay.Figure 3. Tape drive installation for 5U server model with hot-swap power supplies

- Connect one end of the applicable signal cable into the rear of the drive and make sure that the other end of this cable is connected into the applicable connector on the system board.
- Route the signal cable so that it does not block the airflow to the rear of the drives or over the microprocessor and dual inline memory modules (DIMMs).
- Connect the power cable to the rear of the drive. The connectors are keyed and can be inserted only one way.
Attention
If no tape drive is installed, it is important to reinstall the filler back to the bay.
If you have other devices to install, do so now. Otherwise, go to Completing the installation.
Give documentation feedback