2 x SAS/SATA + 2 x AnyBay backplanes
This section lists the required components for server models with 2 x SAS/SATA + 2 x AnyBay 2.5-inch hot-swap backplanes.
Connections between connectors; 1↔1, 2↔2, 3↔3, ... n↔n
When routing the cables, ensure that all cables are routed appropriately through the cable guides and cable clips.
Y-cables are shown as individual cables in the illustrations for each backplane.
Connect cables prioritizing Gen 4 RAID adapters.
For more information on the cables that are used, see Backplane cable list.
Onboard NVMe/SATA + 2 x retimers + 1 x 8i RAID/HBA + 1 x 16i RAID/HBA
Onboard NVMe/SATA + 2 x retimers + 1 x 8i RAID/HBA + 1 x 24i RAID/HBA
Onboard NVMe + 2 x retimers + 2 x 8i RAID/HBA + 1 x 16i RAID/HBA
Onboard NVMe + 2 x retimers + 2 x 8i RAID/HBA + 1 x 24i RAID/HBA
Onboard NVMe + 2 x retimers + 1x 16i RAID/HBA + 1x 24i RAID/HBA
Onboard NVMe/SATA + 3 x retimers + 1 x 8i RAID/HBA + 1 x 16i RAID/HBA
Onboard NVMe/SATA + 3 x retimers + 1 x 8i RAID/HBA + 1 x 24i RAID/HBA
Onboard NVMe + 3 x retimers + 2 x 8i RAID/HBA + 1 x 16i RAID/HBA
Onboard NVMe + 3 x retimers + 2 x 8i RAID/HBA + 1 x 24i RAID/HBA
Onboard NVMe + 3 x retimers + 1 x 16i RAID/HBA + 1 x 24i RAID/HBA
Onboard SATA + 4 x retimers + 1 x 8i RAID/HBA + 1 x 16i RAID/HBA
Onboard SATA + 4 x retimers + 1 x 8i RAID/HBA + 1 x 24i RAID/HBA
Onboard NVMe/SATA + 2 x retimers + 3 x 8i RAID/HBA
| NVMe cable routing | ||
|---|---|---|
Note Depending on your configuration, the adapter will be installed in top PCIe zone or bottom PCIe zone. Figure 1. NVMe cable routing to system board and top PCIe zone 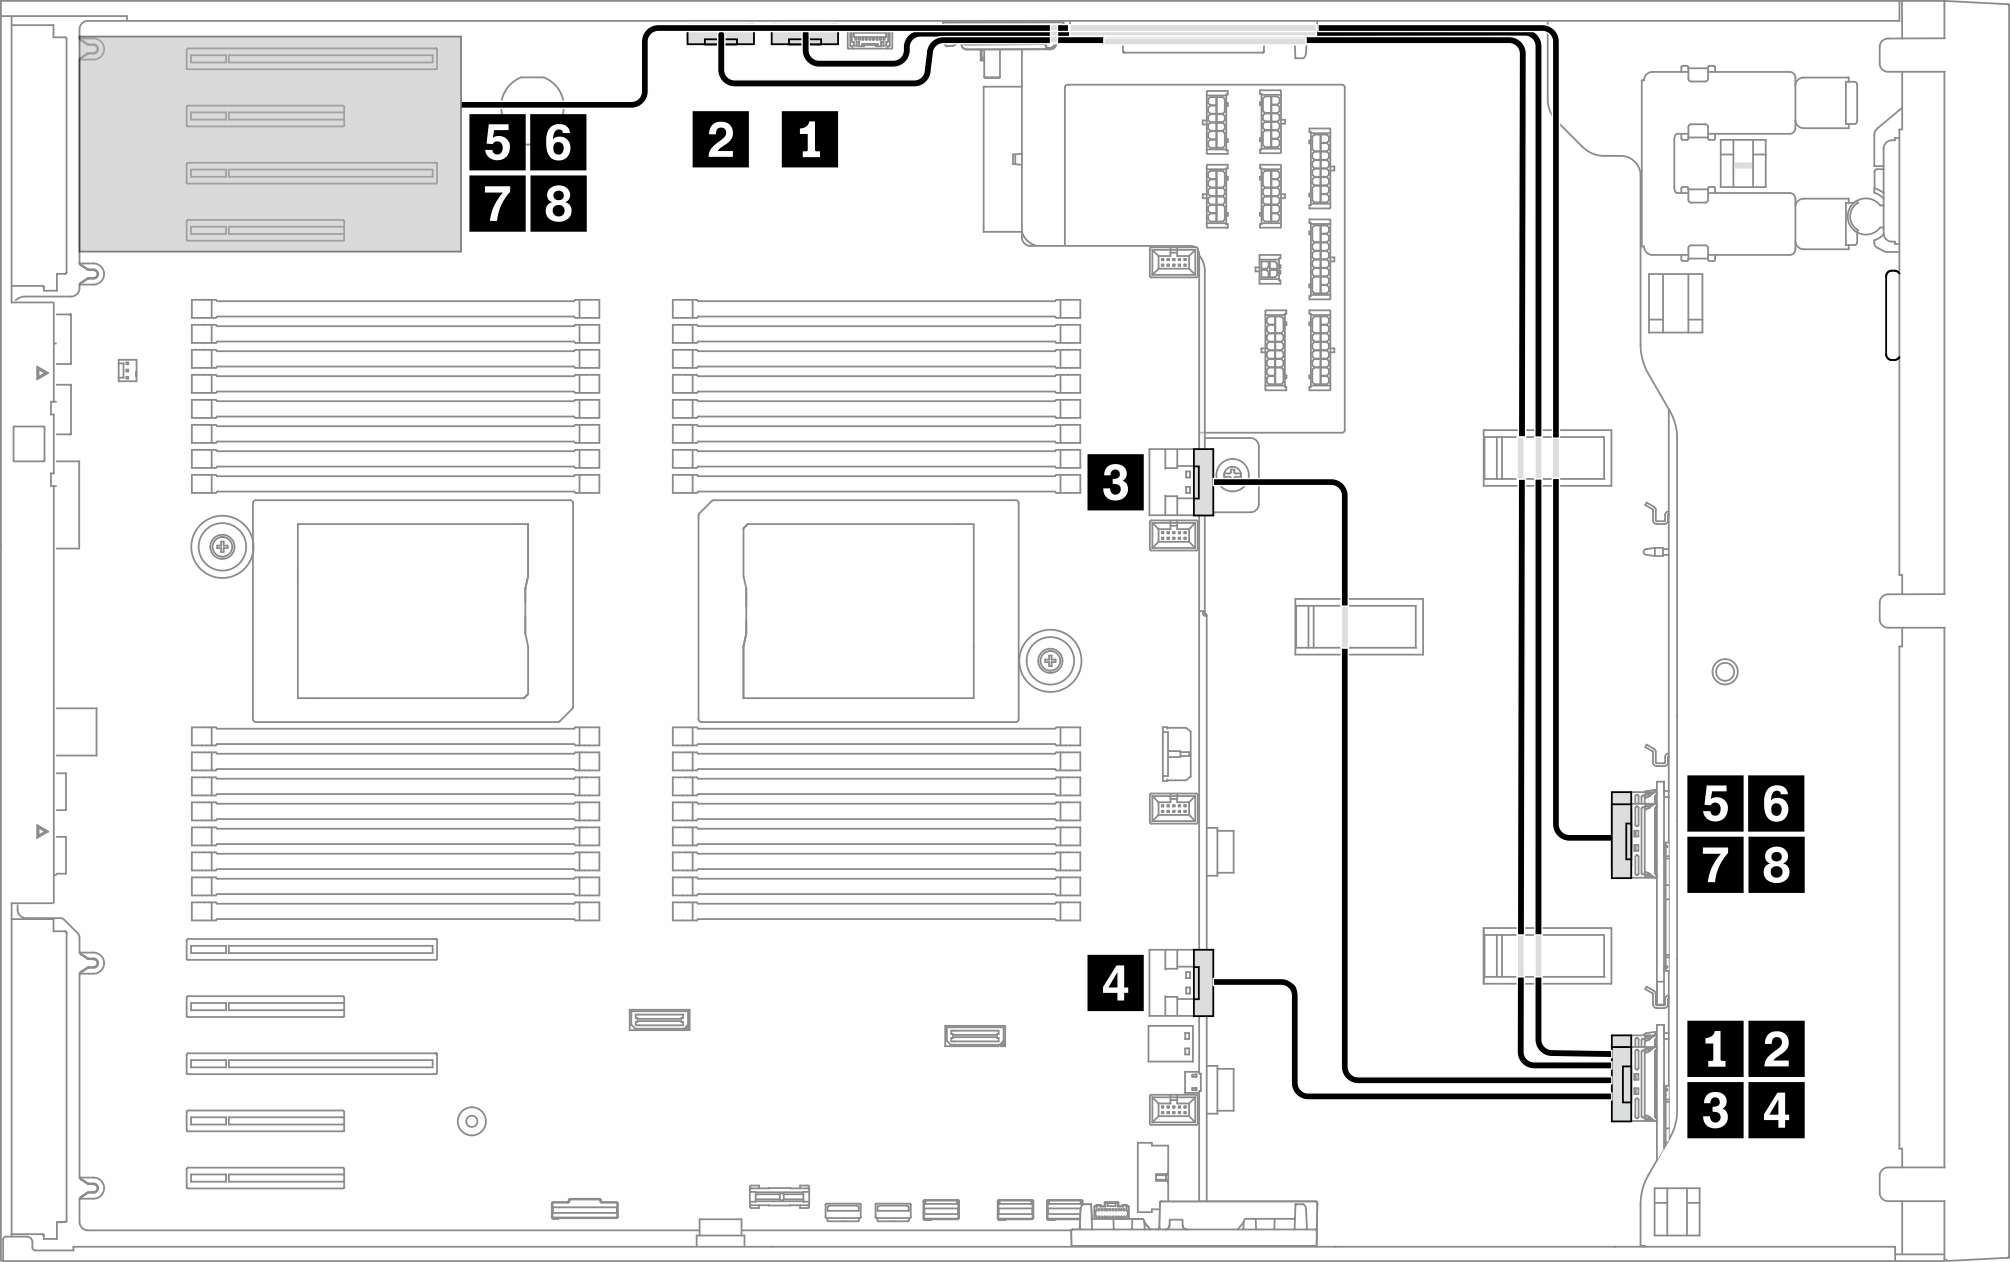 Figure 2. NVMe cable routing to system board and bottom PCIe zone 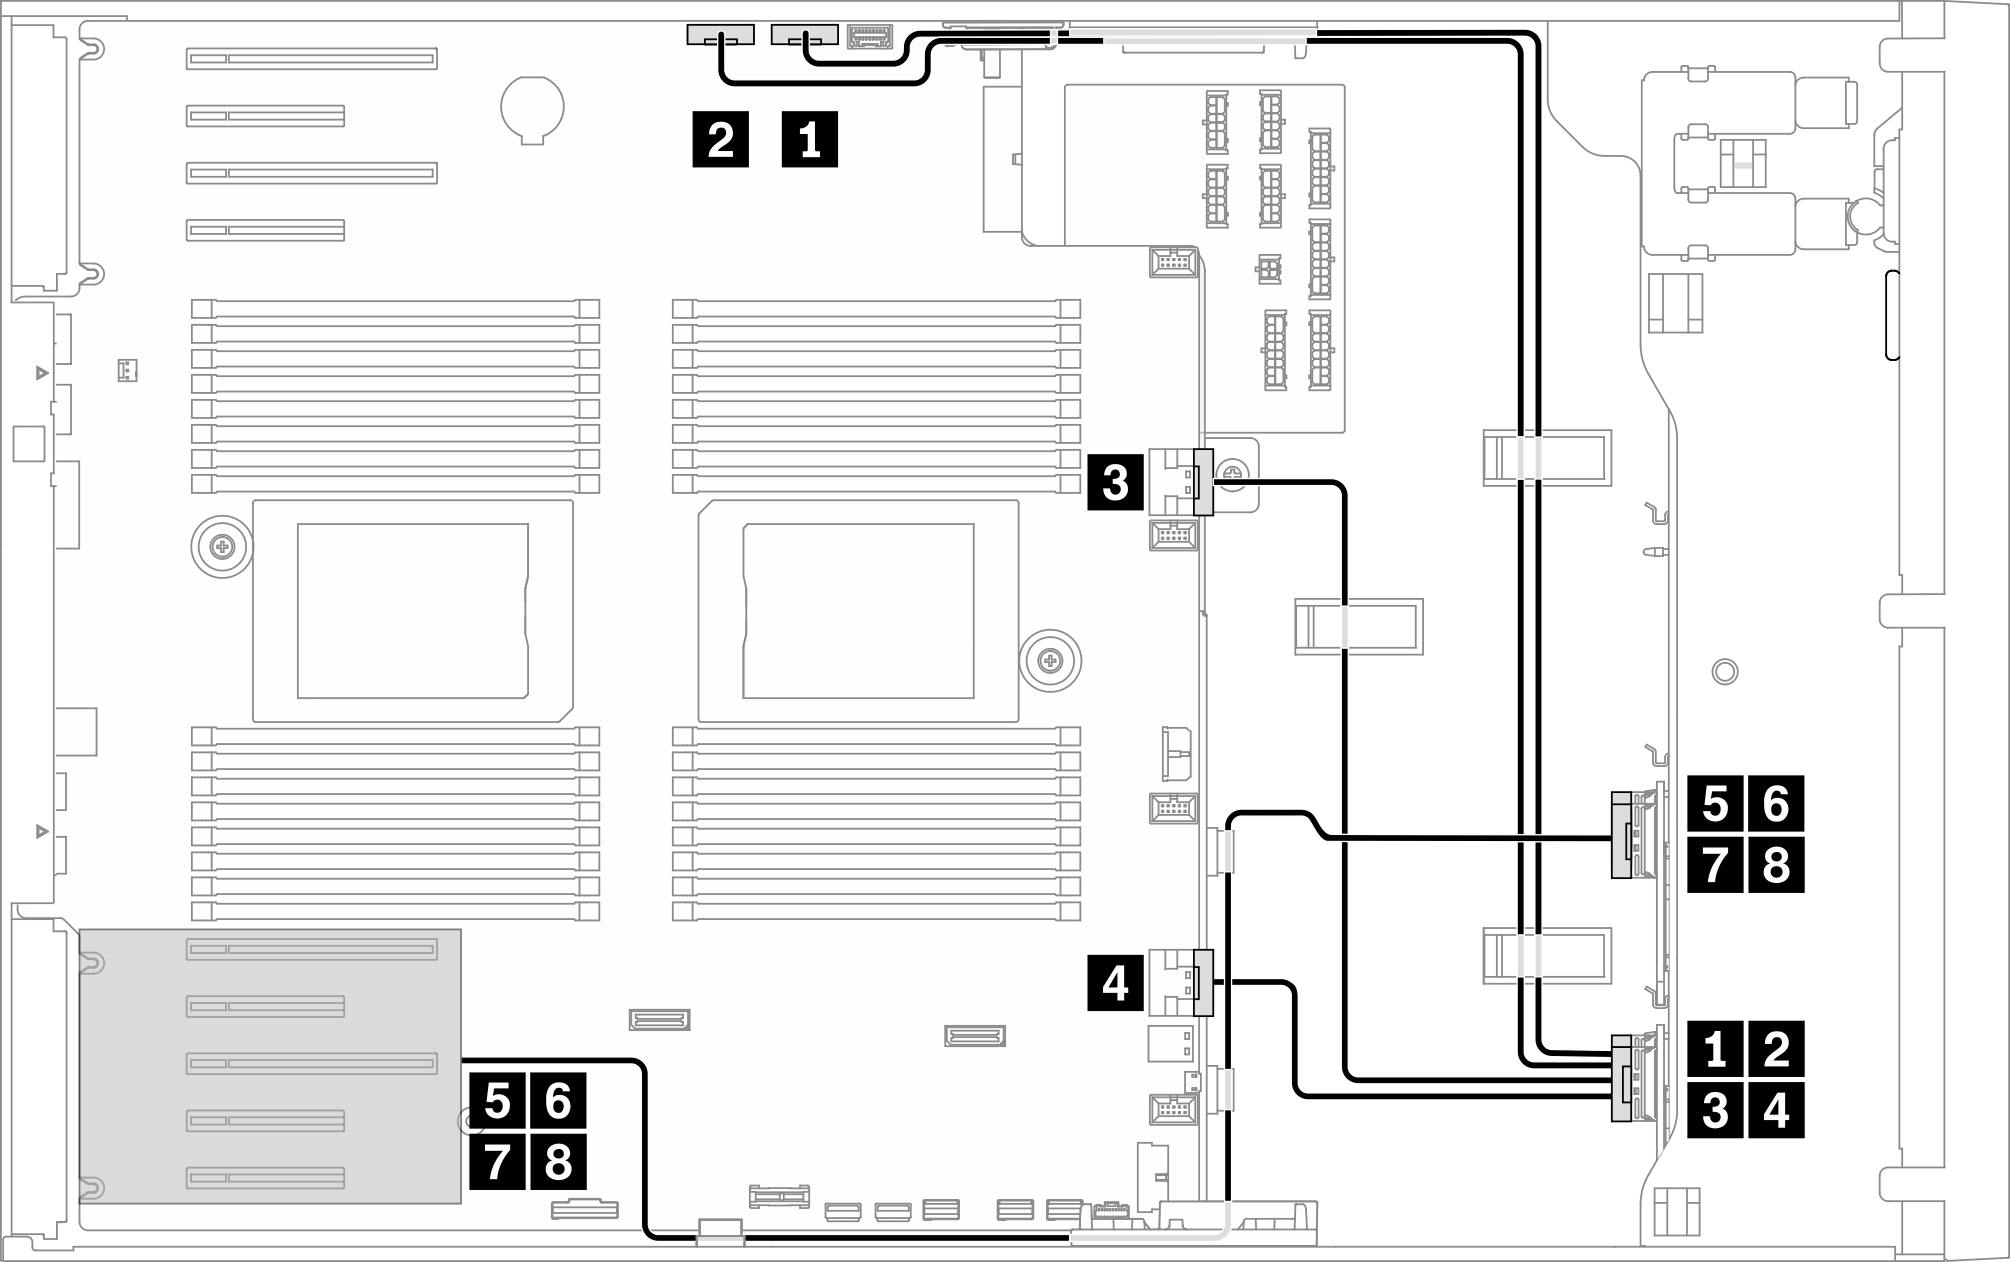 | ||
| From | To | Cable |
| 1 BP1: NVMe 0-1 | PCIe 1 (onboard) | SlimSAS x8 to SlimSAS x8 pair (820 mm/780 mm) |
| 2 BP1: NVMe 2-3 | PCIe 2 (onboard) | |
| 3 BP1: NVMe 4-5 | PCIe 3 (onboard) | SlimSAS x8 to SlimSAS x8 pair (325 mm/160 mm) |
| 4 BP1: NVMe 6-7 | PCIe 4 (onboard) | |
| 5 BP2: NVMe 0-1 | Retimer: C0 | SlimSAS x8 to SlimSAS x8 pair (700 mm/700 mm) |
| 6 BP2: NVMe 2-3 | Retimer: C1 | |
| 7 BP2: NVMe 4-5 | Retimer: C0 | SlimSAS x8 to SlimSAS x8 pair (700 mm/700 mm) |
| 8 BP2: NVMe 6-7 | Retimer: C1 | |
| SAS/SATA cable routing | ||
|---|---|---|
Note Depending on your configuration, the adapter will be installed in top PCIe zone or bottom PCIe zone. Figure 3. SAS/SATA cable routing to system board and top PCIe zone 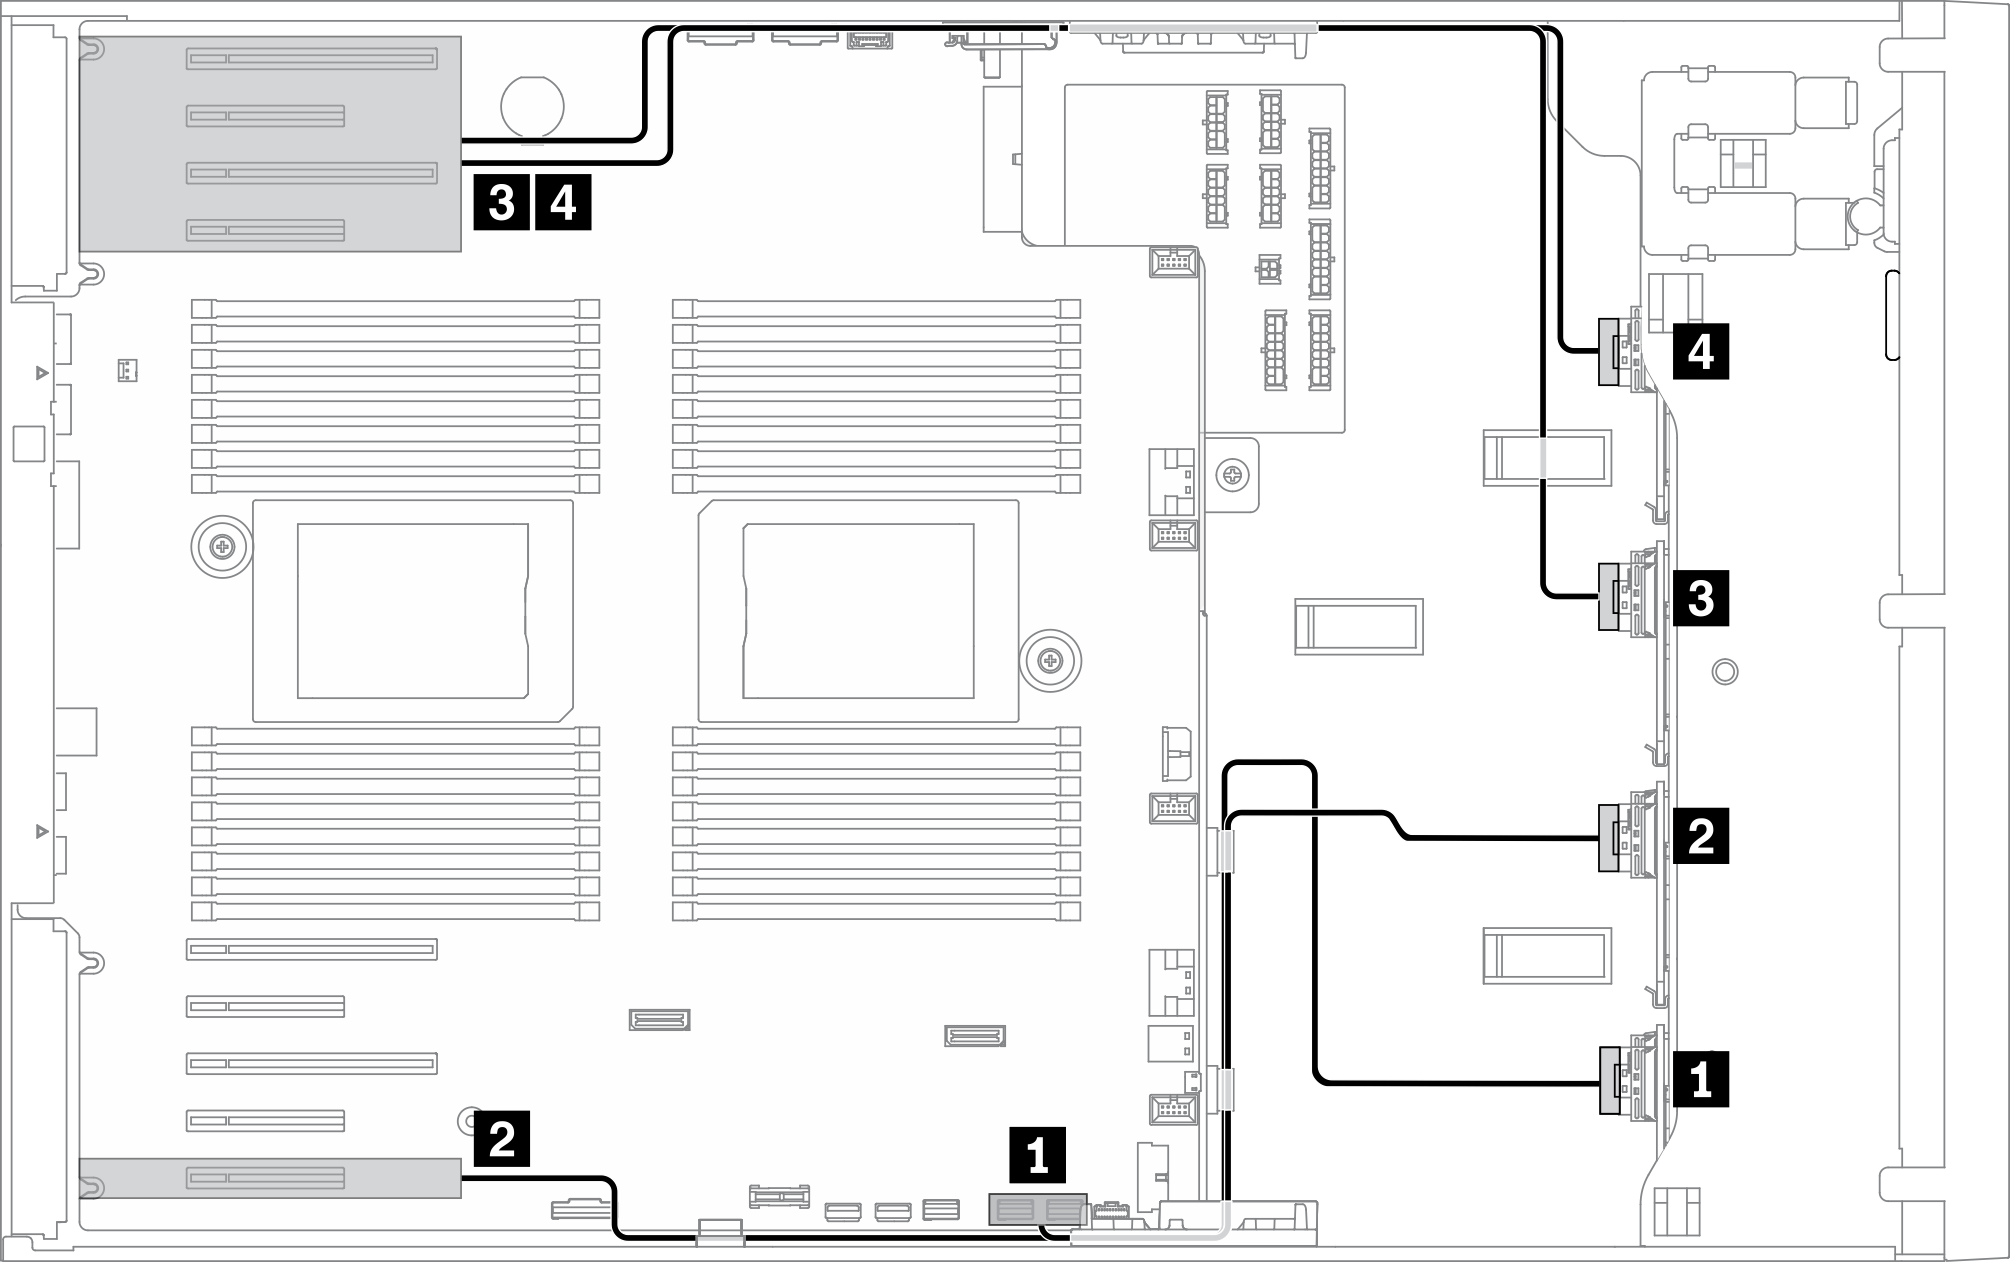 Figure 4. SAS/SATA cable routing to system board and bottom PCIe zone  | ||
| From | To | Cable |
| 1 BP1: SAS/SATA | SATA 0-3, 4-7 (onboard) | SlimSAS x4*2 to SlimSAS x8 (430 mm/430 mm) |
| 2 BP2: SAS/SATA |
|
|
| 3 BP3: SAS/SATA |
|
|
| 4 BP4: SAS/SATA |
|
|
Onboard NVMe/SATA + 2 x retimers + 1 x 8i RAID/HBA + 1 x 16i RAID/HBA
| NVMe cable routing | ||
|---|---|---|
Note Depending on your configuration, the adapter will be installed in top PCIe zone or bottom PCIe zone. Figure 5. NVMe cable routing to system board and top PCIe zone Figure 6. NVMe cable routing to system board and bottom PCIe zone | ||
| From | To | Cable |
| 1 BP1: NVMe 0-1 | PCIe 1 (onboard) | SlimSAS x8 to SlimSAS x8 pair (820 mm/780 mm) |
| 2 BP1: NVMe 2-3 | PCIe 2 (onboard) | |
| 3 BP1: NVMe 4-5 | PCIe 3 (onboard) | SlimSAS x8 to SlimSAS x8 pair (325 mm/160 mm) |
| 4 BP1: NVMe 6-7 | PCIe 4 (onboard) | |
| 5 BP2: NVMe 0-1 | Retimer: C0 | SlimSAS x8 to SlimSAS x8 pair (700 mm/700 mm) |
| 6 BP2: NVMe 2-3 | Retimer: C1 | |
| 7 BP2: NVMe 4-5 | Retimer: C0 | SlimSAS x8 to SlimSAS x8 pair (700 mm/700 mm) |
| 8 BP2: NVMe 6-7 | Retimer: C1 | |
| SAS/SATA cable routing | ||
|---|---|---|
Note Depending on your configuration, the adapter will be installed in top PCIe zone or bottom PCIe zone. Figure 7. SAS/SATA cable routing to system board and top PCIe zone 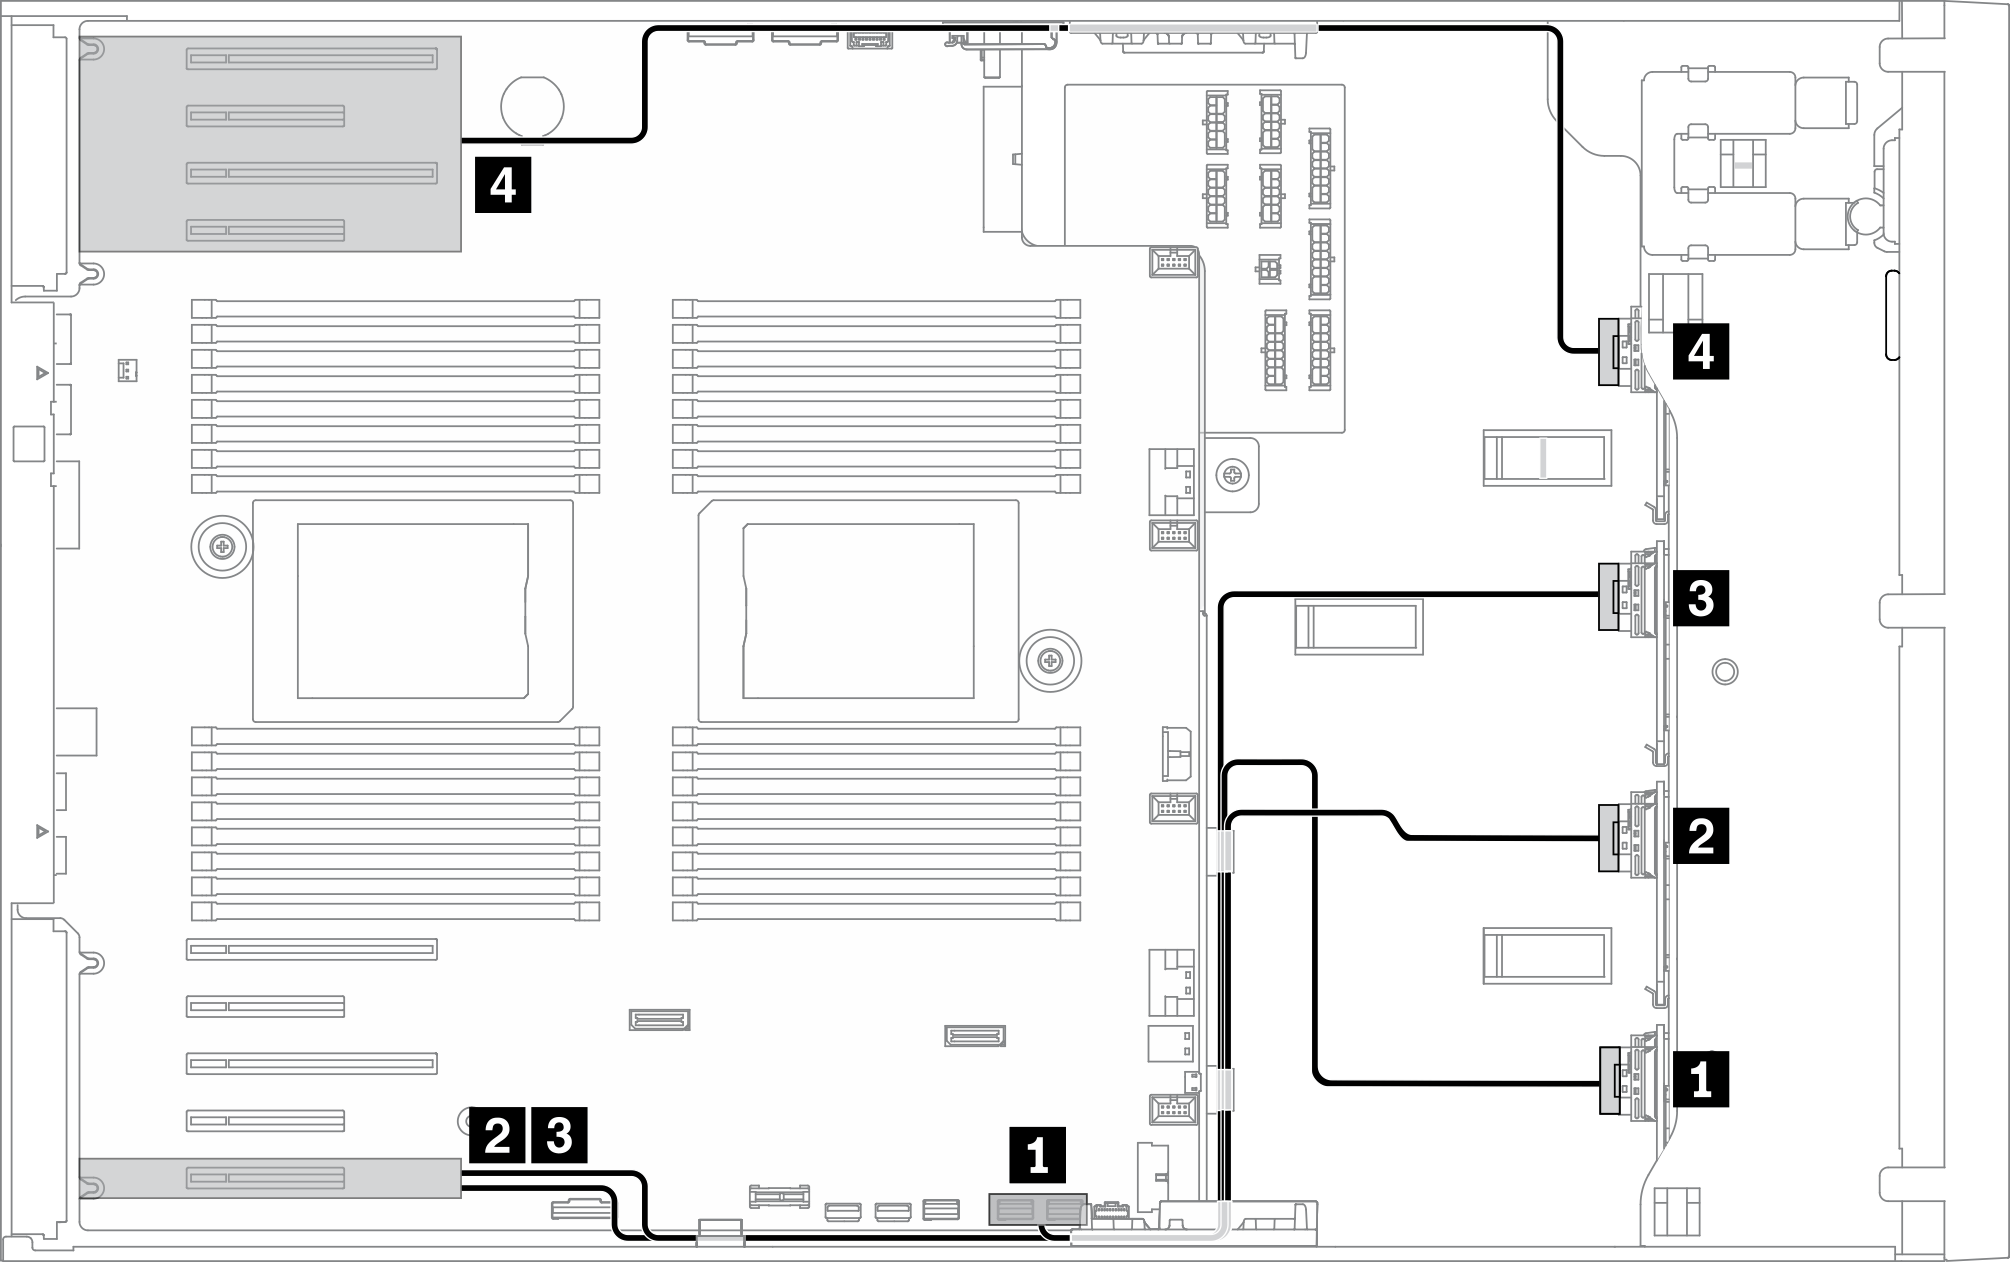 Figure 8. SAS/SATA cable routing to system board and bottom PCIe zone 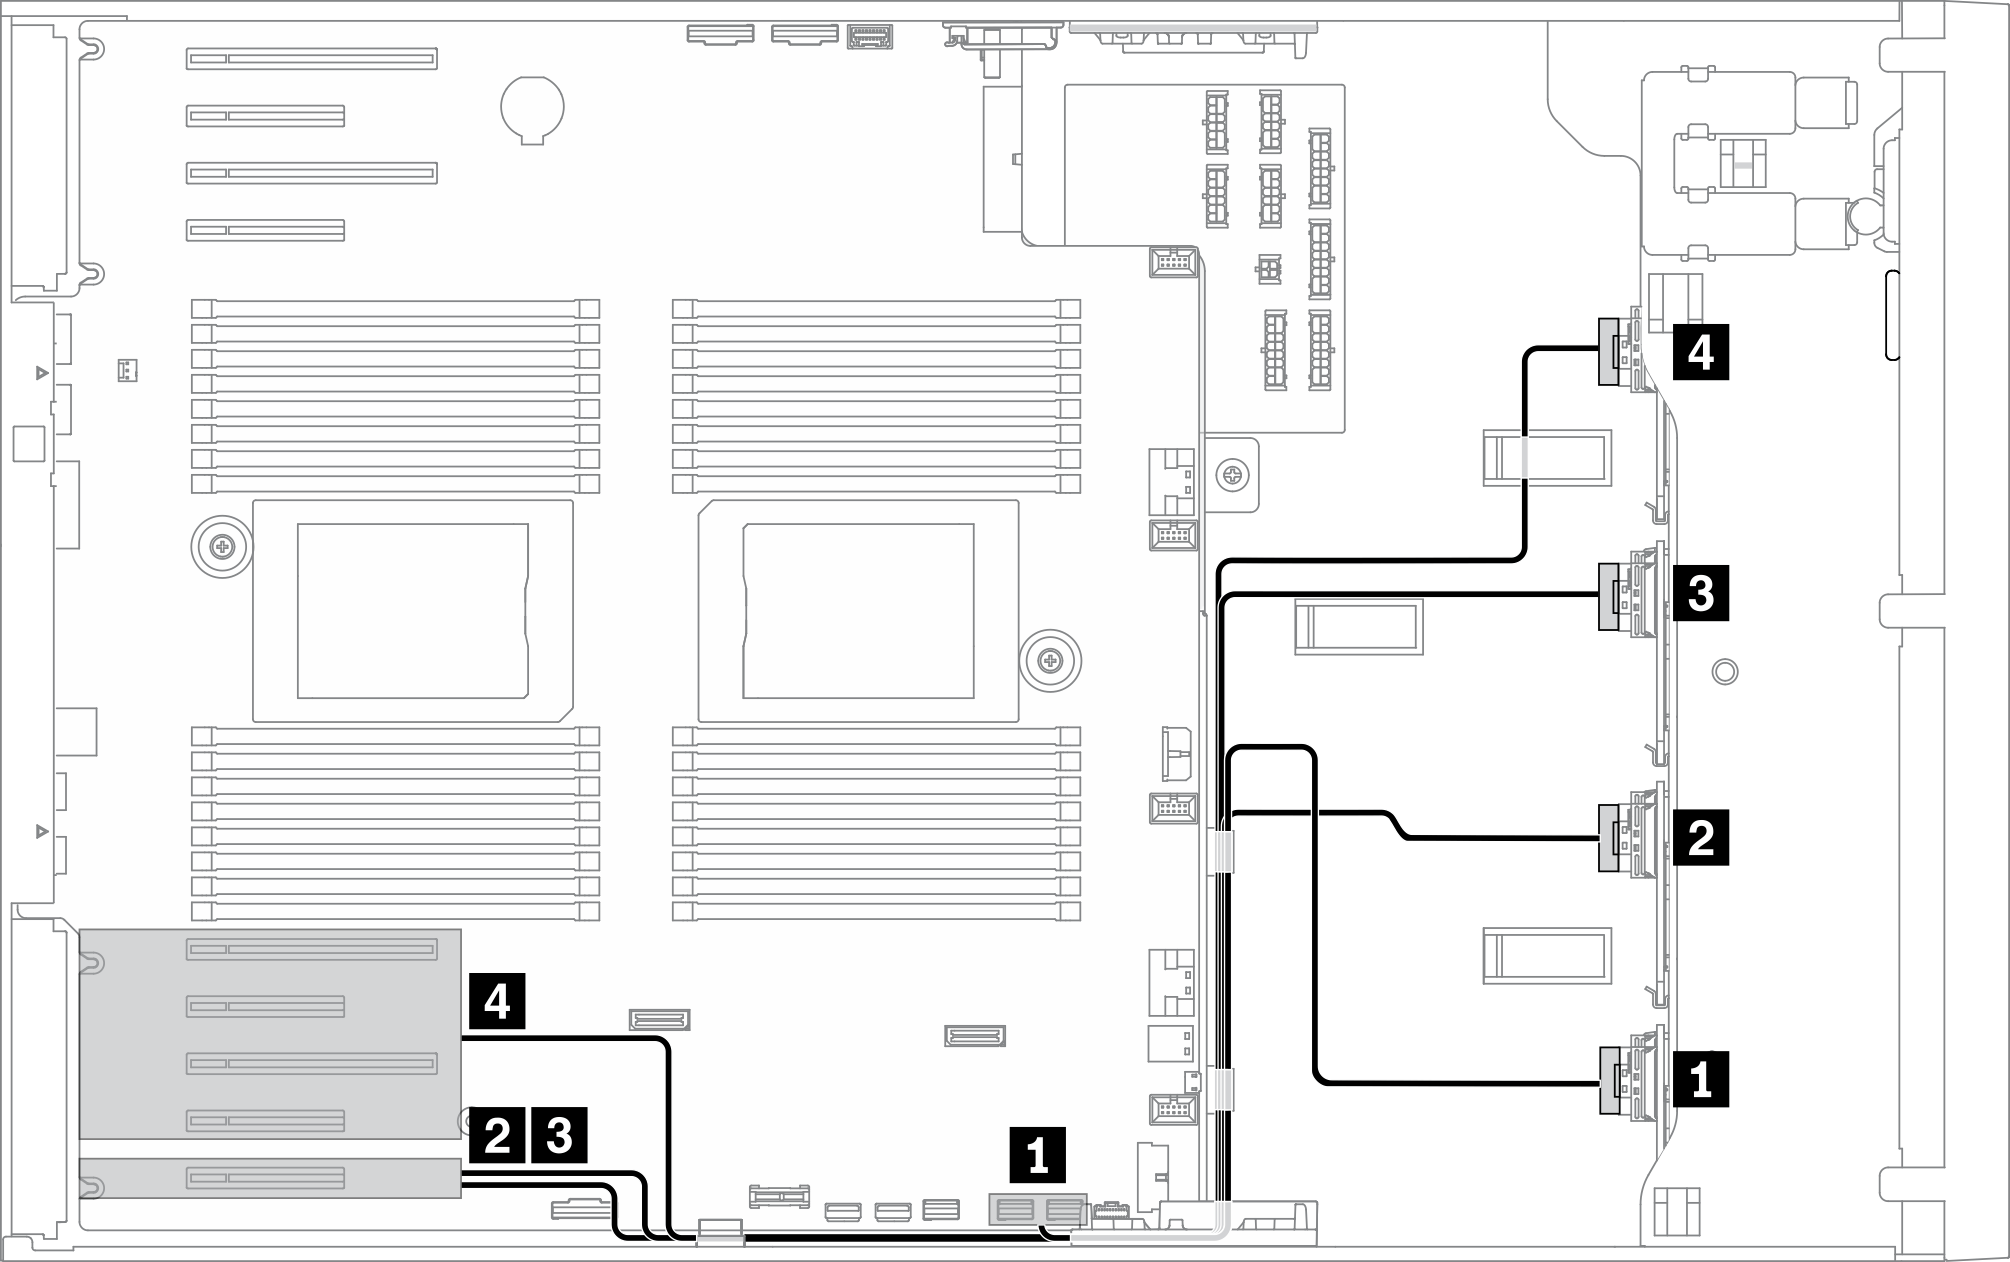 | ||
| From | To | Cable |
| 1 BP1: SAS/SATA | SATA 0-3, 4-7 (onboard) | SlimSAS x4*2 to SlimSAS x8 (430 mm/430 mm) |
| 2 BP2: SAS/SATA |
|
|
| 3 BP3: SAS/SATA |
|
|
| 4 BP4: SAS/SATA |
|
|
Onboard NVMe/SATA + 2 x retimers + 1 x 8i RAID/HBA + 1 x 24i RAID/HBA
| NVMe cable routing | ||
|---|---|---|
Note Depending on your configuration, the adapter will be installed in top PCIe zone or bottom PCIe zone. Figure 9. NVMe cable routing to system board and top PCIe zone Figure 10. NVMe cable routing to system board and bottom PCIe zone | ||
| From | To | Cable |
| 1 BP1: NVMe 0-1 | PCIe 1 (onboard) | SlimSAS x8 to SlimSAS x8 pair (820 mm/780 mm) |
| 2 BP1: NVMe 2-3 | PCIe 2 (onboard) | |
| 3 BP1: NVMe 4-5 | PCIe 3 (onboard) | SlimSAS x8 to SlimSAS x8 pair (325 mm/160 mm) |
| 4 BP1: NVMe 6-7 | PCIe 4 (onboard) | |
| 5 BP2: NVMe 0-1 | Retimer: C0 | SlimSAS x8 to SlimSAS x8 pair (700 mm/700 mm) |
| 6 BP2: NVMe 2-3 | Retimer: C1 | |
| 7 BP2: NVMe 4-5 | Retimer: C0 | SlimSAS x8 to SlimSAS x8 pair (700 mm/700 mm) |
| 8 BP2: NVMe 6-7 | Retimer: C1 | |
| SAS/SATA cable routing | ||
|---|---|---|
Note Depending on your configuration, the adapter will be installed in top PCIe zone or bottom PCIe zone. Figure 11. SAS/SATA cable routing to system board and top PCIe zone Figure 12. SAS/SATA cable routing to system board and bottom PCIe zone | ||
| From | To | Cable |
| 1 BP1: SAS/SATA | SATA 0-3, 4-7 (onboard) | SlimSAS x4*2 to SlimSAS x8 (430 mm/430 mm) |
| 2 BP2: SAS/SATA | 24i G3: C0, C1 | Gen 3: Mini-SAS x4*2 to SlimSAS x8 (640 mm) |
| 3 BP3: SAS/SATA | 24i G3: C2, C3 | Gen 3: Mini-SAS x4*2 to SlimSAS x8 (930 mm) |
| 4 BP4: SAS/SATA |
|
|
Onboard NVMe + 2 x retimers + 4 x 8i RAID/HBA
| NVMe cable routing | ||
|---|---|---|
Note Depending on your configuration, the adapter will be installed in top PCIe zone or bottom PCIe zone. Figure 13. NVMe cable routing to system board and top PCIe zone Figure 14. NVMe cable routing to system board and bottom PCIe zone | ||
| From | To | Cable |
| 1 BP1: NVMe 0-1 | PCIe 1 (onboard) | SlimSAS x8 to SlimSAS x8 pair (820 mm/780 mm) |
| 2 BP1: NVMe 2-3 | PCIe 2 (onboard) | |
| 3 BP1: NVMe 4-5 | PCIe 3 (onboard) | SlimSAS x8 to SlimSAS x8 pair (325 mm/160 mm) |
| 4 BP1: NVMe 6-7 | PCIe 4 (onboard) | |
| 5 BP2: NVMe 0-1 | Retimer: C0 | SlimSAS x8 to SlimSAS x8 pair (700 mm/700 mm) |
| 6 BP2: NVMe 2-3 | Retimer: C1 | |
| 7 BP2: NVMe 4-5 | Retimer: C0 | SlimSAS x8 to SlimSAS x8 pair (700 mm/700 mm) |
| 8 BP2: NVMe 6-7 | Retimer: C1 | |
| SAS/SATA cable routing | ||
|---|---|---|
Note Depending on your configuration, the adapter will be installed in top PCIe zone or bottom PCIe zone. Figure 15. SAS/SATA cable routing to top PCIe zone 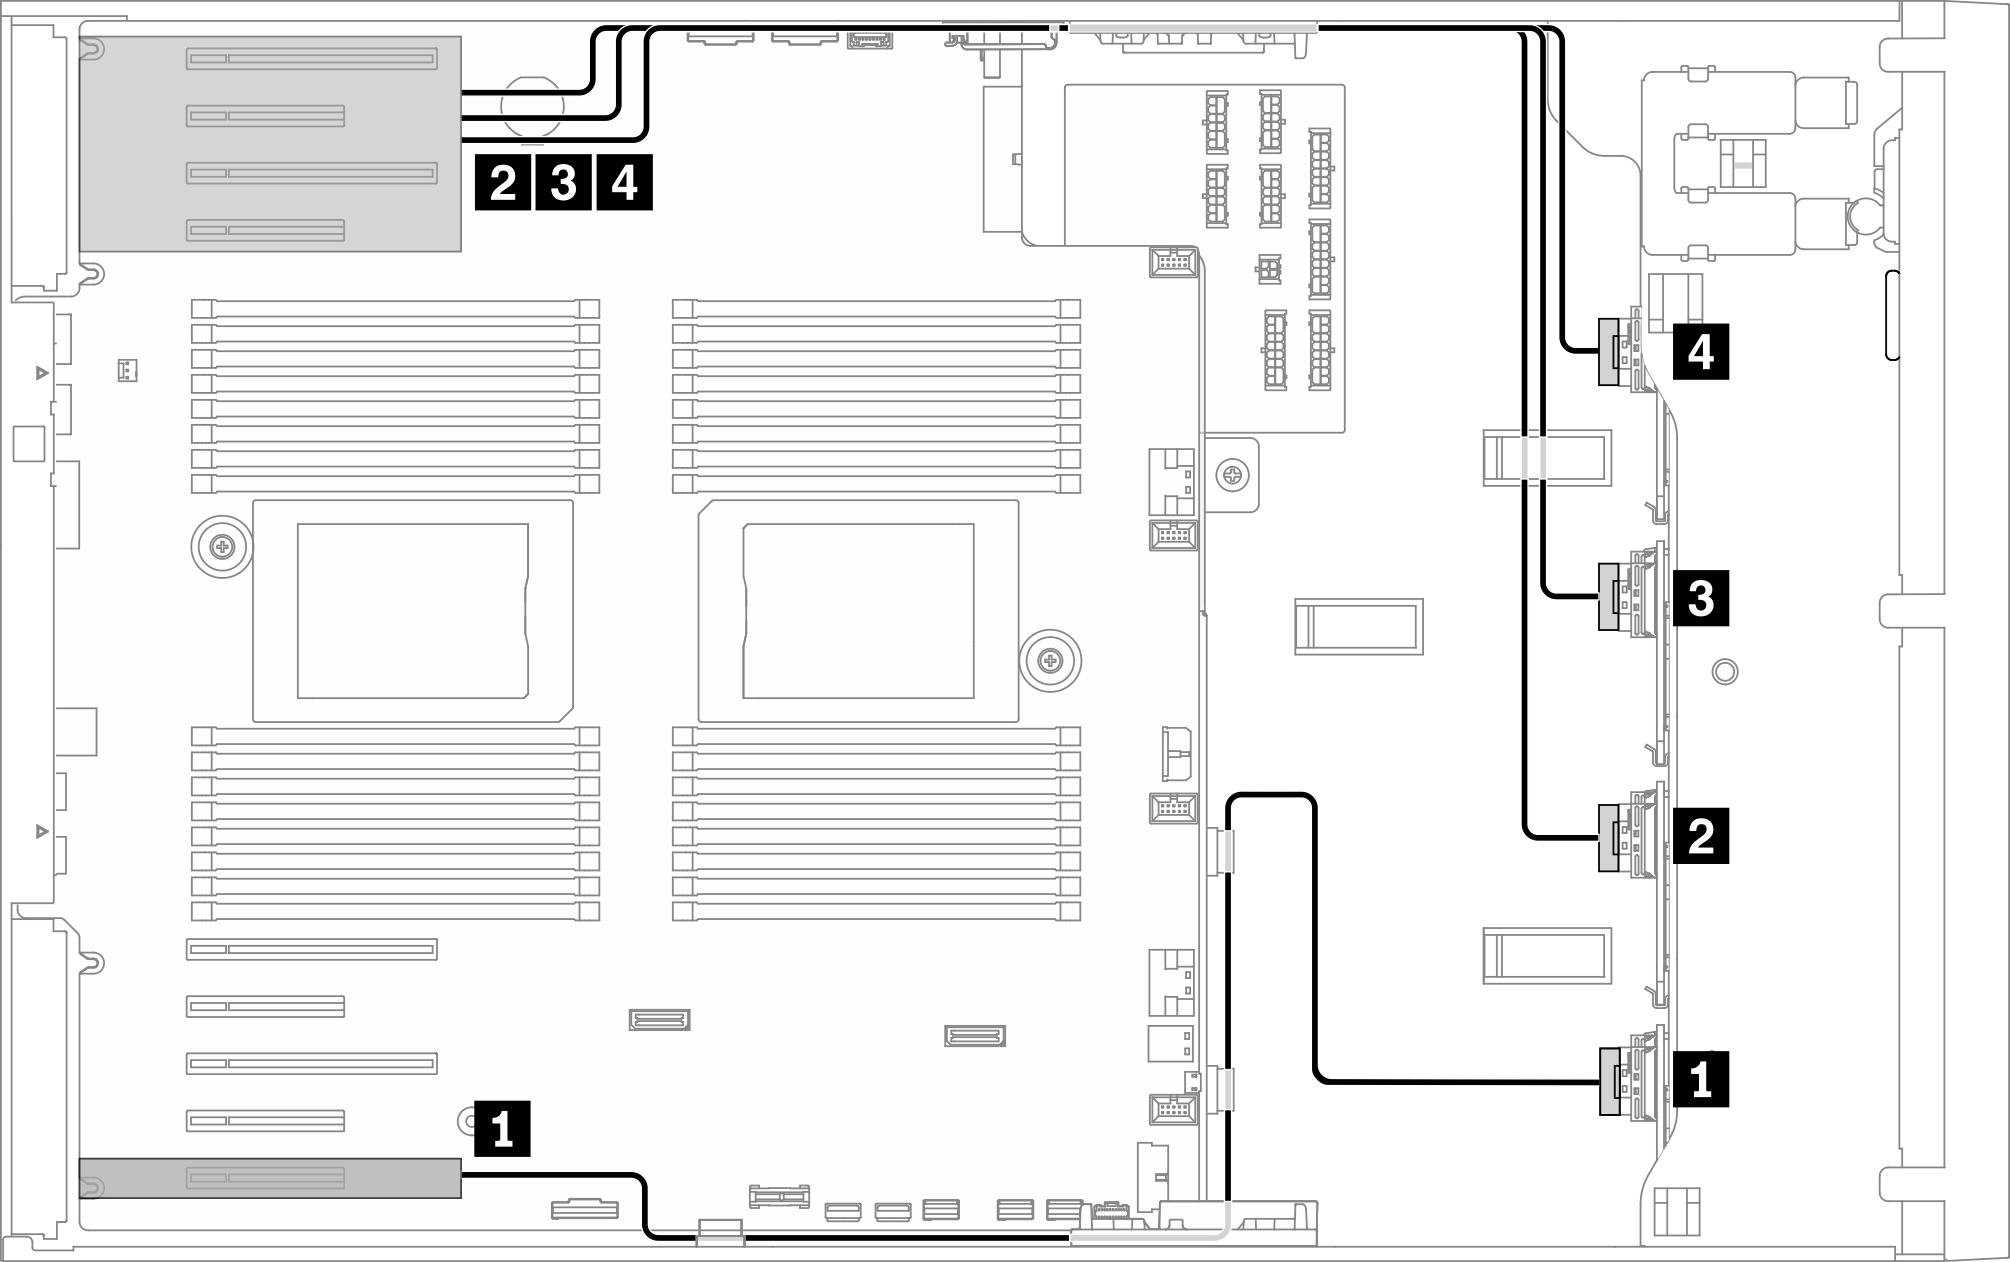 Figure 16. SAS/SATA cable routing to bottom PCIe zone 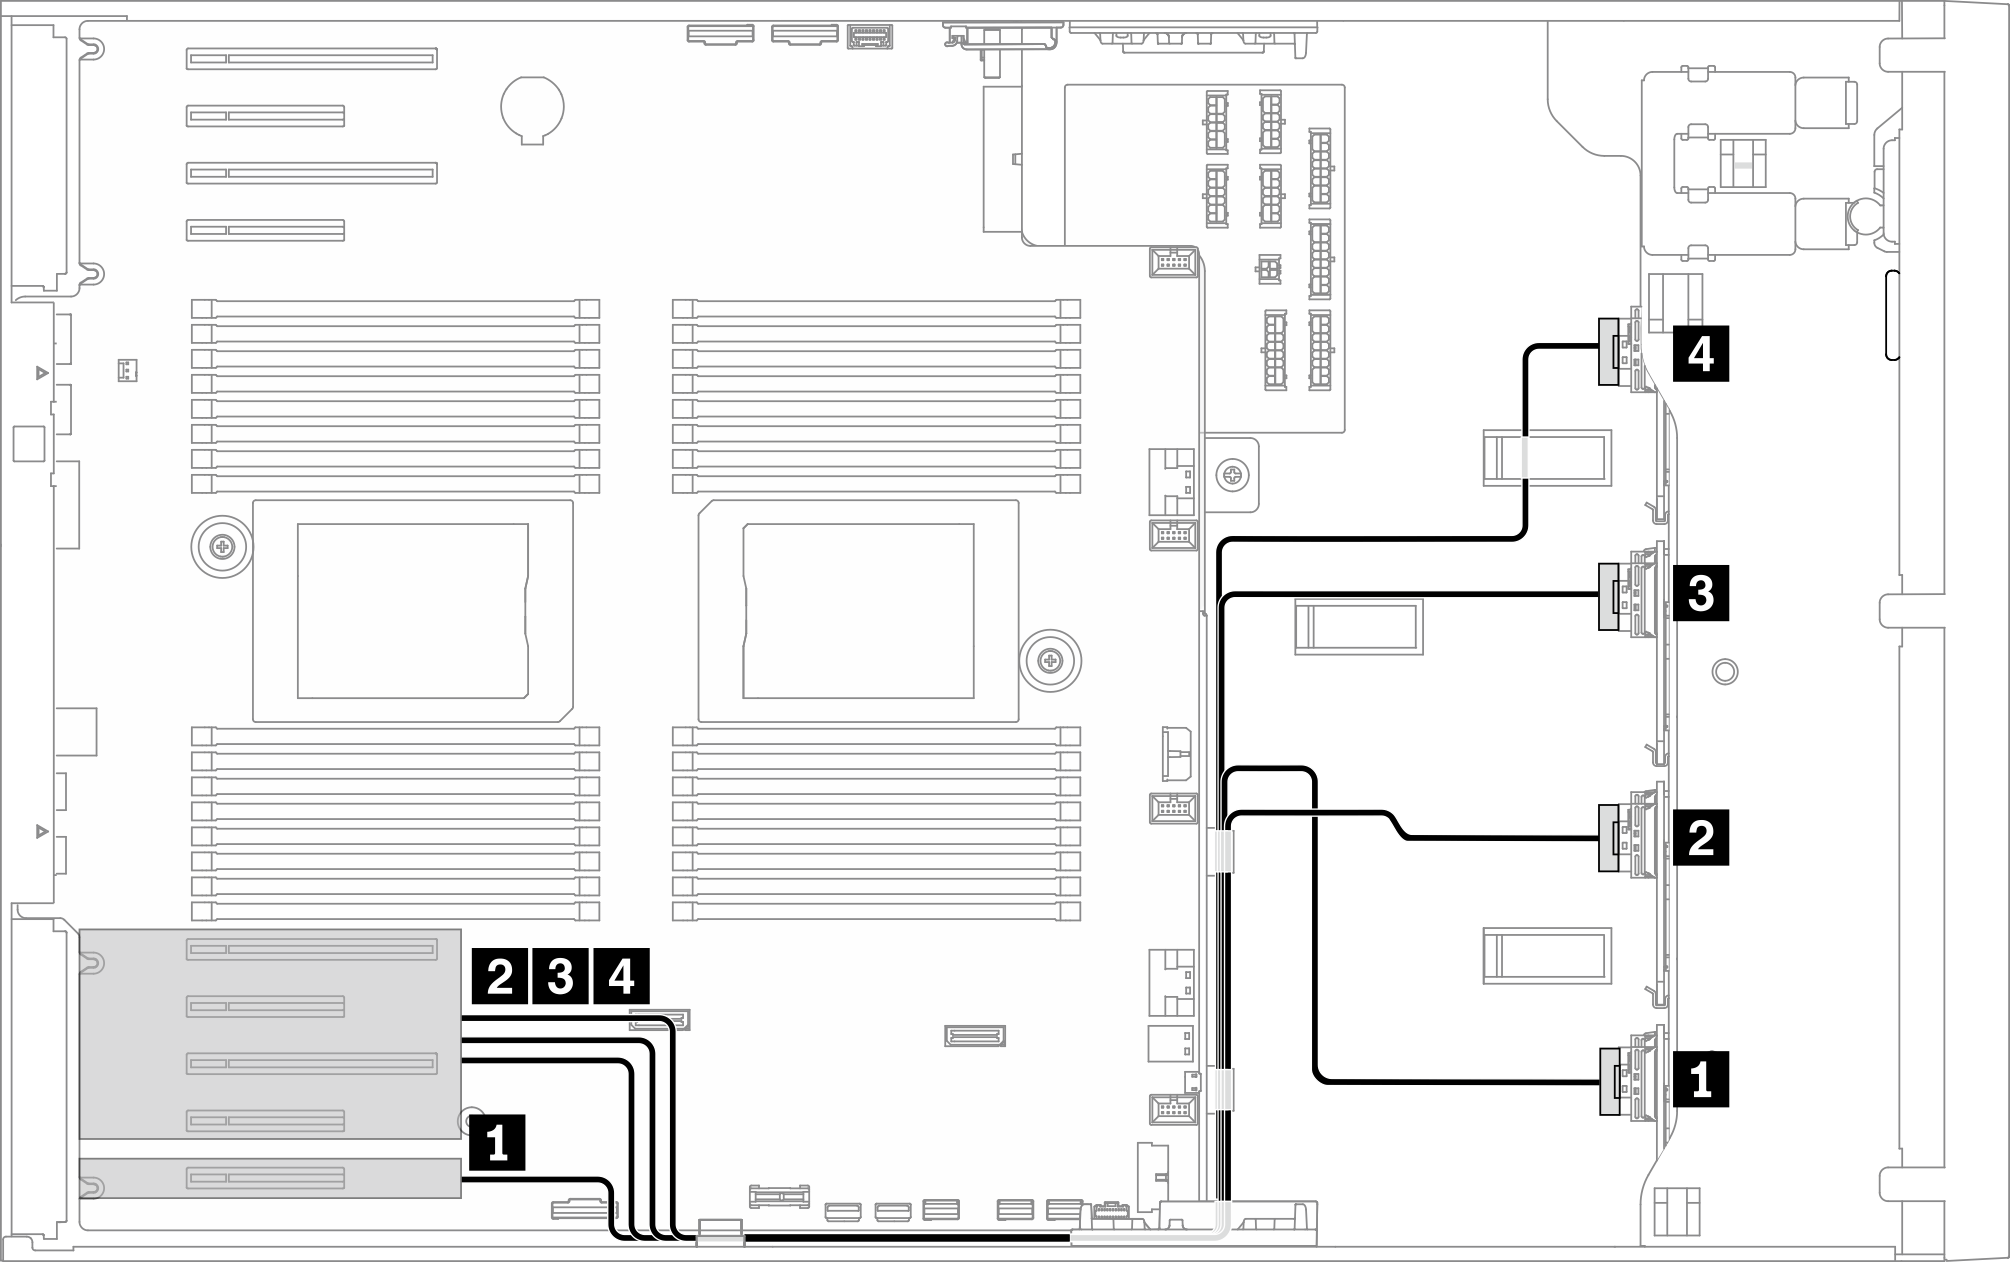 | ||
| From | To | Cable |
| 1 BP1: SAS/SATA |
|
|
| 2 BP2: SAS/SATA |
|
|
| 3 BP3: SAS/SATA |
|
|
| 4 BP4: SAS/SATA |
|
|
Onboard NVMe + 2 x retimers + 2 x 8i RAID/HBA + 1 x 16i RAID/HBA
| NVMe cable routing | ||
|---|---|---|
Note Depending on your configuration, the adapter will be installed in top PCIe zone or bottom PCIe zone. Figure 17. NVMe cable routing to system board and top PCIe zone Figure 18. NVMe cable routing to system board and bottom PCIe zone | ||
| From | To | Cable |
| 1 BP1: NVMe 0-1 | PCIe 1 (onboard) | SlimSAS x8 to SlimSAS x8 pair (820 mm/780 mm) |
| 2 BP1: NVMe 2-3 | PCIe 2 (onboard) | |
| 3 BP1: NVMe 4-5 | PCIe 3 (onboard) | SlimSAS x8 to SlimSAS x8 pair (325 mm/160 mm) |
| 4 BP1: NVMe 6-7 | PCIe 4 (onboard) | |
| 5 BP2: NVMe 0-1 | Retimer: C0 | SlimSAS x8 to SlimSAS x8 pair (700 mm/700 mm) |
| 6 BP2: NVMe 2-3 | Retimer: C1 | |
| 7 BP2: NVMe 4-5 | Retimer: C0 | SlimSAS x8 to SlimSAS x8 pair (700 mm/700 mm) |
| 8 BP2: NVMe 6-7 | Retimer: C1 | |
| SAS/SATA cable routing | ||
|---|---|---|
Note Depending on your configuration, the adapter will be installed in top PCIe zone or bottom PCIe zone. Figure 19. SAS/SATA cable routing to top PCIe zone 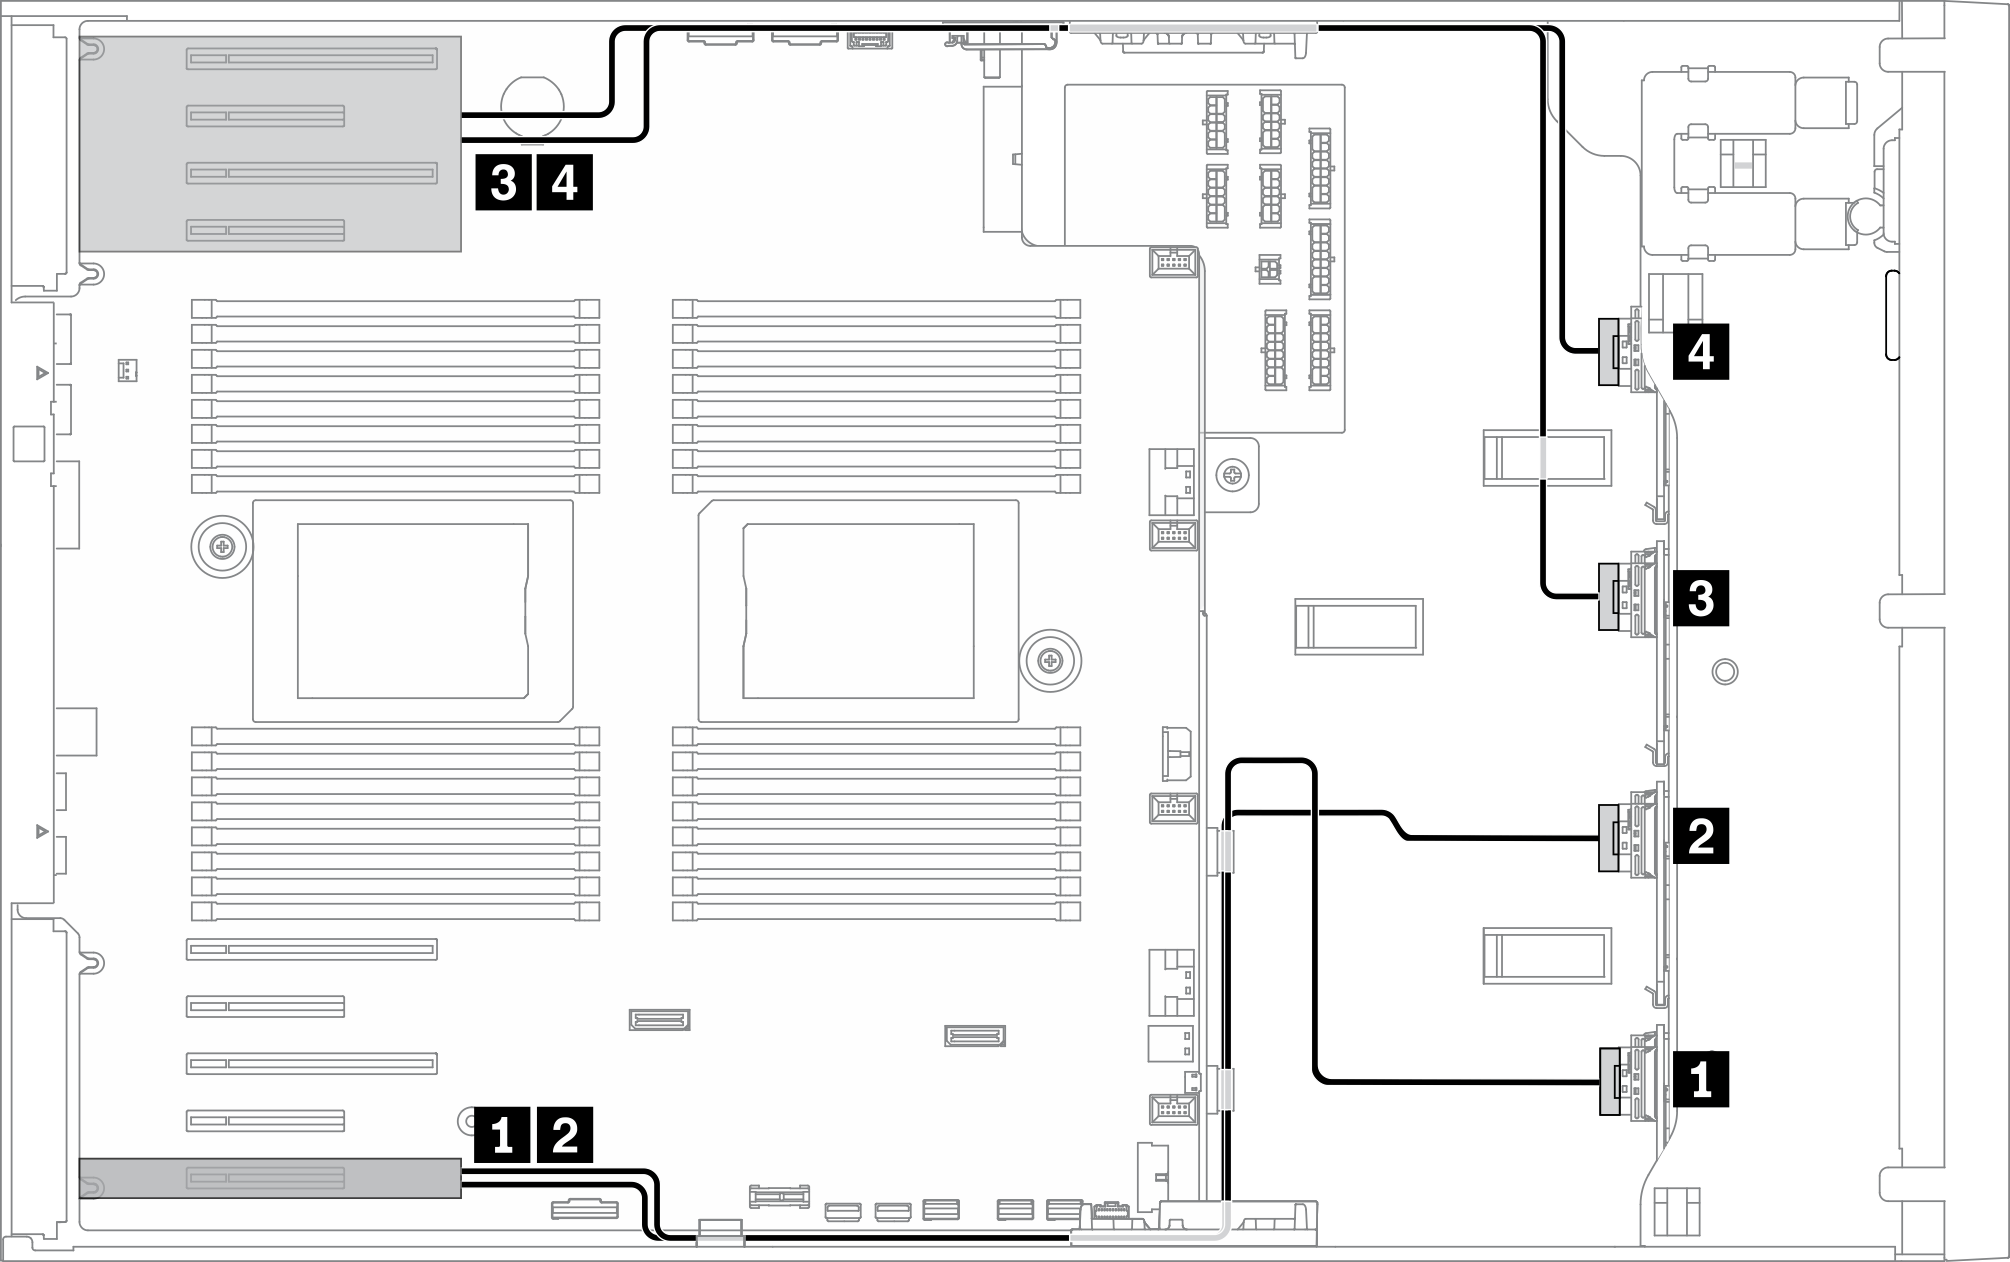 Figure 20. SAS/SATA cable routing to bottom PCIe zone  | ||
| From | To | Cable |
| 1 BP1: SAS/SATA |
|
|
| 2 BP2: SAS/SATA |
|
|
| 3 BP3: SAS/SATA |
|
|
| 4 BP4: SAS/SATA |
|
|
Onboard NVMe + 2 x retimers + 2 x 8i RAID/HBA + 1 x 24i RAID/HBA
| NVMe cable routing | ||
|---|---|---|
Note Depending on your configuration, the adapter will be installed in top PCIe zone or bottom PCIe zone. Figure 21. NVMe cable routing to system board and top PCIe zone Figure 22. NVMe cable routing to system board and bottom PCIe zone | ||
| From | To | Cable |
| 1 BP1: NVMe 0-1 | PCIe 1 (onboard) | SlimSAS x8 to SlimSAS x8 pair (820 mm/780 mm) |
| 2 BP1: NVMe 2-3 | PCIe 2 (onboard) | |
| 3 BP1: NVMe 4-5 | PCIe 3 (onboard) | SlimSAS x8 to SlimSAS x8 pair (325 mm/160 mm) |
| 4 BP1: NVMe 6-7 | PCIe 4 (onboard) | |
| 5 BP2: NVMe 0-1 | Retimer: C0 | SlimSAS x8 to SlimSAS x8 pair (700 mm/700 mm) |
| 6 BP2: NVMe 2-3 | Retimer: C1 | |
| 7 BP2: NVMe 4-5 | Retimer: C0 | SlimSAS x8 to SlimSAS x8 pair (700 mm/700 mm) |
| 8 BP2: NVMe 6-7 | Retimer: C1 | |
| SAS/SATA cable routing | ||
|---|---|---|
Note Depending on your configuration, the adapter will be installed in top PCIe zone or bottom PCIe zone. Figure 23. SAS/SATA cable routing to top PCIe zone Figure 24. SAS/SATA cable routing to bottom PCIe zone | ||
| From | To | Cable |
| 1 BP1: SAS/SATA | 24i G3: C0, C1 | Gen 3: Mini-SAS x4*2 to SlimSAS x8 (640 mm) |
| 2 BP2: SAS/SATA | 24i G3: C2, C3 | Gen 3: Mini-SAS x4*2 to SlimSAS x8 (640 mm) |
| 3 BP3: SAS/SATA |
|
|
| 4 BP4: SAS/SATA |
|
|
Onboard NVMe + 2 x retimers + 2 x 16i RAID/HBA
| NVMe cable routing | ||
|---|---|---|
Note Depending on your configuration, the adapter will be installed in top PCIe zone or bottom PCIe zone. Figure 25. NVMe cable routing to system board and top PCIe zone Figure 26. NVMe cable routing to system board and bottom PCIe zone | ||
| From | To | Cable |
| 1 BP1: NVMe 0-1 | PCIe 1 (onboard) | SlimSAS x8 to SlimSAS x8 pair (820 mm/780 mm) |
| 2 BP1: NVMe 2-3 | PCIe 2 (onboard) | |
| 3 BP1: NVMe 4-5 | PCIe 3 (onboard) | SlimSAS x8 to SlimSAS x8 pair (325 mm/160 mm) |
| 4 BP1: NVMe 6-7 | PCIe 4 (onboard) | |
| 5 BP2: NVMe 0-1 | Retimer: C0 | SlimSAS x8 to SlimSAS x8 pair (700 mm/700 mm) |
| 6 BP2: NVMe 2-3 | Retimer: C1 | |
| 7 BP2: NVMe 4-5 | Retimer: C0 | SlimSAS x8 to SlimSAS x8 pair (700 mm/700 mm) |
| 8 BP2: NVMe 6-7 | Retimer: C1 | |
| SAS/SATA cable routing | ||
|---|---|---|
Note Depending on your configuration, the adapter will be installed in top PCIe zone or bottom PCIe zone. Figure 27. SAS/SATA cable routing to top PCIe zone Figure 28. SAS/SATA cable routing to bottom PCIe zone | ||
| From | To | Cable |
| 1 BP1: SAS/SATA |
|
|
| 2 BP2: SAS/SATA |
|
|
| 3 BP3: SAS/SATA |
|
|
| 4 BP4: SAS/SATA |
|
|
Onboard NVMe + 2 x retimers + 1x 16i RAID/HBA + 1x 24i RAID/HBA
| NVMe cable routing | ||
|---|---|---|
Note Depending on your configuration, the adapter will be installed in top PCIe zone or bottom PCIe zone. Figure 29. NVMe cable routing to system board and top PCIe zone Figure 30. NVMe cable routing to system board and bottom PCIe zone | ||
| From | To | Cable |
| 1 BP1: NVMe 0-1 | PCIe 1 (onboard) | SlimSAS x8 to SlimSAS x8 pair (820 mm/780 mm) |
| 2 BP1: NVMe 2-3 | PCIe 2 (onboard) | |
| 3 BP1: NVMe 4-5 | PCIe 3 (onboard) | SlimSAS x8 to SlimSAS x8 pair (325 mm/160 mm) |
| 4 BP1: NVMe 6-7 | PCIe 4 (onboard) | |
| 5 BP2: NVMe 0-1 | Retimer: C0 | SlimSAS x8 to SlimSAS x8 pair (700 mm/700 mm) |
| 6 BP2: NVMe 2-3 | Retimer: C1 | |
| 7 BP2: NVMe 4-5 | Retimer: C0 | SlimSAS x8 to SlimSAS x8 pair (700 mm/700 mm) |
| 8 BP2: NVMe 6-7 | Retimer: C1 | |
| SAS/SATA cable routing | ||
|---|---|---|
Note Depending on your configuration, the adapter will be installed in top PCIe zone or bottom PCIe zone. Figure 31. SAS/SATA cable routing to top PCIe zone Figure 32. SAS/SATA cable routing to bottom PCIe zone | ||
| From | To | Cable |
| 1 BP1: SAS/SATA | 24i G3: C0, C1 | Gen 3: Mini-SAS x4*2 to SlimSAS x8 (640 mm) |
| 2 BP2: SAS/SATA | 24i G3: C2, C3 | Gen 3: Mini-SAS x4*2 to SlimSAS x8 (640 mm) |
| 3 BP3: SAS/SATA |
|
|
| 4 BP4: SAS/SATA |
|
|
Onboard NVMe + 2 x retimers + 2 x 24i RAID/HBA
| NVMe cable routing | ||
|---|---|---|
Note Depending on your configuration, the adapter will be installed in top PCIe zone or bottom PCIe zone. Figure 33. NVMe cable routing to system board and top PCIe zone Figure 34. NVMe cable routing to system board and bottom PCIe zone | ||
| From | To | Cable |
| 1 BP1: NVMe 0-1 | PCIe 1 (onboard) | SlimSAS x8 to SlimSAS x8 pair (820 mm/780 mm) |
| 2 BP1: NVMe 2-3 | PCIe 2 (onboard) | |
| 3 BP1: NVMe 4-5 | PCIe 3 (onboard) | SlimSAS x8 to SlimSAS x8 pair (325 mm/160 mm) |
| 4 BP1: NVMe 6-7 | PCIe 4 (onboard) | |
| 5 BP2: NVMe 0-1 | Retimer: C0 | SlimSAS x8 to SlimSAS x8 pair (700 mm/700 mm) |
| 6 BP2: NVMe 2-3 | Retimer: C1 | |
| 7 BP2: NVMe 4-5 | Retimer: C0 | SlimSAS x8 to SlimSAS x8 pair (700 mm/700 mm) |
| 8 BP2: NVMe 6-7 | Retimer: C1 | |
| SAS/SATA cable routing | ||
|---|---|---|
Note Depending on your configuration, the adapter will be installed in top PCIe zone or bottom PCIe zone. Figure 35. SAS/SATA cable routing to top PCIe zone Figure 36. SAS/SATA cable routing to bottom PCIe zone | ||
| From | To | Cable |
| 1 BP1: SAS/SATA | 24i G3: C0, C1 | Gen 3: Mini-SAS x4*2 to SlimSAS x8 (640 mm) |
| 2 BP2: SAS/SATA | 24i G3: C2, C3 | Gen 3: Mini-SAS x4*2 to SlimSAS x8 (640 mm) |
| 3 BP3: SAS/SATA | 24i G3: C0, C1 | Gen 3: Mini-SAS x4*2 to SlimSAS x8 (930 mm) |
| 4 BP4: SAS/SATA | 24i G3: C2, C3 | Gen 3: Mini-SAS x4*2 to SlimSAS x8 (930 mm) |
Onboard NVMe + 2 x retimers + 1 x 32i RAID/HBA
| NVMe cable routing | ||
|---|---|---|
Note Depending on your configuration, the adapter will be installed in top PCIe zone or bottom PCIe zone. Figure 37. NVMe cable routing to system board and top PCIe zone Figure 38. NVMe cable routing to system board and bottom PCIe zone | ||
| From | To | Cable |
| 1 BP1: NVMe 0-1 | PCIe 1 (onboard) | SlimSAS x8 to SlimSAS x8 pair (820 mm/780 mm) |
| 2 BP1: NVMe 2-3 | PCIe 2 (onboard) | |
| 3 BP1: NVMe 4-5 | PCIe 3 (onboard) | SlimSAS x8 to SlimSAS x8 pair (325 mm/160 mm) |
| 4 BP1: NVMe 6-7 | PCIe 4 (onboard) | |
| 5 BP2: NVMe 0-1 | Retimer: C0 | SlimSAS x8 to SlimSAS x8 pair (700 mm/700 mm) |
| 6 BP2: NVMe 2-3 | Retimer: C1 | |
| 7 BP2: NVMe 4-5 | Retimer: C0 | SlimSAS x8 to SlimSAS x8 pair (700 mm/700 mm) |
| 8 BP2: NVMe 6-7 | Retimer: C1 | |
| SAS/SATA cable routing | ||
|---|---|---|
Figure 39. SAS/SATA cable routing to PCIe slot 9  | ||
| From | To | Cable |
| 1 BP1: SAS/SATA | 32i G4: C0 | SlimSAS x8 to SlimSAS x8 (720 mm) |
| 2 BP2: SAS/SATA | 32i G4: C1 | SlimSAS x8 to SlimSAS x8 (720 mm) |
| 3 BP3: SAS/SATA | 32i G4: C2 | SlimSAS x8 to SlimSAS x8 (720 mm) |
| 4 BP4: SAS/SATA | 32i G4: C3 | SlimSAS x8 to SlimSAS x8 (880 mm) |
Onboard NVMe/SATA + 3 x retimers + 3 x 8i RAID/HBA
| NVMe cable routing | ||
|---|---|---|
Note Depending on your configuration, the adapter will be installed in top PCIe zone or bottom PCIe zone. Figure 40. NVMe cable routing to system board and top PCIe zone  Figure 41. NVMe cable routing to system board and bottom PCIe zone  | ||
| From | To | Cable |
| 1 BP1: NVMe 0-1 | Retimer: C0 | SlimSAS x8 to SlimSAS x8 pair (700 mm/700 mm) |
| 2 BP1: NVMe 2-3 | Retimer: C1 | |
| 3 BP1: NVMe 4-5 | PCIe 3 (onboard) | SlimSAS x8 to SlimSAS x8 pair (325 mm/160 mm) |
| 4 BP1: NVMe 6-7 | PCIe 4 (onboard) | |
| 5 BP2: NVMe 0-1 | Retimer: C0 | SlimSAS x8 to SlimSAS x8 pair (700 mm/700 mm) |
| 6 BP2: NVMe 2-3 | Retimer: C1 | |
| 7 BP2: NVMe 4-5 | Retimer: C0 | SlimSAS x8 to SlimSAS x8 pair (700 mm/700 mm) |
| 8 BP2: NVMe 6-7 | Retimer: C1 | |
| SAS/SATA cable routing | ||
|---|---|---|
Note Depending on your configuration, the adapter will be installed in top PCIe zone or bottom PCIe zone. Figure 42. SAS/SATA cable routing to system board and top PCIe zone Figure 43. SAS/SATA cable routing to system board and bottom PCIe zone | ||
| From | To | Cable |
| 1 BP1: SAS/SATA | SATA 0-3, 4-7 (onboard) | SlimSAS x4*2 to SlimSAS x8 (430 mm/430 mm) |
| 2 BP2: SAS/SATA |
|
|
| 3 BP3: SAS/SATA |
|
|
| 4 BP4: SAS/SATA |
|
|
Onboard NVMe/SATA + 3 x retimers + 1 x 8i RAID/HBA + 1 x 16i RAID/HBA
| NVMe cable routing | ||
|---|---|---|
Note Depending on your configuration, the adapter will be installed in top PCIe zone or bottom PCIe zone. Figure 44. NVMe cable routing to system board and top PCIe zone Figure 45. NVMe cable routing to system board and bottom PCIe zone | ||
| From | To | Cable |
| 1 BP1: NVMe 0-1 | Retimer: C0 | SlimSAS x8 to SlimSAS x8 pair (700 mm/700 mm) |
| 2 BP1: NVMe 2-3 | Retimer: C1 | |
| 3 BP1: NVMe 4-5 | PCIe 3 (onboard) | SlimSAS x8 to SlimSAS x8 pair (325 mm/160 mm) |
| 4 BP1: NVMe 6-7 | PCIe 4 (onboard) | |
| 5 BP2: NVMe 0-1 | Retimer: C0 | SlimSAS x8 to SlimSAS x8 pair (700 mm/700 mm) |
| 6 BP2: NVMe 2-3 | Retimer: C1 | |
| 7 BP2: NVMe 4-5 | Retimer: C0 | SlimSAS x8 to SlimSAS x8 pair (700 mm/700 mm) |
| 8 BP2: NVMe 6-7 | Retimer: C1 | |
| SAS/SATA cable routing | ||
|---|---|---|
Note Depending on your configuration, the adapter will be installed in top PCIe zone or bottom PCIe zone. Figure 46. SAS/SATA cable routing to system board and top PCIe zone Figure 47. SAS/SATA cable routing to system board and bottom PCIe zone | ||
| From | To | Cable |
| 1 BP1: SAS/SATA | SATA 0-3, 4-7 (onboard) | SlimSAS x4*2 to SlimSAS x8 (430 mm/430 mm) |
| 2 BP2: SAS/SATA |
|
|
| 3 BP3: SAS/SATA |
|
|
| 4 BP4: SAS/SATA |
|
|
Onboard NVMe/SATA + 3 x retimers + 1 x 8i RAID/HBA + 1 x 24i RAID/HBA
| NVMe cable routing | ||
|---|---|---|
Note Depending on your configuration, the adapter will be installed in top PCIe zone or bottom PCIe zone. Figure 48. NVMe cable routing to system board and top PCIe zone Figure 49. NVMe cable routing to system board and bottom PCIe zone | ||
| From | To | Cable |
| 1 BP1: NVMe 0-1 | Retimer: C0 | SlimSAS x8 to SlimSAS x8 pair (700 mm/700 mm) |
| 2 BP1: NVMe 2-3 | Retimer: C1 | |
| 3 BP1: NVMe 4-5 | PCIe 3 (onboard) | SlimSAS x8 to SlimSAS x8 pair (325 mm/160 mm) |
| 4 BP1: NVMe 6-7 | PCIe 4 (onboard) | |
| 5 BP2: NVMe 0-1 | Retimer: C0 | SlimSAS x8 to SlimSAS x8 pair (700 mm/700 mm) |
| 6 BP2: NVMe 2-3 | Retimer: C1 | |
| 7 BP2: NVMe 4-5 | Retimer: C0 | SlimSAS x8 to SlimSAS x8 pair (700 mm/700 mm) |
| 8 BP2: NVMe 6-7 | Retimer: C1 | |
| SAS/SATA cable routing | ||
|---|---|---|
Note Depending on your configuration, the adapter will be installed in top PCIe zone or bottom PCIe zone. Figure 50. SAS/SATA cable routing to system board and top PCIe zone Figure 51. SAS/SATA cable routing to system board and bottom PCIe zone | ||
| From | To | Cable |
| 1 BP1: SAS/SATA | SATA 0-3, 4-7 (onboard) | SlimSAS x4*2 to SlimSAS x8 (430 mm/430 mm) |
| 2 BP2: SAS/SATA | 24i G3: C0, C1 | Gen 3: Mini-SAS x4*2 to SlimSAS x8 (640 mm) |
| 3 BP3: SAS/SATA | 24i G3: C2, C3 | Gen 3: Mini-SAS x4*2 to SlimSAS x8 (930 mm) |
| 4 BP4: SAS/SATA |
|
|
Onboard NVMe + 3 x retimers + 4 x 8i RAID/HBA
| NVMe cable routing | ||
|---|---|---|
Note Depending on your configuration, the adapter will be installed in top PCIe zone or bottom PCIe zone. Figure 52. NVMe cable routing to system board and top PCIe zone Figure 53. NVMe cable routing to system board and bottom PCIe zone | ||
| From | To | Cable |
| 1 BP1: NVMe 0-1 | Retimer: C0 | SlimSAS x8 to SlimSAS x8 pair (700 mm/700 mm) |
| 2 BP1: NVMe 2-3 | Retimer: C1 | |
| 3 BP1: NVMe 4-5 | PCIe 3 (onboard) | SlimSAS x8 to SlimSAS x8 pair (325 mm/160 mm) |
| 4 BP1: NVMe 6-7 | PCIe 4 (onboard) | |
| 5 BP2: NVMe 0-1 | Retimer: C0 | SlimSAS x8 to SlimSAS x8 pair (700 mm/700 mm) |
| 6 BP2: NVMe 2-3 | Retimer: C1 | |
| 7 BP2: NVMe 4-5 | Retimer: C0 | SlimSAS x8 to SlimSAS x8 pair (700 mm/700 mm) |
| 8 BP2: NVMe 6-7 | Retimer: C1 | |
| SAS/SATA cable routing | ||
|---|---|---|
Note Depending on your configuration, the adapter will be installed in top PCIe zone or bottom PCIe zone. Figure 54. SAS/SATA cable routing to top PCIe zone Figure 55. SAS/SATA cable routing to bottom PCIe zone | ||
| From | To | Cable |
| 1 BP1: SAS/SATA |
|
|
| 2 BP2: SAS/SATA |
|
|
| 3 BP3: SAS/SATA |
|
|
| 4 BP4: SAS/SATA |
|
|
Onboard NVMe + 3 x retimers + 2 x 8i RAID/HBA + 1 x 16i RAID/HBA
| NVMe cable routing | ||
|---|---|---|
Note Depending on your configuration, the adapter will be installed in top PCIe zone or bottom PCIe zone. Figure 56. NVMe cable routing to system board and top PCIe zone Figure 57. NVMe cable routing to system board and bottom PCIe zone | ||
| From | To | Cable |
| 1 BP1: NVMe 0-1 | Retimer: C0 | SlimSAS x8 to SlimSAS x8 pair (700 mm/700 mm) |
| 2 BP1: NVMe 2-3 | Retimer: C1 | |
| 3 BP1: NVMe 4-5 | PCIe 3 (onboard) | SlimSAS x8 to SlimSAS x8 pair (325 mm/160 mm) |
| 4 BP1: NVMe 6-7 | PCIe 4 (onboard) | |
| 5 BP2: NVMe 0-1 | Retimer: C0 | SlimSAS x8 to SlimSAS x8 pair (700 mm/700 mm) |
| 6 BP2: NVMe 2-3 | Retimer: C1 | |
| 7 BP2: NVMe 4-5 | Retimer: C0 | SlimSAS x8 to SlimSAS x8 pair (700 mm/700 mm) |
| 8 BP2: NVMe 6-7 | Retimer: C1 | |
| SAS/SATA cable routing | ||
|---|---|---|
Note Depending on your configuration, the adapter will be installed in top PCIe zone or bottom PCIe zone. Figure 58. SAS/SATA cable routing to top PCIe zone Figure 59. SAS/SATA cable routing to bottom PCIe zone | ||
| From | To | Cable |
| 1 BP1: SAS/SATA |
|
|
| 2 BP2: SAS/SATA |
|
|
| 3 BP3: SAS/SATA |
|
|
| 4 BP4: SAS/SATA |
|
|
Onboard NVMe + 3 x retimers + 2 x 8i RAID/HBA + 1 x 24i RAID/HBA
| NVMe cable routing | ||
|---|---|---|
Note Depending on your configuration, the adapter will be installed in top PCIe zone or bottom PCIe zone. Figure 60. NVMe cable routing to system board and top PCIe zone Figure 61. NVMe cable routing to system board and bottom PCIe zone | ||
| From | To | Cable |
| 1 BP1: NVMe 0-1 | Retimer: C0 | SlimSAS x8 to SlimSAS x8 pair (700 mm/700 mm) |
| 2 BP1: NVMe 2-3 | Retimer: C1 | |
| 3 BP1: NVMe 4-5 | PCIe 3 (onboard) | SlimSAS x8 to SlimSAS x8 pair (325 mm/160 mm) |
| 4 BP1: NVMe 6-7 | PCIe 4 (onboard) | |
| 5 BP2: NVMe 0-1 | Retimer: C0 | SlimSAS x8 to SlimSAS x8 pair (700 mm/700 mm) |
| 6 BP2: NVMe 2-3 | Retimer: C1 | |
| 7 BP2: NVMe 4-5 | Retimer: C0 | SlimSAS x8 to SlimSAS x8 pair (700 mm/700 mm) |
| 8 BP2: NVMe 6-7 | Retimer: C1 | |
| SAS/SATA cable routing | ||
|---|---|---|
Note Depending on your configuration, the adapter will be installed in top PCIe zone or bottom PCIe zone. Figure 62. SAS/SATA cable routing to top PCIe zone Figure 63. SAS/SATA cable routing to bottom PCIe zone | ||
| From | To | Cable |
| 1 BP1: SAS/SATA | 24i G3: C0, C1 | Gen 3: Mini-SAS x4*2 to SlimSAS x8 (640 mm) |
| 2 BP2: SAS/SATA | 24i G3: C2, C3 | Gen 3: Mini-SAS x4*2 to SlimSAS x8 (640 mm) |
| 3 BP3: SAS/SATA |
|
|
| 4 BP4: SAS/SATA |
|
|
Onboard NVMe + 3 x retimers + 2 x 16i RAID/HBA
| NVMe cable routing | ||
|---|---|---|
Note Depending on your configuration, the adapter will be installed in top PCIe zone or bottom PCIe zone. Figure 64. NVMe cable routing to system board and top PCIe zone Figure 65. NVMe cable routing to system board and bottom PCIe zone | ||
| From | To | Cable |
| 1 BP1: NVMe 0-1 | Retimer: C0 | SlimSAS x8 to SlimSAS x8 pair (700 mm/700 mm) |
| 2 BP1: NVMe 2-3 | Retimer: C1 | |
| 3 BP1: NVMe 4-5 | PCIe 3 (onboard) | SlimSAS x8 to SlimSAS x8 pair (325 mm/160 mm) |
| 4 BP1: NVMe 6-7 | PCIe 4 (onboard) | |
| 5 BP2: NVMe 0-1 | Retimer: C0 | SlimSAS x8 to SlimSAS x8 pair (700 mm/700 mm) |
| 6 BP2: NVMe 2-3 | Retimer: C1 | |
| 7 BP2: NVMe 4-5 | Retimer: C0 | SlimSAS x8 to SlimSAS x8 pair (700 mm/700 mm) |
| 8 BP2: NVMe 6-7 | Retimer: C1 | |
| SAS/SATA cable routing | ||
|---|---|---|
Note Depending on your configuration, the adapter will be installed in top PCIe zone or bottom PCIe zone. Figure 66. SAS/SATA cable routing to top PCIe zone Figure 67. SAS/SATA cable routing to bottom PCIe zone | ||
| From | To | Cable |
| 1 BP1: SAS/SATA |
|
|
| 2 BP2: SAS/SATA |
|
|
| 3 BP3: SAS/SATA |
|
|
| 4 BP4: SAS/SATA |
|
|
Onboard NVMe + 3 x retimers + 1 x 16i RAID/HBA + 1 x 24i RAID/HBA
| NVMe cable routing | ||
|---|---|---|
Note Depending on your configuration, the adapter will be installed in top PCIe zone or bottom PCIe zone. Figure 68. NVMe cable routing to system board and top PCIe zone Figure 69. NVMe cable routing to system board and bottom PCIe zone | ||
| From | To | Cable |
| 1 BP1: NVMe 0-1 | Retimer: C0 | SlimSAS x8 to SlimSAS x8 pair (700 mm/700 mm) |
| 2 BP1: NVMe 2-3 | Retimer: C1 | |
| 3 BP1: NVMe 4-5 | PCIe 3 (onboard) | SlimSAS x8 to SlimSAS x8 pair (325 mm/160 mm) |
| 4 BP1: NVMe 6-7 | PCIe 4 (onboard) | |
| 5 BP2: NVMe 0-1 | Retimer: C0 | SlimSAS x8 to SlimSAS x8 pair (700 mm/700 mm) |
| 6 BP2: NVMe 2-3 | Retimer: C1 | |
| 7 BP2: NVMe 4-5 | Retimer: C0 | SlimSAS x8 to SlimSAS x8 pair (700 mm/700 mm) |
| 8 BP2: NVMe 6-7 | Retimer: C1 | |
| SAS/SATA cable routing | ||
|---|---|---|
Note Depending on your configuration, the adapter will be installed in top PCIe zone or bottom PCIe zone. Figure 70. SAS/SATA cable routing to top PCIe zone Figure 71. SAS/SATA cable routing to bottom PCIe zone | ||
| From | To | Cable |
| 1 BP1: SAS/SATA | 24i G3: C0, C1 | Gen 3: Mini-SAS x4*2 to SlimSAS x8 (640 mm) |
| 2 BP2: SAS/SATA | 24i G3: C2, C3 | Gen 3: Mini-SAS x4*2 to SlimSAS x8 (640 mm) |
| 3 BP3: SAS/SATA |
|
|
| 4 BP4: SAS/SATA |
|
|
Onboard NVMe + 3 x retimers + 2 x 24i RAID/HBA
| NVMe cable routing | ||
|---|---|---|
Note Depending on your configuration, the adapter will be installed in top PCIe zone or bottom PCIe zone. Figure 72. NVMe cable routing to system board and top PCIe zone Figure 73. NVMe cable routing to system board and bottom PCIe zone | ||
| From | To | Cable |
| 1 BP1: NVMe 0-1 | Retimer: C0 | SlimSAS x8 to SlimSAS x8 pair (700 mm/700 mm) |
| 2 BP1: NVMe 2-3 | Retimer: C1 | |
| 3 BP1: NVMe 4-5 | PCIe 3 (onboard) | SlimSAS x8 to SlimSAS x8 pair (325 mm/160 mm) |
| 4 BP1: NVMe 6-7 | PCIe 4 (onboard) | |
| 5 BP2: NVMe 0-1 | Retimer: C0 | SlimSAS x8 to SlimSAS x8 pair (700 mm/700 mm) |
| 6 BP2: NVMe 2-3 | Retimer: C1 | |
| 7 BP2: NVMe 4-5 | Retimer: C0 | SlimSAS x8 to SlimSAS x8 pair (700 mm/700 mm) |
| 8 BP2: NVMe 6-7 | Retimer: C1 | |
| SAS/SATA cable routing | ||
|---|---|---|
Note Depending on your configuration, the adapter will be installed in top PCIe zone or bottom PCIe zone. Figure 74. SAS/SATA cable routing to top PCIe zone Figure 75. SAS/SATA cable routing to bottom PCIe zone | ||
| From | To | Cable |
| 1 BP1: SAS/SATA | 24i G3: C0, C1 | Gen 3: Mini-SAS x4*2 to SlimSAS x8 (640 mm) |
| 2 BP2: SAS/SATA | 24i G3: C2, C3 | Gen 3: Mini-SAS x4*2 to SlimSAS x8 (640 mm) |
| 3 BP3: SAS/SATA | 24i G3: C0, C1 | Gen 3: Mini-SAS x4*2 to SlimSAS x8 (930 mm) |
| 4 BP4: SAS/SATA | 24i G3: C2, C3 | Gen 3: Mini-SAS x4*2 to SlimSAS x8 (930 mm) |
Onboard NVMe + 3 x retimers + 1 x 32i RAID/HBA
| NVMe cable routing | ||
|---|---|---|
Note Depending on your configuration, the adapter will be installed in top PCIe zone or bottom PCIe zone. Figure 76. NVMe cable routing to system board and top PCIe zone Figure 77. NVMe cable routing to system board and bottom PCIe zone | ||
| From | To | Cable |
| 1 BP1: NVMe 0-1 | Retimer: C0 | SlimSAS x8 to SlimSAS x8 pair (700 mm/700 mm) |
| 2 BP1: NVMe 2-3 | Retimer: C1 | |
| 3 BP1: NVMe 4-5 | PCIe 3 (onboard) | SlimSAS x8 to SlimSAS x8 pair (325 mm/160 mm) |
| 4 BP1: NVMe 6-7 | PCIe 4 (onboard) | |
| 5 BP2: NVMe 0-1 | Retimer: C0 | SlimSAS x8 to SlimSAS x8 pair (700 mm/700 mm) |
| 6 BP2: NVMe 2-3 | Retimer: C1 | |
| 7 BP2: NVMe 4-5 | Retimer: C0 | SlimSAS x8 to SlimSAS x8 pair (700 mm/700 mm) |
| 8 BP2: NVMe 6-7 | Retimer: C1 | |
| SAS/SATA cable routing | ||
|---|---|---|
Figure 78. SAS/SATA cable routing to PCIe slot 9 | ||
| From | To | Cable |
| 1 BP1: SAS/SATA | 32i G4: C0 | SlimSAS x8 to SlimSAS x8 (720 mm) |
| 2 BP2: SAS/SATA | 32i G4: C1 | SlimSAS x8 to SlimSAS x8 (720 mm) |
| 3 BP3: SAS/SATA | 32i G4: C2 | SlimSAS x8 to SlimSAS x8 (720 mm) |
| 4 BP4: SAS/SATA | 32i G4: C3 | SlimSAS x8 to SlimSAS x8 (880 mm) |
Onboard SATA + 4 x retimers + 3 x 8i RAID/HBA
| NVMe cable routing | ||
|---|---|---|
Note Depending on your configuration, the adapter will be installed in top PCIe zone or bottom PCIe zone. Figure 79. NVMe cable routing to top PCIe zone 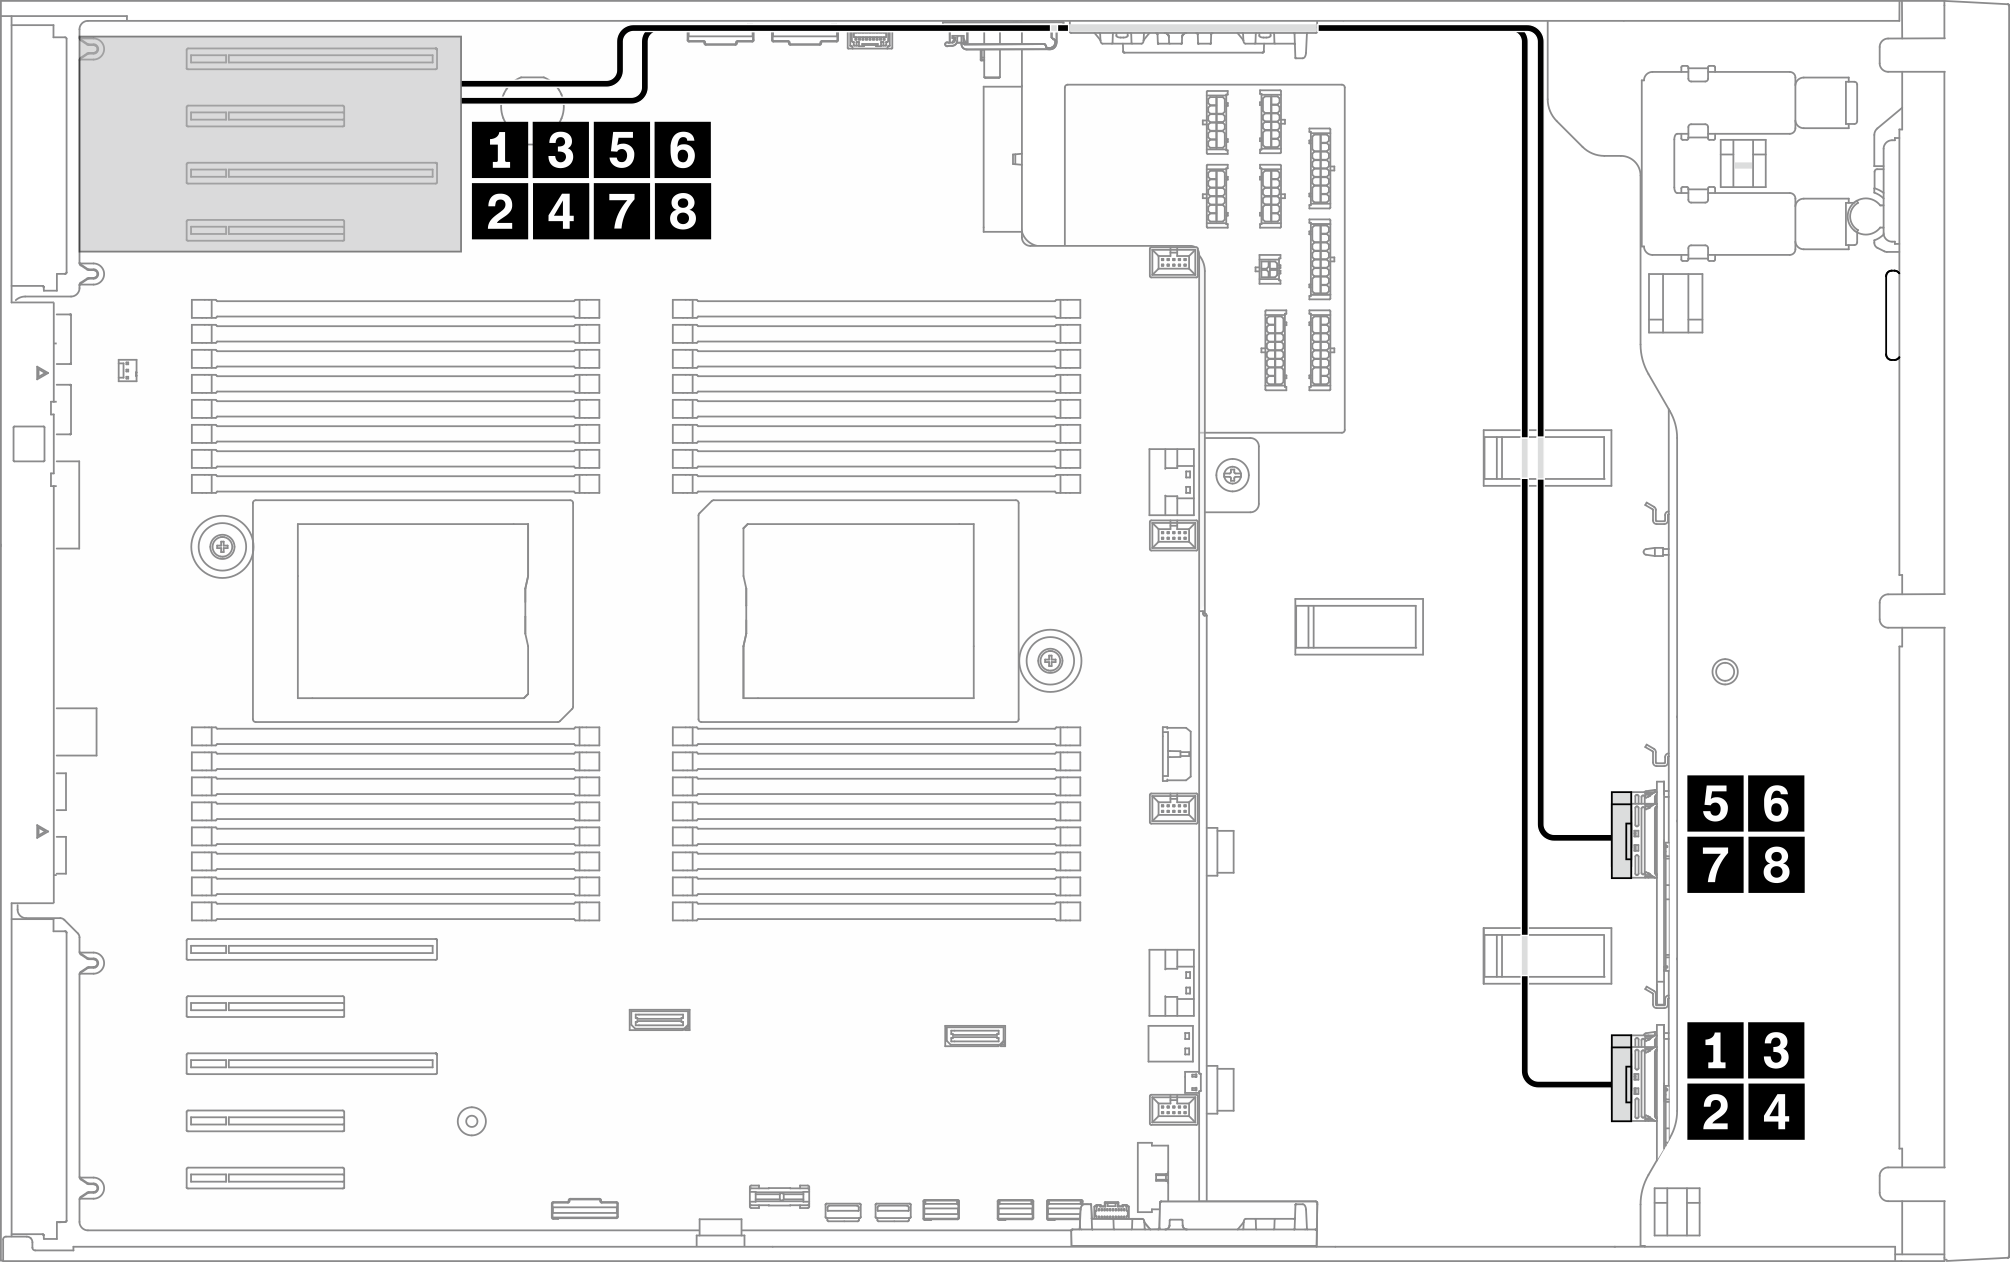 Figure 80. NVMe cable routing to bottom PCIe zone  | ||
| From | To | Cable |
| 1 BP1: NVMe 0-1 | Retimer: C0 | SlimSAS x8 to SlimSAS x8 pair (700 mm/700 mm) |
| 2 BP1: NVMe 2-3 | Retimer: C1 | |
| 3 BP1: NVMe 4-5 | Retimer: C0 | SlimSAS x8 to SlimSAS x8 pair (700 mm/700 mm) |
| 4 BP1: NVMe 6-7 | Retimer: C1 | |
| 5 BP2: NVMe 0-1 | Retimer: C0 | SlimSAS x8 to SlimSAS x8 pair (700 mm/700 mm) |
| 6 BP2: NVMe 2-3 | Retimer: C1 | |
| 7 BP2: NVMe 4-5 | Retimer: C0 | SlimSAS x8 to SlimSAS x8 pair (700 mm/700 mm) |
| 8 BP2: NVMe 6-7 | Retimer: C1 | |
| SAS/SATA cable routing | ||
|---|---|---|
Note Depending on your configuration, the adapter will be installed in top PCIe zone or bottom PCIe zone. Figure 81. SAS/SATA cable routing to system board and top PCIe zone Figure 82. SAS/SATA cable routing to system board and bottom PCIe zone | ||
| From | To | Cable |
| 1 BP1: SAS/SATA | SATA 0-3, 4-7 (onboard) | SlimSAS x4*2 to SlimSAS x8 (430 mm/430 mm) |
| 2 BP2: SAS/SATA |
|
|
| 3 BP3: SAS/SATA |
|
|
| 4 BP4: SAS/SATA |
|
|
Onboard SATA + 4 x retimers + 1 x 8i RAID/HBA + 1 x 16i RAID/HBA
| NVMe cable routing | ||
|---|---|---|
Note Depending on your configuration, the adapter will be installed in top PCIe zone or bottom PCIe zone. Figure 83. NVMe cable routing to top PCIe zone Figure 84. NVMe cable routing to bottom PCIe zone | ||
| From | To | Cable |
| 1 BP1: NVMe 0-1 | Retimer: C0 | SlimSAS x8 to SlimSAS x8 pair (700 mm/700 mm) |
| 2 BP1: NVMe 2-3 | Retimer: C1 | |
| 3 BP1: NVMe 4-5 | Retimer: C0 | SlimSAS x8 to SlimSAS x8 pair (700 mm/700 mm) |
| 4 BP1: NVMe 6-7 | Retimer: C1 | |
| 5 BP2: NVMe 0-1 | Retimer: C0 | SlimSAS x8 to SlimSAS x8 pair (700 mm/700 mm) |
| 6 BP2: NVMe 2-3 | Retimer: C1 | |
| 7 BP2: NVMe 4-5 | Retimer: C0 | SlimSAS x8 to SlimSAS x8 pair (700 mm/700 mm) |
| 8 BP2: NVMe 6-7 | Retimer: C1 | |
| SAS/SATA cable routing | ||
|---|---|---|
Note Depending on your configuration, the adapter will be installed in top PCIe zone or bottom PCIe zone. Figure 85. SAS/SATA cable routing to system board and top PCIe zone Figure 86. SAS/SATA cable routing to system board and bottom PCIe zone | ||
| From | To | Cable |
| 1 BP1: SAS/SATA | SATA 0-3, 4-7 (onboard) | SlimSAS x4*2 to SlimSAS x8 (430 mm/430 mm) |
| 2 BP2: SAS/SATA |
|
|
| 3 BP3: SAS/SATA |
|
|
| 4 BP4: SAS/SATA |
|
|
Onboard SATA + 4 x retimers + 1 x 8i RAID/HBA + 1 x 24i RAID/HBA
| NVMe cable routing | ||
|---|---|---|
Note Depending on your configuration, the adapter will be installed in top PCIe zone or bottom PCIe zone. Figure 87. NVMe cable routing to top PCIe zone Figure 88. NVMe cable routing to bottom PCIe zone | ||
| From | To | Cable |
| 1 BP1: NVMe 0-1 | Retimer: C0 | SlimSAS x8 to SlimSAS x8 pair (700 mm/700 mm) |
| 2 BP1: NVMe 2-3 | Retimer: C1 | |
| 3 BP1: NVMe 4-5 | Retimer: C0 | SlimSAS x8 to SlimSAS x8 pair (700 mm/700 mm) |
| 4 BP1: NVMe 6-7 | Retimer: C1 | |
| 5 BP2: NVMe 0-1 | Retimer: C0 | SlimSAS x8 to SlimSAS x8 pair (700 mm/700 mm) |
| 6 BP2: NVMe 2-3 | Retimer: C1 | |
| 7 BP2: NVMe 4-5 | Retimer: C0 | SlimSAS x8 to SlimSAS x8 pair (700 mm/700 mm) |
| 8 BP2: NVMe 6-7 | Retimer: C1 | |
| SAS/SATA cable routing | ||
|---|---|---|
Note Depending on your configuration, the adapter will be installed in top PCIe zone or bottom PCIe zone. Figure 89. SAS/SATA cable routing to system board and top PCIe zone Figure 90. SAS/SATA cable routing to system board and bottom PCIe zone | ||
| From | To | Cable |
| 1 BP1: SAS/SATA | SATA 0-3, 4-7 (onboard) | SlimSAS x4*2 to SlimSAS x8 (430 mm/430 mm) |
| 2 BP2: SAS/SATA | 24i G3: C0, C1 | Gen 3: Mini-SAS x4*2 to SlimSAS x8 (640 mm) |
| 3 BP3: SAS/SATA | 24i G3: C2, C3 | Gen 3: Mini-SAS x4*2 to SlimSAS x8 (930 mm) |
| 4 BP4: SAS/SATA |
|
|
4 x retimers + 4 x 8i RAID/HBA
| NVMe cable routing | ||
|---|---|---|
Note Depending on your configuration, the adapter will be installed in top PCIe zone or bottom PCIe zone. Figure 91. NVMe cable routing to top PCIe zone Figure 92. NVMe cable routing to bottom PCIe zone | ||
| From | To | Cable |
| 1 BP1: NVMe 0-1 | Retimer: C0 | SlimSAS x8 to SlimSAS x8 pair (700 mm/700 mm) |
| 2 BP1: NVMe 2-3 | Retimer: C1 | |
| 3 BP1: NVMe 4-5 | Retimer: C0 | SlimSAS x8 to SlimSAS x8 pair (700 mm/700 mm) |
| 4 BP1: NVMe 6-7 | Retimer: C1 | |
| 5 BP2: NVMe 0-1 | Retimer: C0 | SlimSAS x8 to SlimSAS x8 pair (700 mm/700 mm) |
| 6 BP2: NVMe 2-3 | Retimer: C1 | |
| 7 BP2: NVMe 4-5 | Retimer: C0 | SlimSAS x8 to SlimSAS x8 pair (700 mm/700 mm) |
| 8 BP2: NVMe 6-7 | Retimer: C1 | |
| SAS/SATA cable routing | ||
|---|---|---|
Note Depending on your configuration, the adapter will be installed in top PCIe zone or bottom PCIe zone. Figure 93. SAS/SATA cable routing to top PCIe zone Figure 94. SAS/SATA cable routing to bottom PCIe zone | ||
| From | To | Cable |
| 1 BP1: SAS/SATA |
|
|
| 2 BP2: SAS/SATA |
|
|
| 3 BP3: SAS/SATA |
|
|
| 4 BP4: SAS/SATA |
|
|
4 x retimers + 2 x 8i RAID/HBA + 1 x 16i RAID/HBA
| NVMe cable routing | ||
|---|---|---|
Note Depending on your configuration, the adapter will be installed in top PCIe zone or bottom PCIe zone. Figure 95. NVMe cable routing to top PCIe zone Figure 96. NVMe cable routing to bottom PCIe zone | ||
| From | To | Cable |
| 1 BP1: NVMe 0-1 | Retimer: C0 | SlimSAS x8 to SlimSAS x8 pair (700 mm/700 mm) |
| 2 BP1: NVMe 2-3 | Retimer: C1 | |
| 3 BP1: NVMe 4-5 | Retimer: C0 | SlimSAS x8 to SlimSAS x8 pair (700 mm/700 mm) |
| 4 BP1: NVMe 6-7 | Retimer: C1 | |
| 5 BP2: NVMe 0-1 | Retimer: C0 | SlimSAS x8 to SlimSAS x8 pair (700 mm/700 mm) |
| 6 BP2: NVMe 2-3 | Retimer: C1 | |
| 7 BP2: NVMe 4-5 | Retimer: C0 | SlimSAS x8 to SlimSAS x8 pair (700 mm/700 mm) |
| 8 BP2: NVMe 6-7 | Retimer: C1 | |
| SAS/SATA cable routing | ||
|---|---|---|
Note Depending on your configuration, the adapter will be installed in top PCIe zone or bottom PCIe zone. Figure 97. SAS/SATA cable routing to top PCIe zone Figure 98. SAS/SATA cable routing to bottom PCIe zone | ||
| From | To | Cable |
| 1 BP1: SAS/SATA |
|
|
| 2 BP2: SAS/SATA |
|
|
| 3 BP3: SAS/SATA |
|
|
| 4 BP4: SAS/SATA |
|
|
4 x retimers + 2 x 8i RAID/HBA + 1 x 24i RAID/HBA
| NVMe cable routing | ||
|---|---|---|
Note Depending on your configuration, the adapter will be installed in top PCIe zone or bottom PCIe zone. Figure 99. NVMe cable routing to top PCIe zone Figure 100. NVMe cable routing to bottom PCIe zone | ||
| From | To | Cable |
| 1 BP1: NVMe 0-1 | Retimer: C0 | SlimSAS x8 to SlimSAS x8 pair (700 mm/700 mm) |
| 2 BP1: NVMe 2-3 | Retimer: C1 | |
| 3 BP1: NVMe 4-5 | Retimer: C0 | SlimSAS x8 to SlimSAS x8 pair (700 mm/700 mm) |
| 4 BP1: NVMe 6-7 | Retimer: C1 | |
| 5 BP2: NVMe 0-1 | Retimer: C0 | SlimSAS x8 to SlimSAS x8 pair (700 mm/700 mm) |
| 6 BP2: NVMe 2-3 | Retimer: C1 | |
| 7 BP2: NVMe 4-5 | Retimer: C0 | SlimSAS x8 to SlimSAS x8 pair (700 mm/700 mm) |
| 8 BP2: NVMe 6-7 | Retimer: C1 | |
| SAS/SATA cable routing | ||
|---|---|---|
Note Depending on your configuration, the adapter will be installed in top PCIe zone or bottom PCIe zone. Figure 101. SAS/SATA cable routing to top PCIe zone Figure 102. SAS/SATA cable routing to bottom PCIe zone | ||
| From | To | Cable |
| 1 BP1: SAS/SATA | 24i G3: C0, C1 | Gen 3: Mini-SAS x4*2 to SlimSAS x8 (640 mm) |
| 2 BP2: SAS/SATA | 24i G3: C2, C3 | Gen 3: Mini-SAS x4*2 to SlimSAS x8 (640 mm) |
| 3 BP3: SAS/SATA |
|
|
| 4 BP4: SAS/SATA |
|
|
4 x retimers + 2 x 16i RAID/HBA
| NVMe cable routing | ||
|---|---|---|
Note Depending on your configuration, the adapter will be installed in top PCIe zone or bottom PCIe zone. Figure 103. NVMe cable routing to top PCIe zone Figure 104. NVMe cable routing to bottom PCIe zone | ||
| From | To | Cable |
| 1 BP1: NVMe 0-1 | Retimer: C0 | SlimSAS x8 to SlimSAS x8 pair (700 mm/700 mm) |
| 2 BP1: NVMe 2-3 | Retimer: C1 | |
| 3 BP1: NVMe 4-5 | Retimer: C0 | SlimSAS x8 to SlimSAS x8 pair (700 mm/700 mm) |
| 4 BP1: NVMe 6-7 | Retimer: C1 | |
| 5 BP2: NVMe 0-1 | Retimer: C0 | SlimSAS x8 to SlimSAS x8 pair (700 mm/700 mm) |
| 6 BP2: NVMe 2-3 | Retimer: C1 | |
| 7 BP2: NVMe 4-5 | Retimer: C0 | SlimSAS x8 to SlimSAS x8 pair (700 mm/700 mm) |
| 8 BP2: NVMe 6-7 | Retimer: C1 | |
| SAS/SATA cable routing | ||
|---|---|---|
Note Depending on your configuration, the adapter will be installed in top PCIe zone or bottom PCIe zone. Figure 105. SAS/SATA cable routing to top PCIe zone Figure 106. SAS/SATA cable routing to bottom PCIe zone | ||
| From | To | Cable |
| 1 BP1: SAS/SATA |
|
|
| 2 BP2: SAS/SATA |
|
|
| 3 BP3: SAS/SATA |
|
|
| 4 BP4: SAS/SATA |
|
|
4 x retimers + 1 x 16i RAID/HBA + 1 x 24i RAID/HBA
| NVMe cable routing | ||
|---|---|---|
Note Depending on your configuration, the adapter will be installed in top PCIe zone or bottom PCIe zone. Figure 107. NVMe cable routing to top PCIe zone Figure 108. NVMe cable routing to bottom PCIe zone | ||
| From | To | Cable |
| 1 BP1: NVMe 0-1 | Retimer: C0 | SlimSAS x8 to SlimSAS x8 pair (700 mm/700 mm) |
| 2 BP1: NVMe 2-3 | Retimer: C1 | |
| 3 BP1: NVMe 4-5 | Retimer: C0 | SlimSAS x8 to SlimSAS x8 pair (700 mm/700 mm) |
| 4 BP1: NVMe 6-7 | Retimer: C1 | |
| 5 BP2: NVMe 0-1 | Retimer: C0 | SlimSAS x8 to SlimSAS x8 pair (700 mm/700 mm) |
| 6 BP2: NVMe 2-3 | Retimer: C1 | |
| 7 BP2: NVMe 4-5 | Retimer: C0 | SlimSAS x8 to SlimSAS x8 pair (700 mm/700 mm) |
| 8 BP2: NVMe 6-7 | Retimer: C1 | |
| SAS/SATA cable routing | ||
|---|---|---|
Note Depending on your configuration, the adapter will be installed in top PCIe zone or bottom PCIe zone. Figure 109. SAS/SATA cable routing to top PCIe zone Figure 110. SAS/SATA cable routing to bottom PCIe zone | ||
| From | To | Cable |
| 1 BP1: SAS/SATA | 24i G3: C0, C1 | Gen 3: Mini-SAS x4*2 to SlimSAS x8 (640 mm) |
| 2 BP2: SAS/SATA | 24i G3: C2, C3 | Gen 3: Mini-SAS x4*2 to SlimSAS x8 (640 mm) |
| 3 BP3: SAS/SATA |
|
|
| 4 BP4: SAS/SATA |
|
|
4 x retimers + 2 x 24i RAID/HBA
| NVMe cable routing | ||
|---|---|---|
Note Depending on your configuration, the adapter will be installed in top PCIe zone or bottom PCIe zone. Figure 111. NVMe cable routing to top PCIe zone Figure 112. NVMe cable routing to bottom PCIe zone | ||
| From | To | Cable |
| 1 BP1: NVMe 0-1 | Retimer: C0 | SlimSAS x8 to SlimSAS x8 pair (700 mm/700 mm) |
| 2 BP1: NVMe 2-3 | Retimer: C1 | |
| 3 BP1: NVMe 4-5 | Retimer: C0 | SlimSAS x8 to SlimSAS x8 pair (700 mm/700 mm) |
| 4 BP1: NVMe 6-7 | Retimer: C1 | |
| 5 BP2: NVMe 0-1 | Retimer: C0 | SlimSAS x8 to SlimSAS x8 pair (700 mm/700 mm) |
| 6 BP2: NVMe 2-3 | Retimer: C1 | |
| 7 BP2: NVMe 4-5 | Retimer: C0 | SlimSAS x8 to SlimSAS x8 pair (700 mm/700 mm) |
| 8 BP2: NVMe 6-7 | Retimer: C1 | |
| SAS/SATA cable routing | ||
|---|---|---|
Note Depending on your configuration, the adapter will be installed in top PCIe zone or bottom PCIe zone. Figure 113. SAS/SATA cable routing to top PCIe zone Figure 114. SAS/SATA cable routing to bottom PCIe zone | ||
| From | To | Cable |
| 1 BP1: SAS/SATA | 24i G3: C0, C1 | Gen 3: Mini-SAS x4*2 to SlimSAS x8 (640 mm) |
| 2 BP2: SAS/SATA | 24i G3: C2, C3 | Gen 3: Mini-SAS x4*2 to SlimSAS x8 (640 mm) |
| 3 BP3: SAS/SATA | 24i G3: C0, C1 | Gen 3: Mini-SAS x4*2 to SlimSAS x8 (930 mm) |
| 4 BP4: SAS/SATA | 24i G3: C2, C3 | Gen 3: Mini-SAS x4*2 to SlimSAS x8 (930 mm) |
4 x retimers + 1 x 32i RAID/HBA
| NVMe cable routing | ||
|---|---|---|
Note Depending on your configuration, the adapter will be installed in top PCIe zone or bottom PCIe zone. Figure 115. NVMe cable routing to top PCIe zone Figure 116. NVMe cable routing to bottom PCIe zone | ||
| From | To | Cable |
| 1 BP1: NVMe 0-1 | Retimer: C0 | SlimSAS x8 to SlimSAS x8 pair (700 mm/700 mm) |
| 2 BP1: NVMe 2-3 | Retimer: C1 | |
| 3 BP1: NVMe 4-5 | Retimer: C0 | SlimSAS x8 to SlimSAS x8 pair (700 mm/700 mm) |
| 4 BP1: NVMe 6-7 | Retimer: C1 | |
| 5 BP2: NVMe 0-1 | Retimer: C0 | SlimSAS x8 to SlimSAS x8 pair (700 mm/700 mm) |
| 6 BP2: NVMe 2-3 | Retimer: C1 | |
| 7 BP2: NVMe 4-5 | Retimer: C0 | SlimSAS x8 to SlimSAS x8 pair (700 mm/700 mm) |
| 8 BP2: NVMe 6-7 | Retimer: C1 | |
| SAS/SATA cable routing | ||
|---|---|---|
Figure 117. SAS/SATA cable routing to PCIe slot 9 | ||
| From | To | Cable |
| 1 BP1: SAS/SATA | 32i G4: C0 | SlimSAS x8 to SlimSAS x8 (720 mm) |
| 2 BP2: SAS/SATA | 32i G4: C1 | SlimSAS x8 to SlimSAS x8 (720 mm) |
| 3 BP3: SAS/SATA | 32i G4: C2 | SlimSAS x8 to SlimSAS x8 (720 mm) |
| 4 BP4: SAS/SATA | 32i G4: C3 | SlimSAS x8 to SlimSAS x8 (880 mm) |