2 x SAS/SATA + 2 x NVMe backplanes
This section lists the required components for server models with 2 x SAS/SATA + 2 x NVMe 2.5-inch hot-swap backplanes.
Connections between connectors; 1↔1, 2↔2, 3↔3, ... n↔n
When routing the cables, ensure that all cables are routed appropriately through the cable guides and cable clips.
Y-cables are shown as individual cables in the illustrations for each backplane.
Connect cables prioritizing Gen 4 RAID adapters.
For more information on the cables that are used, see Backplane cable list.
Onboard NVMe/SATA + 2 x retimers + 1 x 8i RAID/HBA
| NVMe cable routing | ||
|---|---|---|
Note Depending on your configuration, the adapter will be installed in top PCIe zone or bottom PCIe zone. Figure 1. NVMe cable routing to system board and top PCIe zone 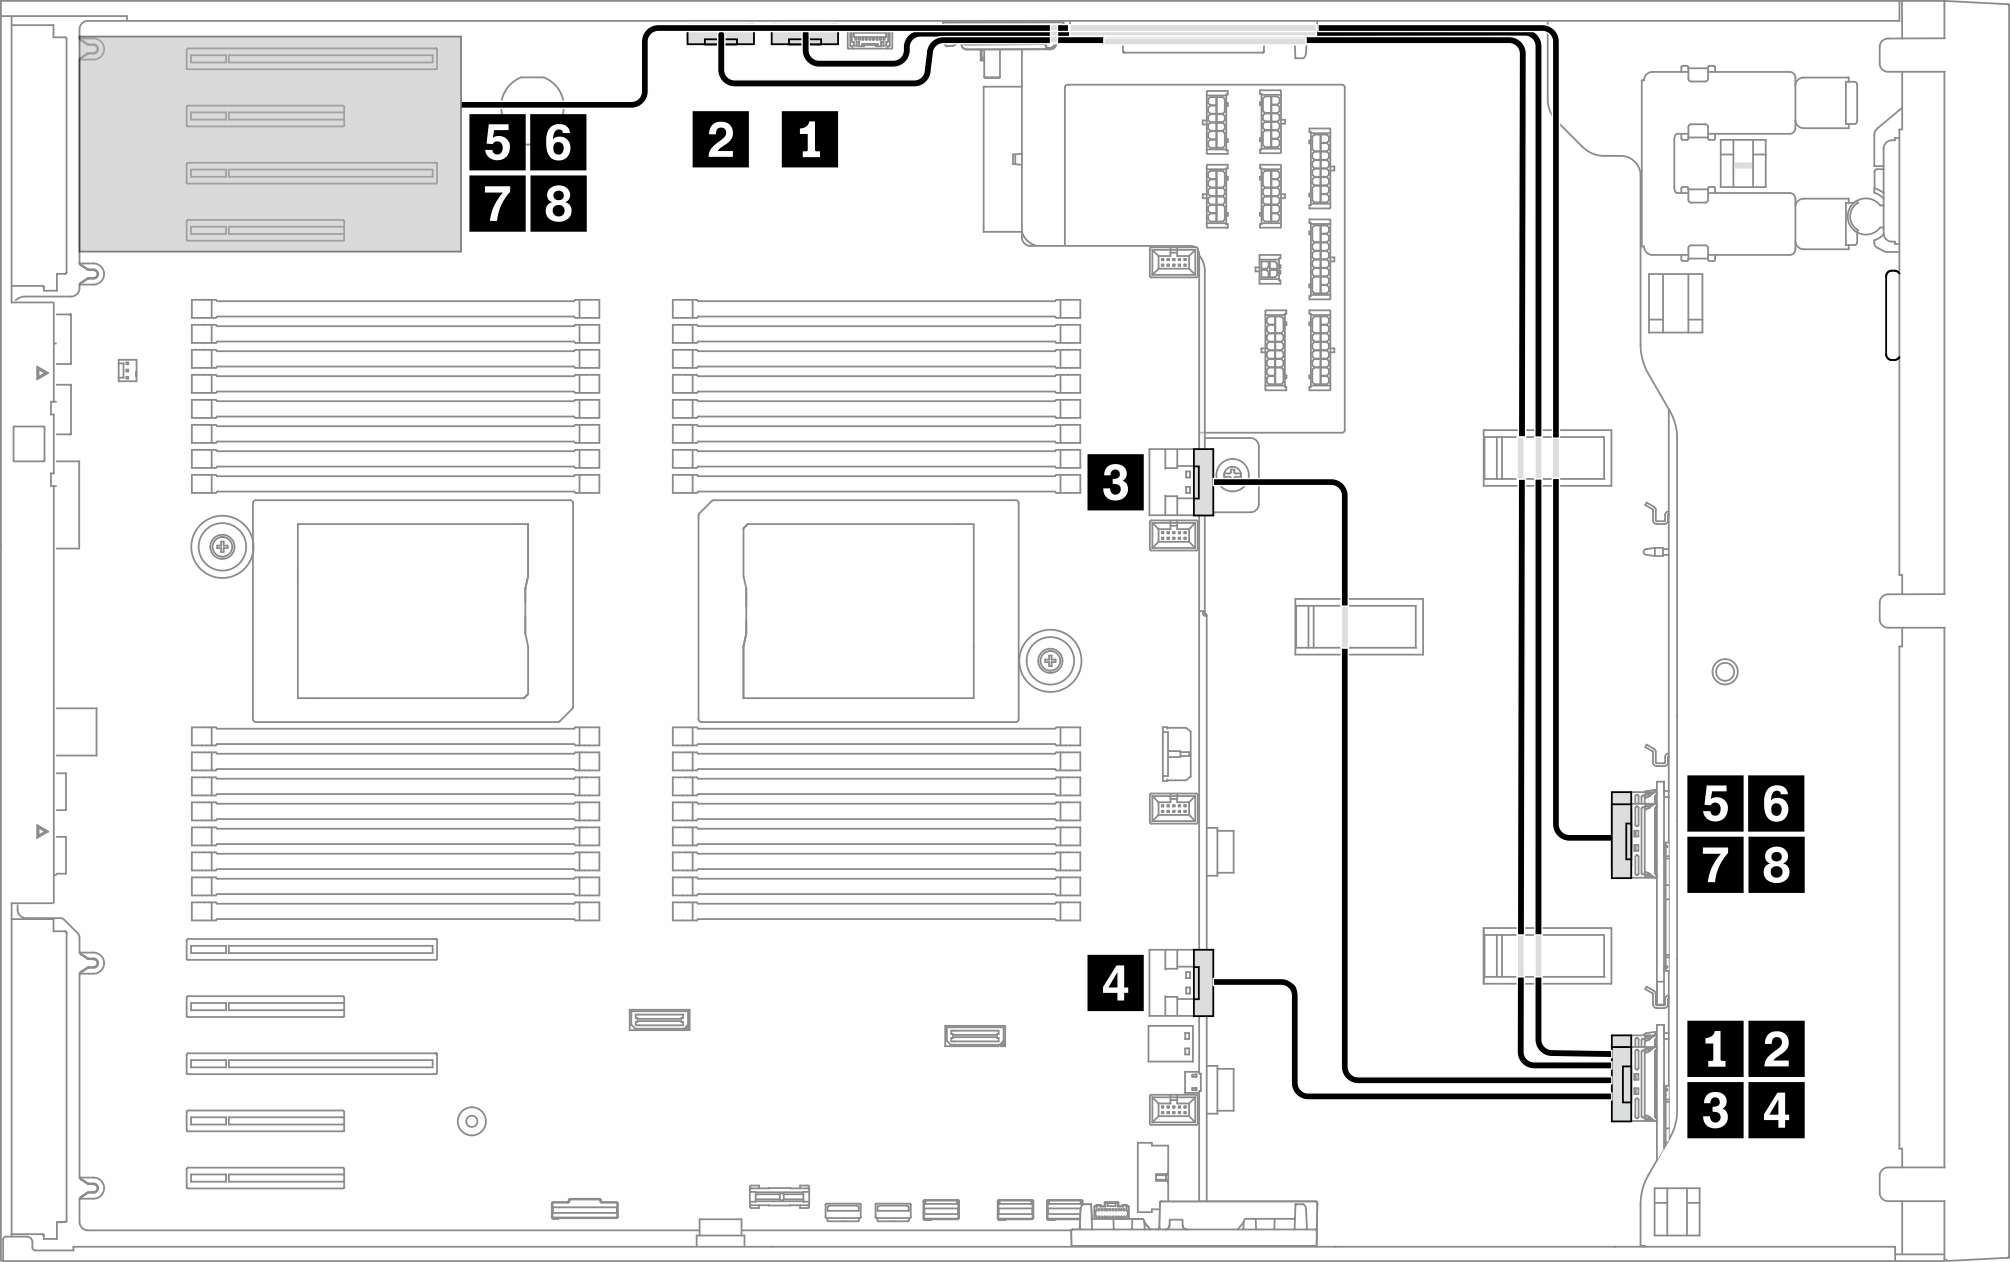 Figure 2. NVMe cable routing to system board and bottom PCIe zone 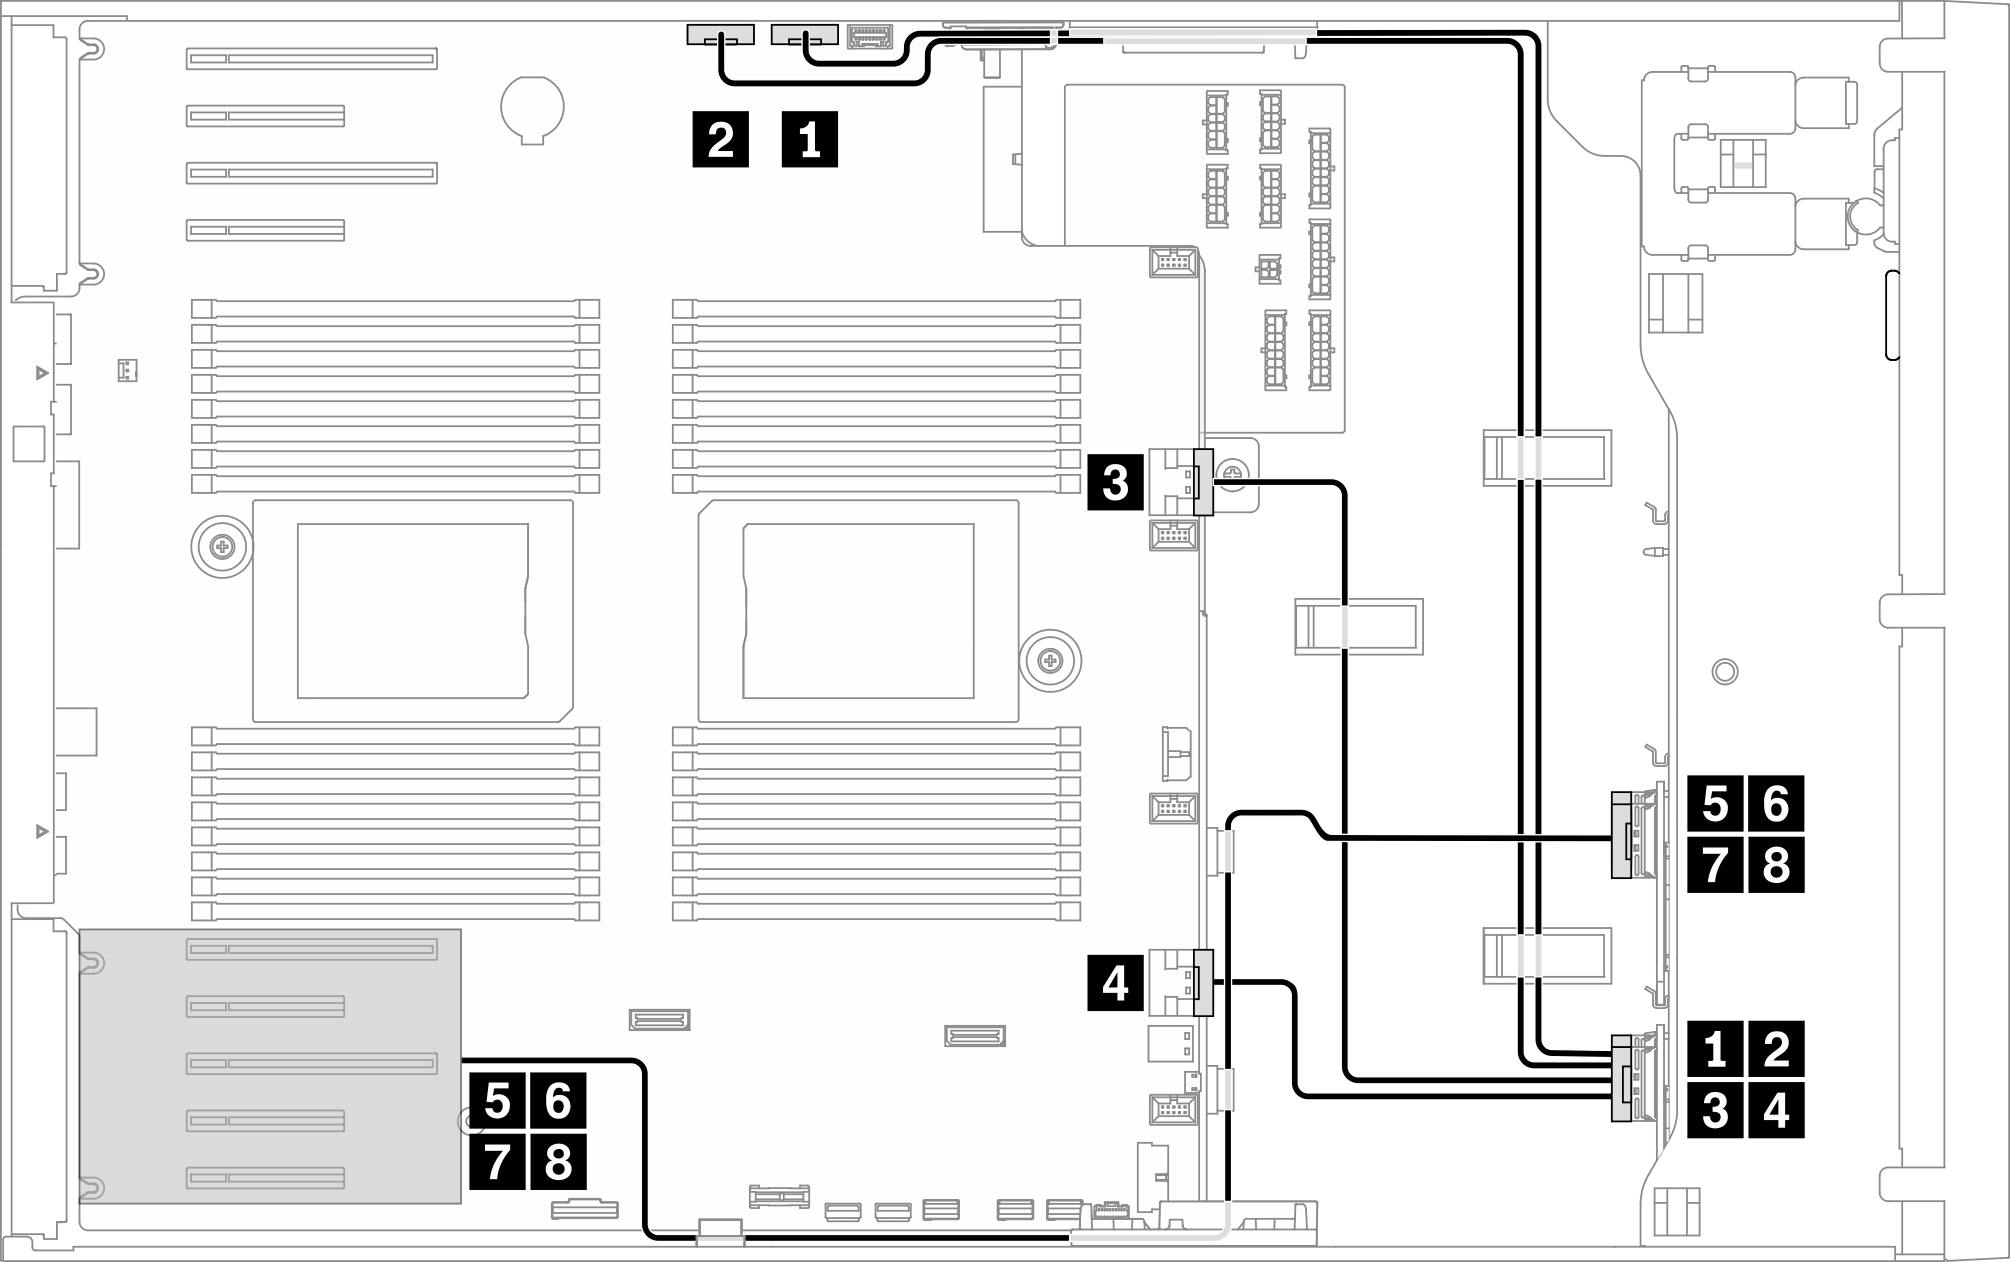 | ||
| From | To | Cable |
| 1 BP1: NVMe 0-1 | PCIe 1 (onboard) | SlimSAS x8 to SlimSAS x8 pair (820 mm/780 mm) |
| 2 BP1: NVMe 2-3 | PCIe 2 (onboard) | |
| 3 BP1: NVMe 4-5 | PCIe 3 (onboard) | SlimSAS x8 to SlimSAS x8 pair (325 mm/160 mm) |
| 4 BP1: NVMe 6-7 | PCIe 4 (onboard) | |
| 5 BP2: NVMe 0-1 | Retimer: C0 | SlimSAS x8 to SlimSAS x8 pair (700 mm/700 mm) |
| 6 BP2: NVMe 2-3 | Retimer: C1 | |
| 7 BP2: NVMe 4-5 | Retimer: C0 | SlimSAS x8 to SlimSAS x8 pair (700 mm/700 mm) |
| 8 BP2: NVMe 6-7 | Retimer: C1 | |
| SAS/SATA cable routing | ||
|---|---|---|
Figure 3. SAS/SATA cable routing to system board and PCIe slot 9 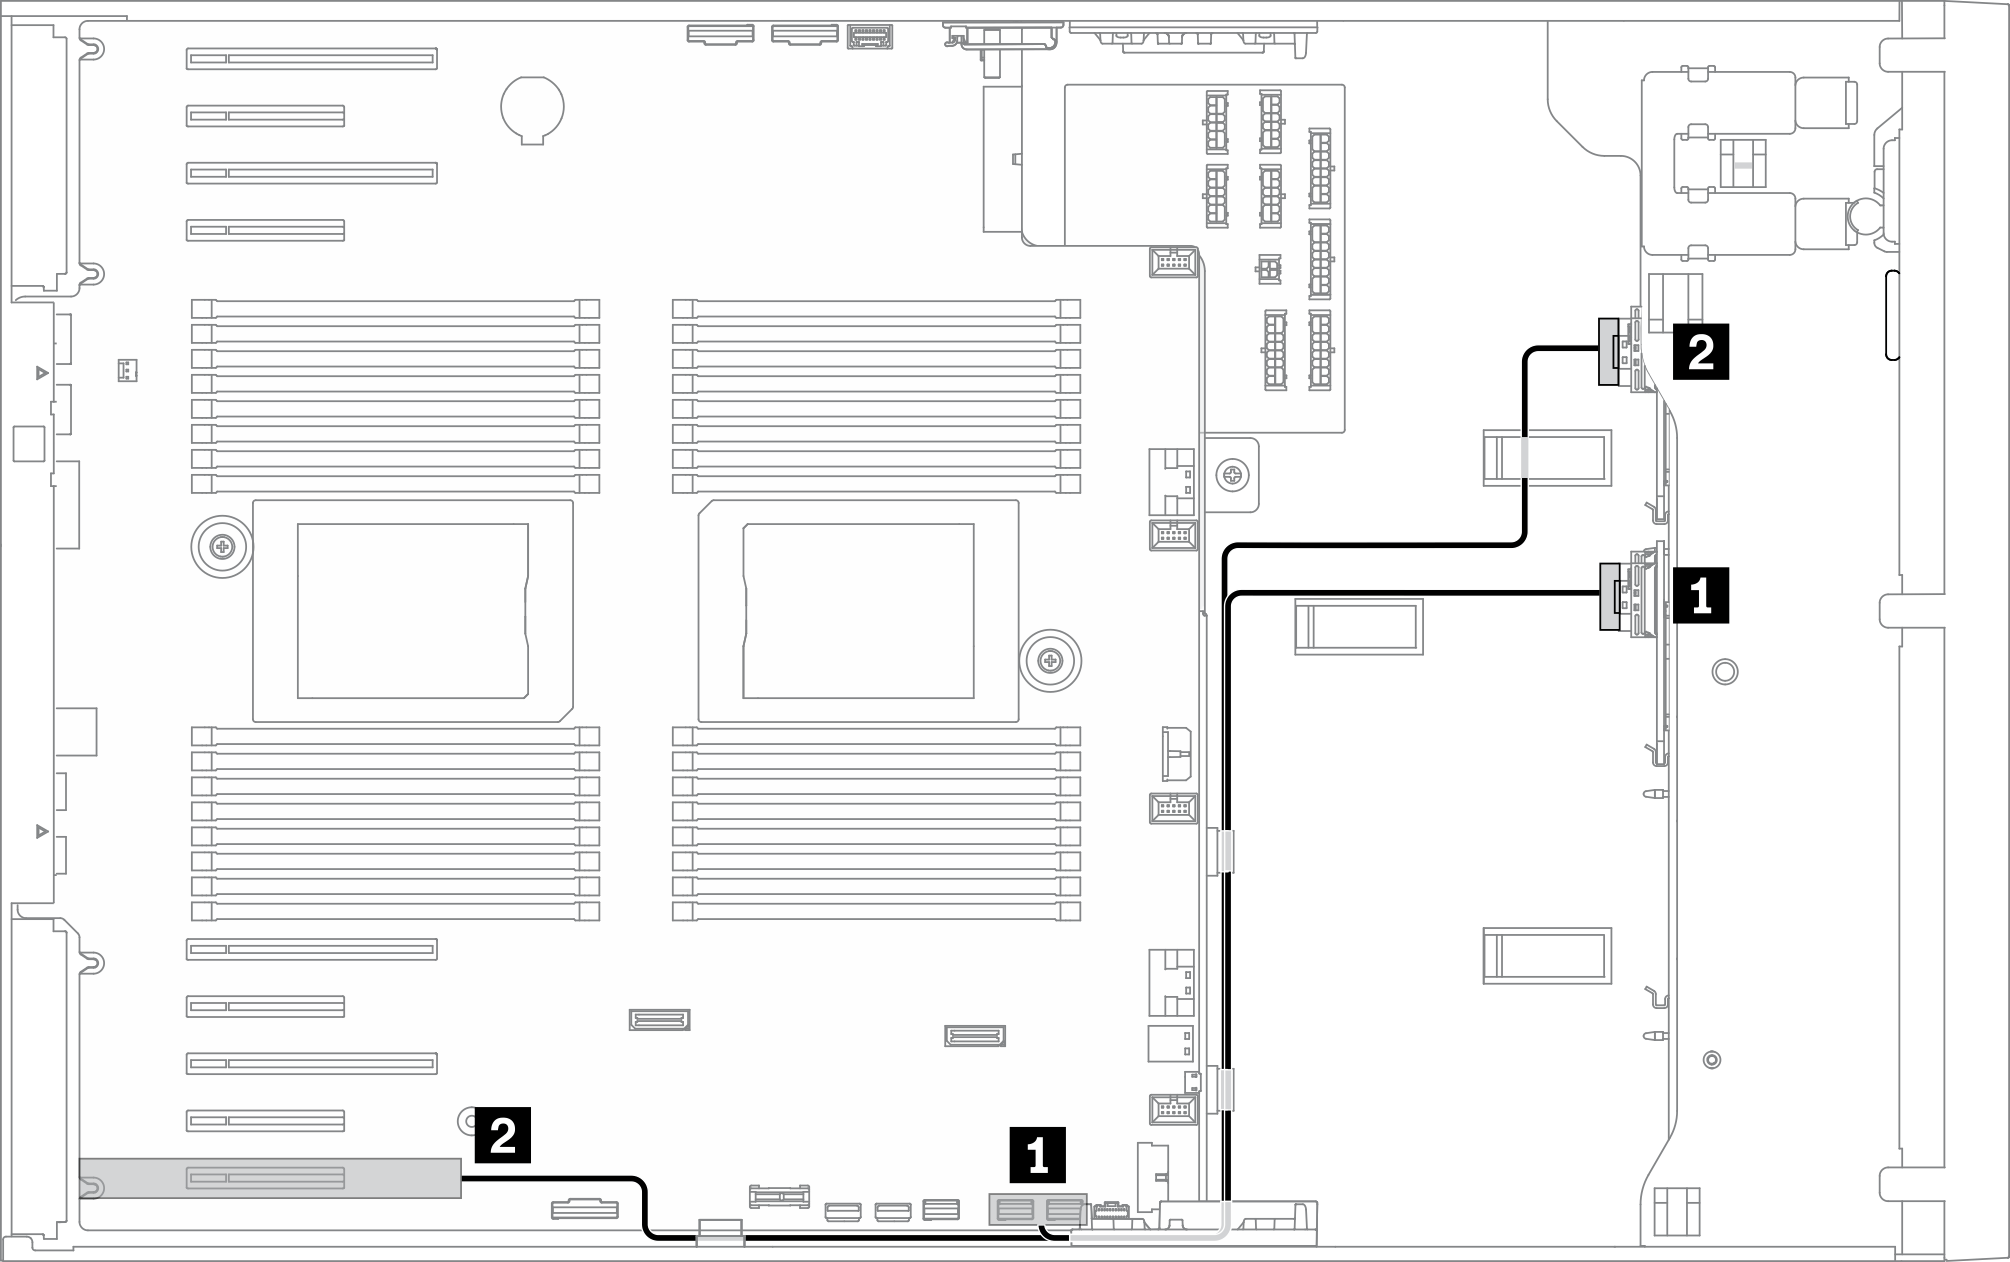 | ||
| From | To | Cable |
| 1 BP3: SAS/SATA | SATA 0-3, 4-7 (onboard) | SlimSAS x4*2 to SlimSAS x8 (430 mm/430 mm) |
| 2 BP4: SAS/SATA |
|
|
Onboard NVMe + 2 x retimers + 2 x 8i RAID/HBA
| NVMe cable routing | ||
|---|---|---|
Note Depending on your configuration, the adapter will be installed in top PCIe zone or bottom PCIe zone. Figure 4. NVMe cable routing to system board and top PCIe zone Figure 5. NVMe cable routing to system board and bottom PCIe zone | ||
| From | To | Cable |
| 1 BP1: NVMe 0-1 | PCIe 1 (onboard) | SlimSAS x8 to SlimSAS x8 pair (820 mm/780 mm) |
| 2 BP1: NVMe 2-3 | PCIe 2 (onboard) | |
| 3 BP1: NVMe 4-5 | PCIe 3 (onboard) | SlimSAS x8 to SlimSAS x8 pair (325 mm/160 mm) |
| 4 BP1: NVMe 6-7 | PCIe 4 (onboard) | |
| 5 BP2: NVMe 0-1 | Retimer: C0 | SlimSAS x8 to SlimSAS x8 pair (700 mm/700 mm) |
| 6 BP2: NVMe 2-3 | Retimer: C1 | |
| 7 BP2: NVMe 4-5 | Retimer: C0 | SlimSAS x8 to SlimSAS x8 pair (700 mm/700 mm) |
| 8 BP2: NVMe 6-7 | Retimer: C1 | |
| SAS/SATA cable routing | ||
|---|---|---|
Note Depending on your configuration, the adapter will be installed in top PCIe zone or bottom PCIe zone. Figure 6. SAS/SATA cable routing to top PCIe zone 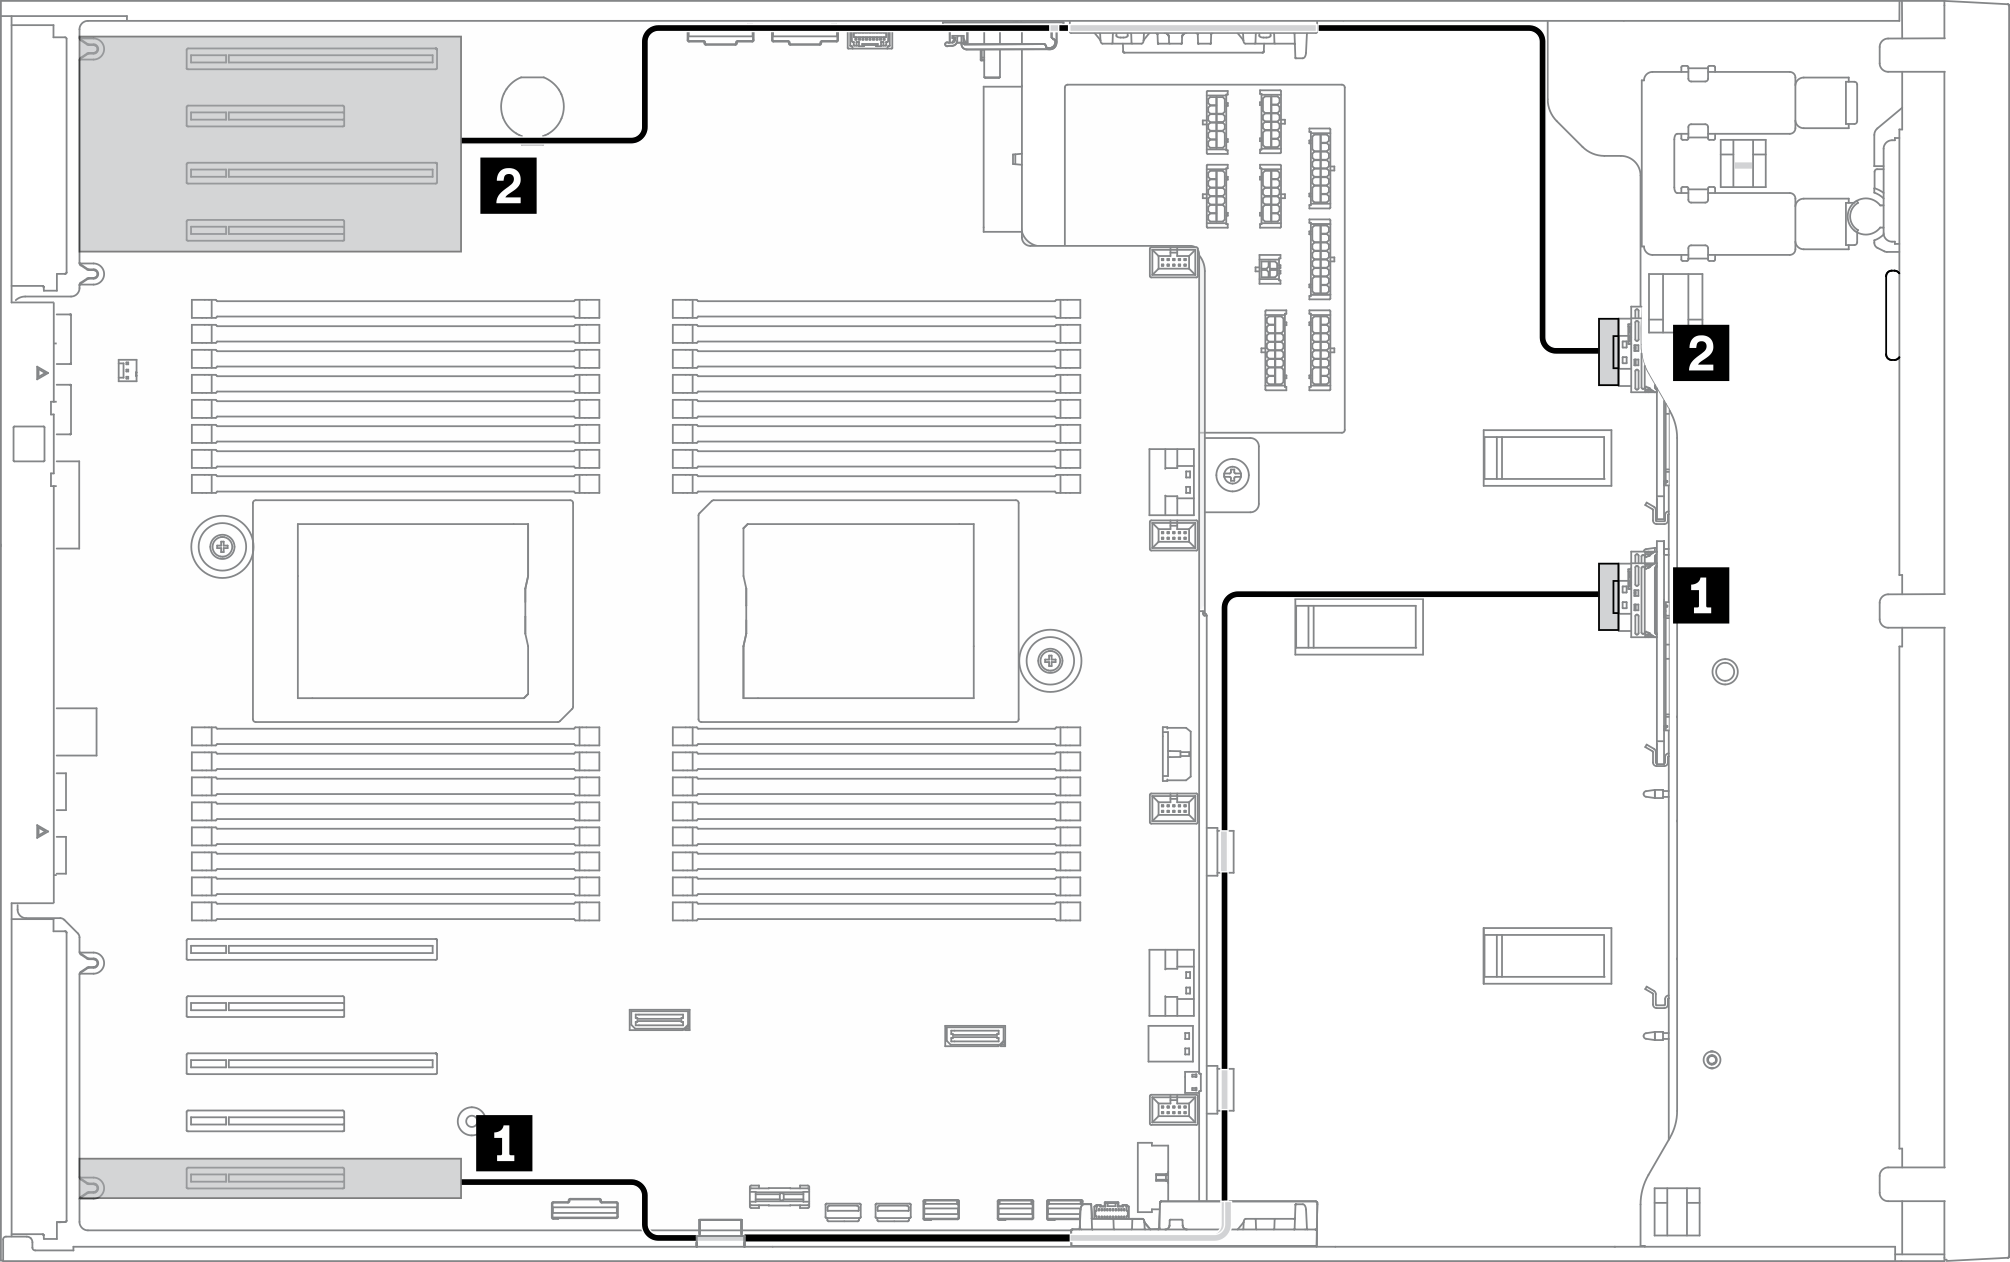 Figure 7. SAS/SATA cable routing to bottom PCIe zone 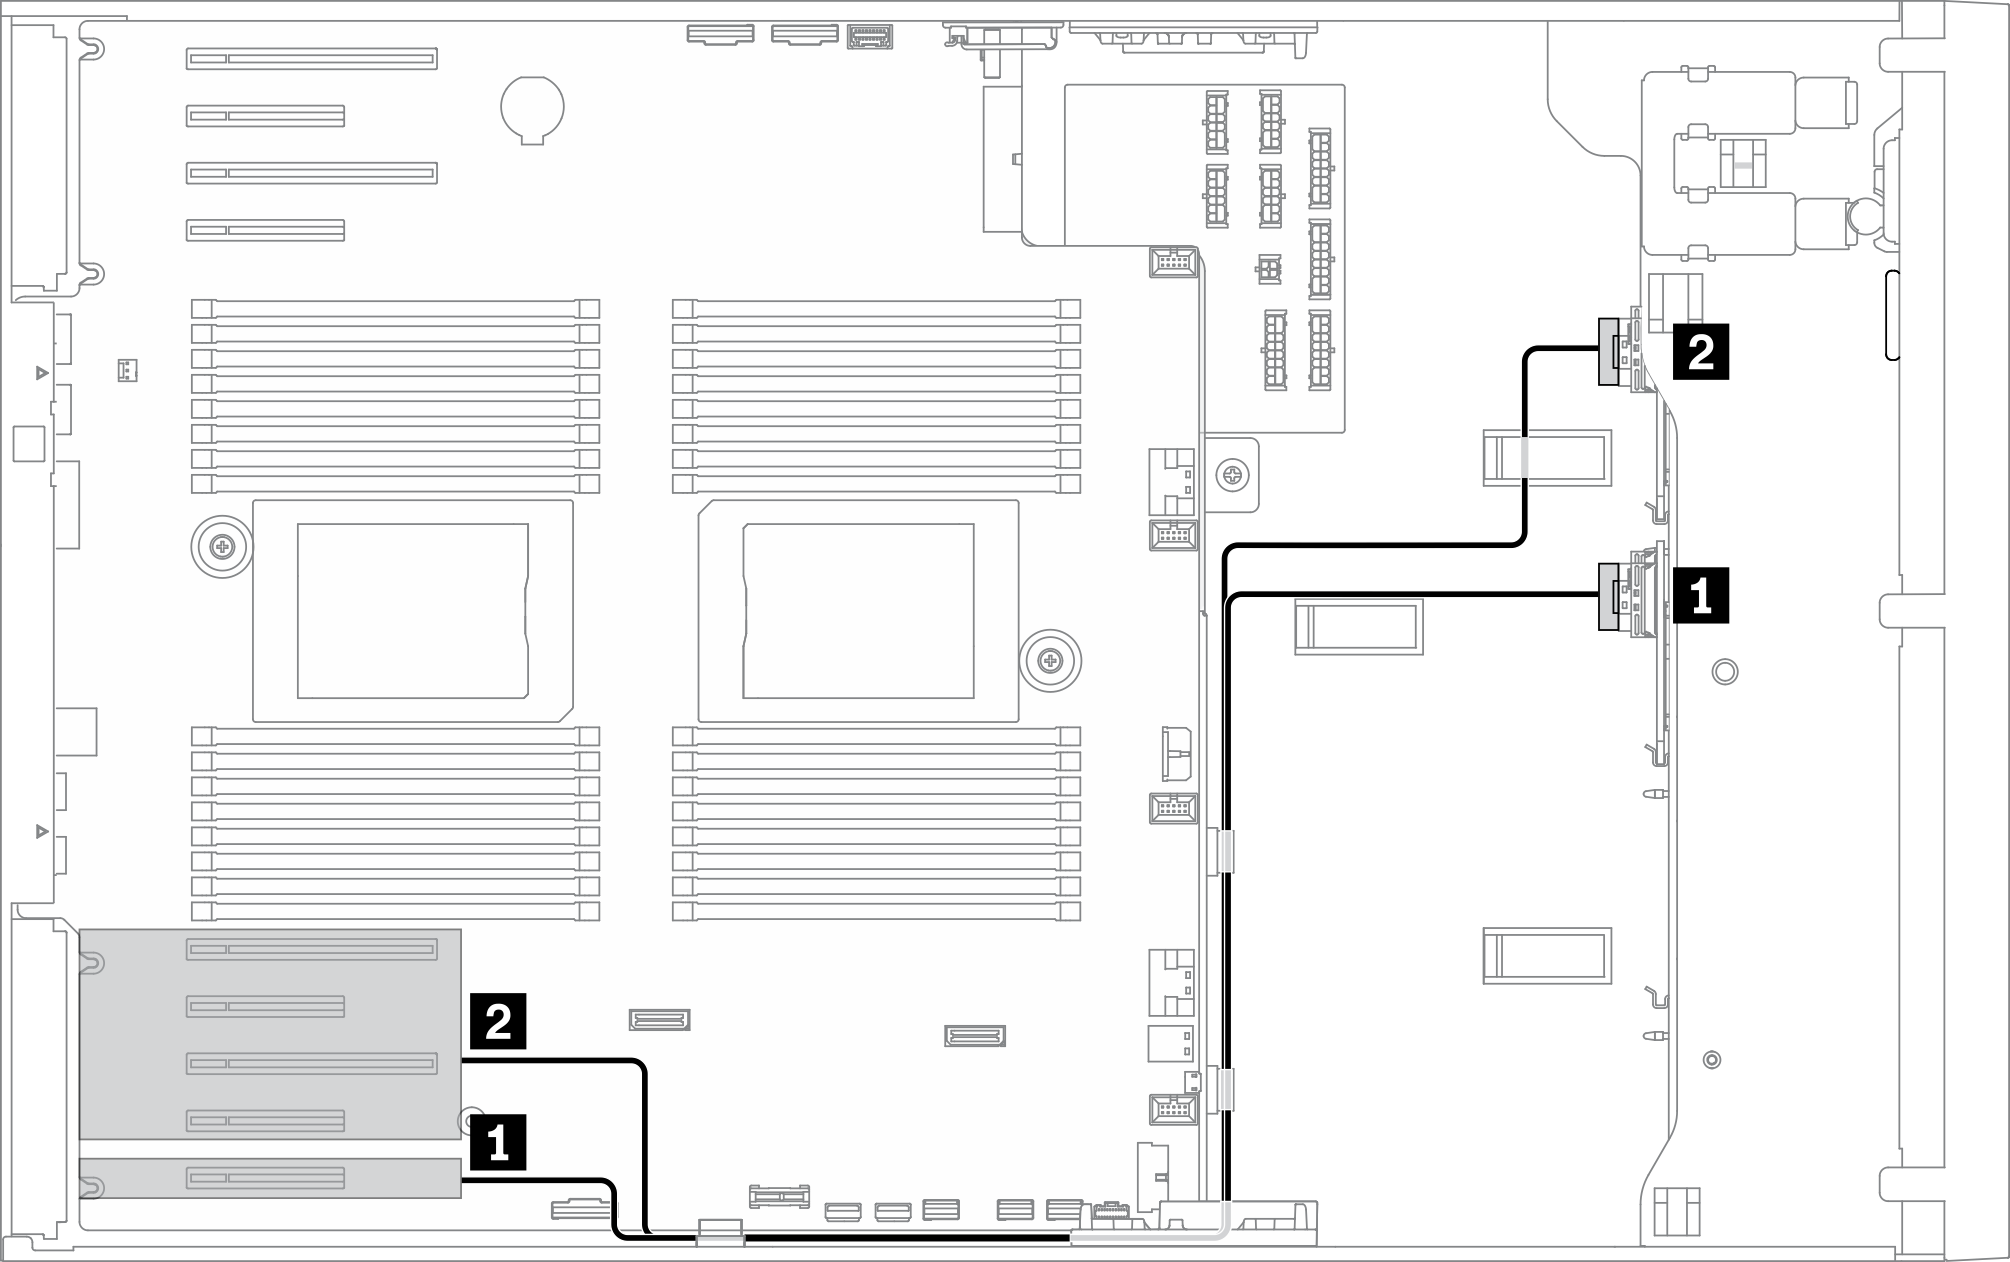 | ||
| From | To | Cable |
| 1 BP3: SAS/SATA |
|
|
| 2 BP4: SAS/SATA |
|
|
Onboard NVMe + 2 x retimers + 1 x 16i RAID/HBA
| NVMe cable routing | ||
|---|---|---|
Note Depending on your configuration, the adapter will be installed in top PCIe zone or bottom PCIe zone. Figure 8. NVMe cable routing to system board and top PCIe zone Figure 9. NVMe cable routing to system board and bottom PCIe zone | ||
| From | To | Cable |
| 1 BP1: NVMe 0-1 | PCIe 1 (onboard) | SlimSAS x8 to SlimSAS x8 pair (820 mm/780 mm) |
| 2 BP1: NVMe 2-3 | PCIe 2 (onboard) | |
| 3 BP1: NVMe 4-5 | PCIe 3 (onboard) | SlimSAS x8 to SlimSAS x8 pair (325 mm/160 mm) |
| 4 BP1: NVMe 6-7 | PCIe 4 (onboard) | |
| 5 BP2: NVMe 0-1 | Retimer: C0 | SlimSAS x8 to SlimSAS x8 pair (700 mm/700 mm) |
| 6 BP2: NVMe 2-3 | Retimer: C1 | |
| 7 BP2: NVMe 4-5 | Retimer: C0 | SlimSAS x8 to SlimSAS x8 pair (700 mm/700 mm) |
| 8 BP2: NVMe 6-7 | Retimer: C1 | |
| SAS/SATA cable routing | ||
|---|---|---|
Figure 10. SAS/SATA cable routing to PCIe slot 9 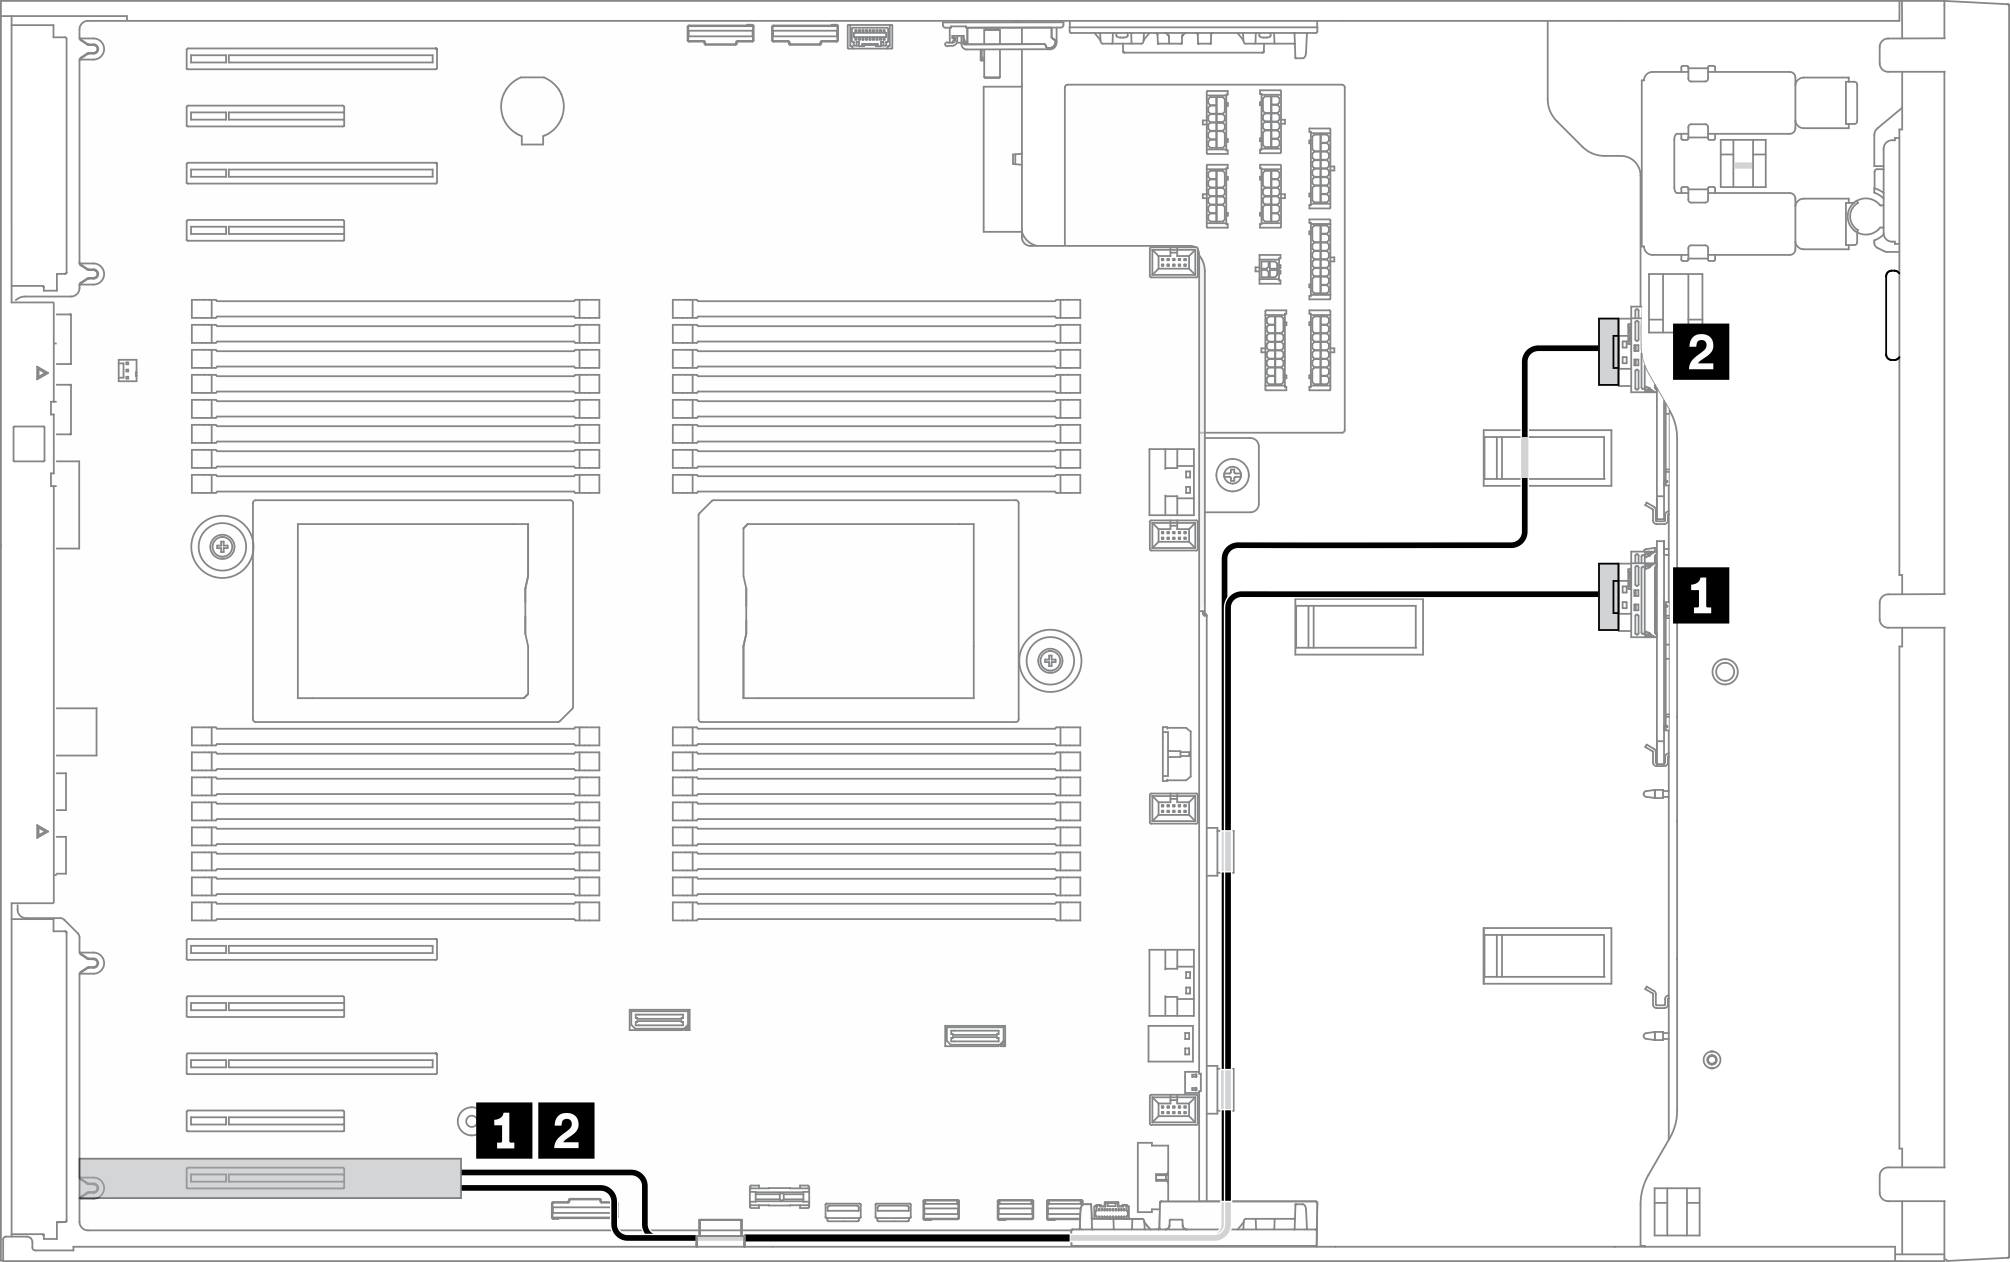 | ||
| From | To | Cable |
| 1 BP3: SAS/SATA |
|
|
| 2 BP4: SAS/SATA |
|
|
Onboard NVMe + 2 x retimers + 1 x 24i RAID/HBA
| NVMe cable routing | ||
|---|---|---|
Note Depending on your configuration, the adapter will be installed in top PCIe zone or bottom PCIe zone. Figure 11. NVMe cable routing to system board and top PCIe zone Figure 12. NVMe cable routing to system board and bottom PCIe zone | ||
| From | To | Cable |
| 1 BP1: NVMe 0-1 | PCIe 1 (onboard) | SlimSAS x8 to SlimSAS x8 pair (820 mm/780 mm) |
| 2 BP1: NVMe 2-3 | PCIe 2 (onboard) | |
| 3 BP1: NVMe 4-5 | PCIe 3 (onboard) | SlimSAS x8 to SlimSAS x8 pair (325 mm/160 mm) |
| 4 BP1: NVMe 6-7 | PCIe 4 (onboard) | |
| 5 BP2: NVMe 0-1 | Retimer: C0 | SlimSAS x8 to SlimSAS x8 pair (700 mm/700 mm) |
| 6 BP2: NVMe 2-3 | Retimer: C1 | |
| 7 BP2: NVMe 4-5 | Retimer: C0 | SlimSAS x8 to SlimSAS x8 pair (700 mm/700 mm) |
| 8 BP2: NVMe 6-7 | Retimer: C1 | |
| SAS/SATA cable routing | ||
|---|---|---|
Figure 13. SAS/SATA cable routing to PCIe slot 9 | ||
| From | To | Cable |
| 1 BP3: SAS/SATA | 24i G3: C0, C1 | Gen 3: Mini-SAS x4*2 to SlimSAS x8 (930 mm) |
| 2 BP4: SAS/SATA | 24i G3: C2, C3 | Gen 3: Mini-SAS x4*2 to SlimSAS x8 (930 mm) |
Onboard NVMe + 2 x retimers + 1 x 32i RAID/HBA
| NVMe cable routing | ||
|---|---|---|
Note Depending on your configuration, the adapter will be installed in top PCIe zone or bottom PCIe zone. Figure 14. NVMe cable routing to system board and top PCIe zone Figure 15. NVMe cable routing to system board and bottom PCIe zone | ||
| From | To | Cable |
| 1 BP1: NVMe 0-1 | PCIe 1 (onboard) | SlimSAS x8 to SlimSAS x8 pair (820 mm/780 mm) |
| 2 BP1: NVMe 2-3 | PCIe 2 (onboard) | |
| 3 BP1: NVMe 4-5 | PCIe 3 (onboard) | SlimSAS x8 to SlimSAS x8 pair (325 mm/160 mm) |
| 4 BP1: NVMe 6-7 | PCIe 4 (onboard) | |
| 5 BP2: NVMe 0-1 | Retimer: C0 | SlimSAS x8 to SlimSAS x8 pair (700 mm/700 mm) |
| 6 BP2: NVMe 2-3 | Retimer: C1 | |
| 7 BP2: NVMe 4-5 | Retimer: C0 | SlimSAS x8 to SlimSAS x8 pair (700 mm/700 mm) |
| 8 BP2: NVMe 6-7 | Retimer: C1 | |
| SAS/SATA cable routing | ||
|---|---|---|
Figure 16. SAS/SATA cable routing to PCIe slot 9 | ||
| From | To | Cable |
| 1 BP3: SAS/SATA | 32i G4: C0 | SlimSAS x8 to SlimSAS x8 (720 mm) |
| 2 BP4: SAS/SATA | 32i G4: C1 | SlimSAS x8 to SlimSAS x8 (880 mm) |
Onboard SATA + 4 x retimers + 1 x 8i RAID/HBA
| NVMe cable routing | ||
|---|---|---|
Note Depending on your configuration, the adapter will be installed in top PCIe zone or bottom PCIe zone. Figure 17. NVMe cable routing to top PCIe zone 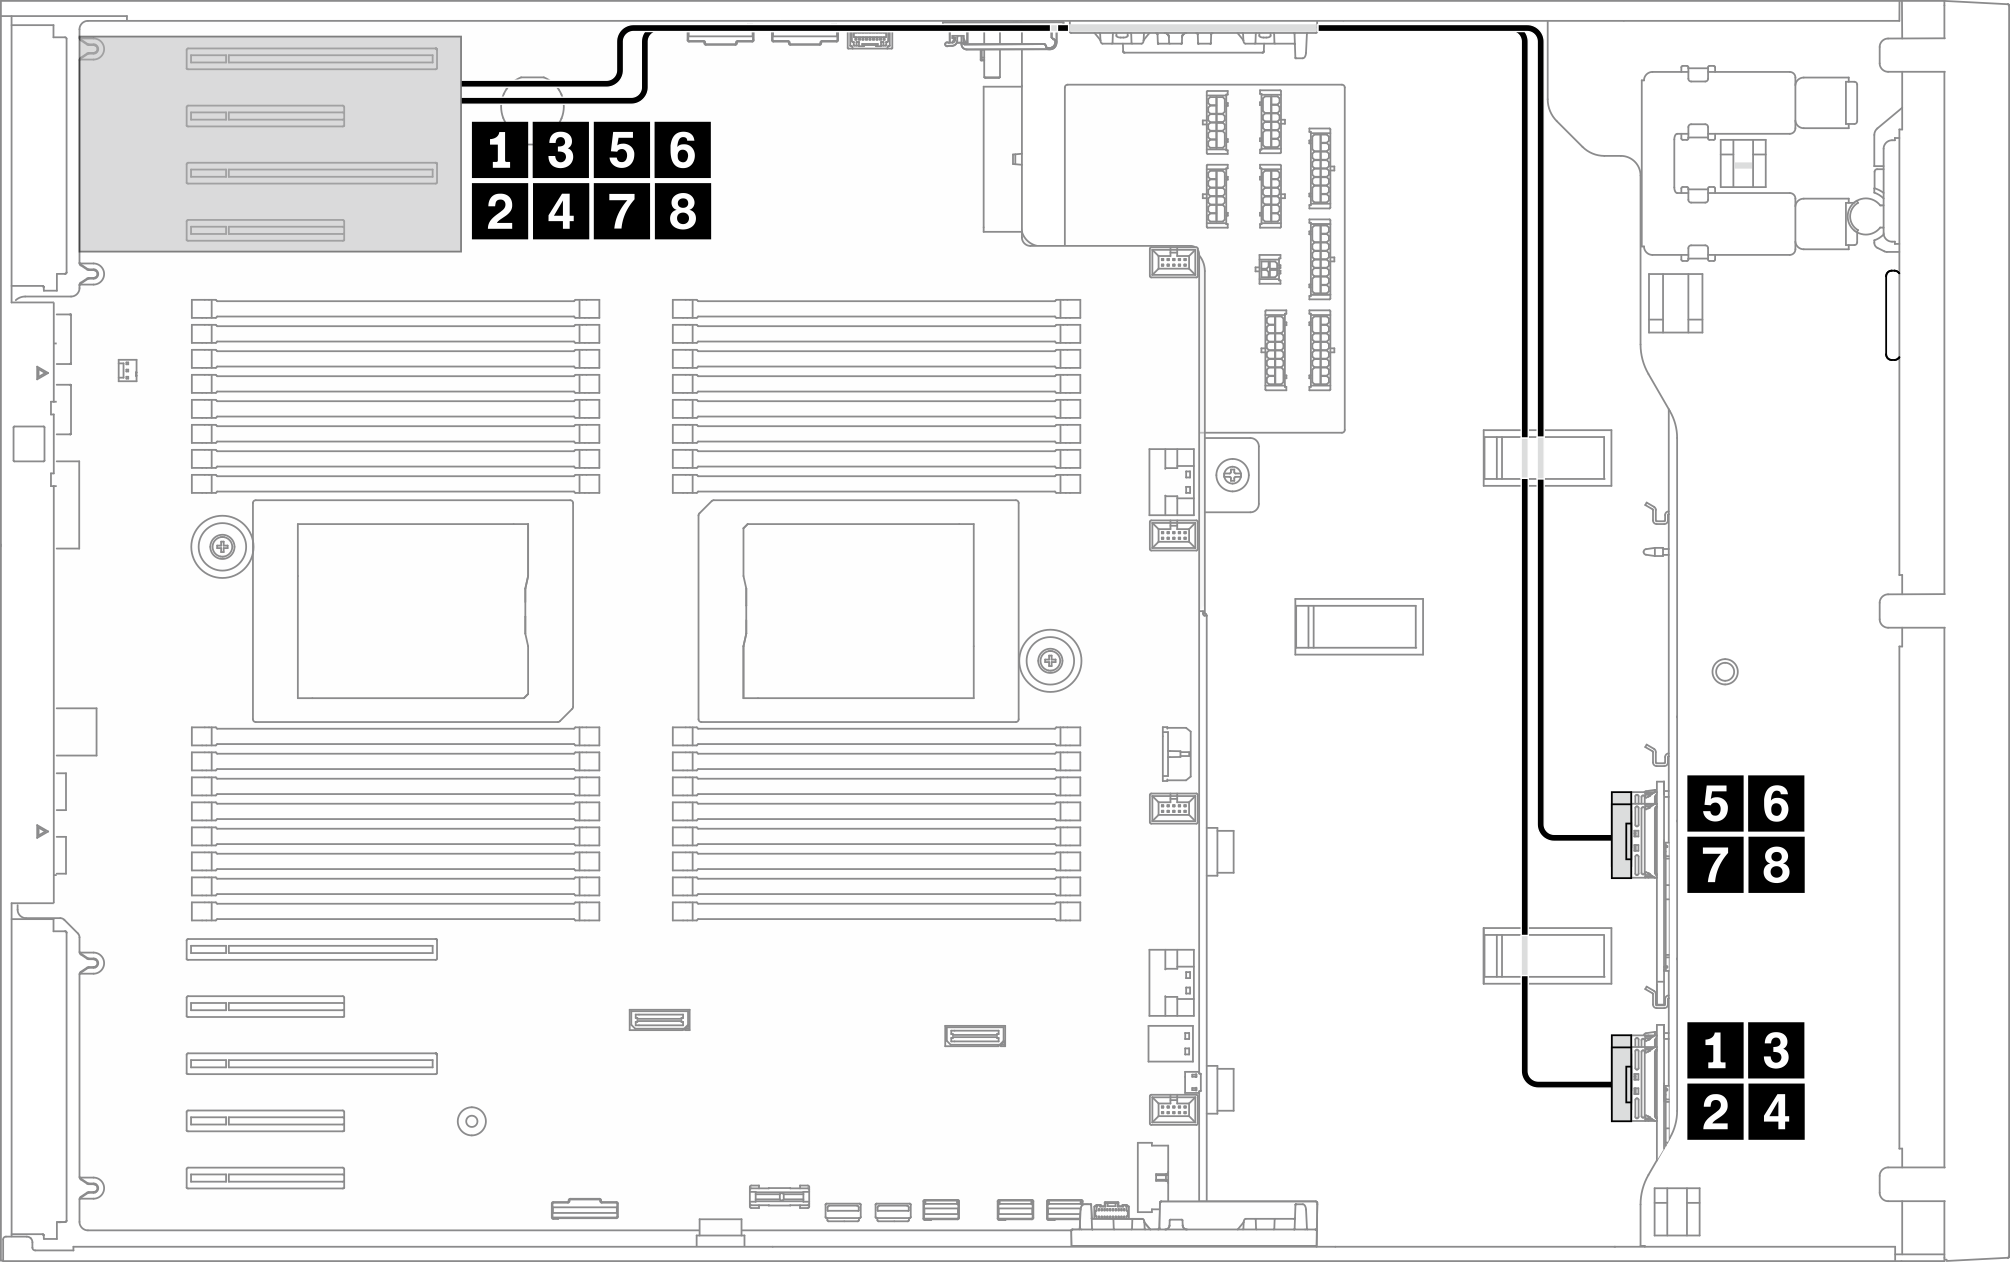 Figure 18. NVMe cable routing to bottom PCIe zone 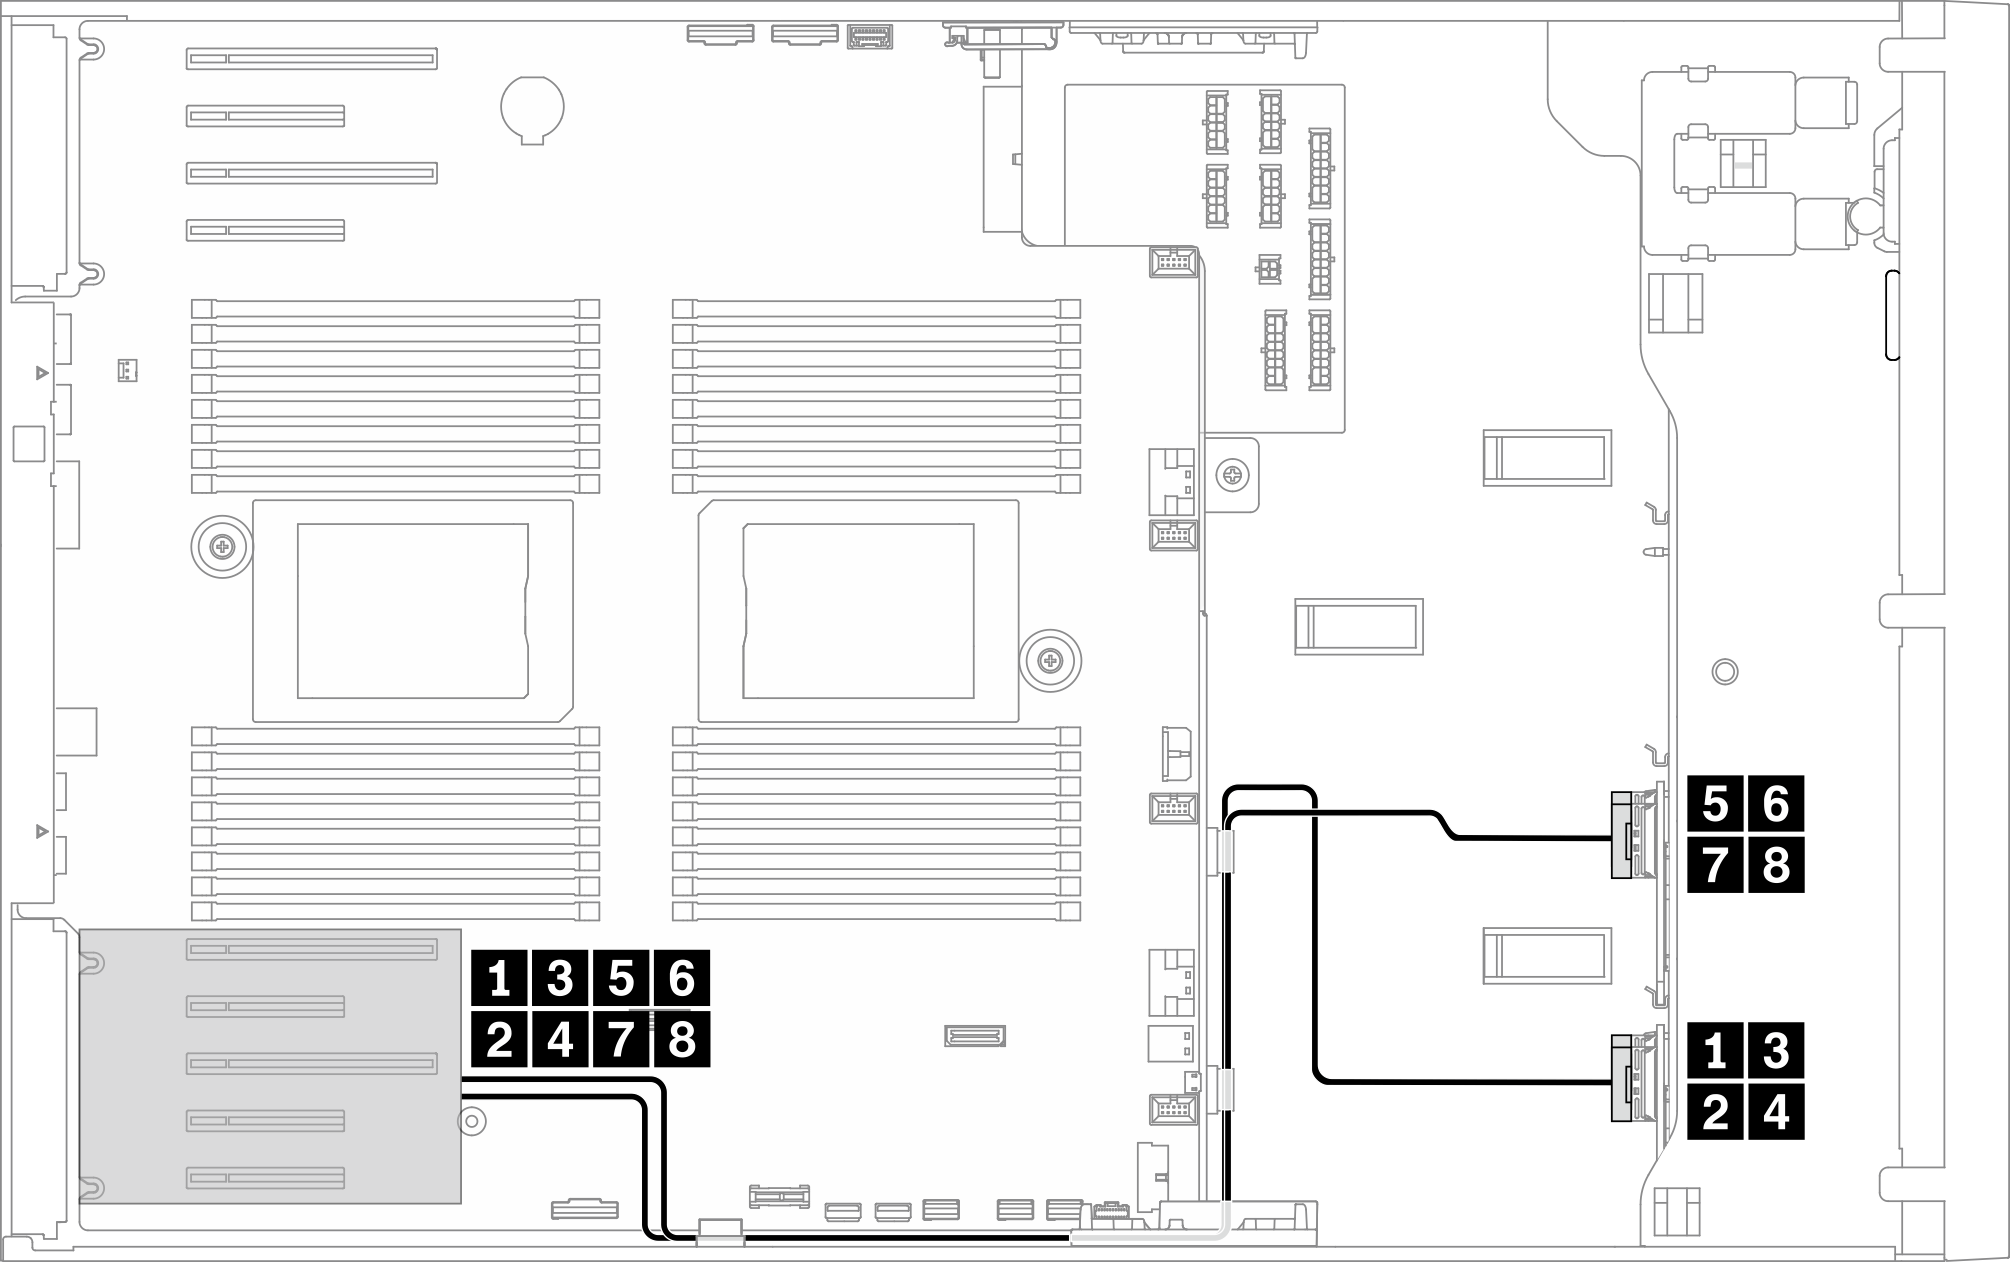 | ||
| From | To | Cable |
| 1 BP1: NVMe 0-1 | Retimer: C0 | SlimSAS x8 to SlimSAS x8 pair (700 mm/700 mm) |
| 2 BP1: NVMe 2-3 | Retimer: C1 | |
| 3 BP1: NVMe 4-5 | Retimer: C0 | SlimSAS x8 to SlimSAS x8 pair (700 mm/700 mm) |
| 4 BP1: NVMe 6-7 | Retimer: C1 | |
| 5 BP2: NVMe 0-1 | Retimer: C0 | SlimSAS x8 to SlimSAS x8 pair (700 mm/700 mm) |
| 6 BP2: NVMe 2-3 | Retimer: C1 | |
| 7 BP2: NVMe 4-5 | Retimer: C0 | SlimSAS x8 to SlimSAS x8 pair (700 mm/700 mm) |
| 8 BP2: NVMe 6-7 | Retimer: C1 | |
| SAS/SATA cable routing | ||
|---|---|---|
Figure 19. SAS/SATA cable routing to system board and bottom PCIe zone | ||
| From | To | Cable |
| 1 BP3: SAS/SATA | SATA 0-3, 4-7 (onboard) | SlimSAS x4*2 to SlimSAS x8 (430 mm/430 mm) |
| 2 BP4: SAS/SATA |
|
|
4 x retimers + 2 x 8i RAID/HBA
| NVMe cable routing | ||
|---|---|---|
Note Depending on your configuration, the adapter will be installed in top PCIe zone or bottom PCIe zone. Figure 20. NVMe cable routing to top PCIe zone Figure 21. NVMe cable routing to bottom PCIe zone | ||
| From | To | Cable |
| 1 BP1: NVMe 0-1 | Retimer: C0 | SlimSAS x8 to SlimSAS x8 pair (700 mm/700 mm) |
| 2 BP1: NVMe 2-3 | Retimer: C1 | |
| 3 BP1: NVMe 4-5 | Retimer: C0 | SlimSAS x8 to SlimSAS x8 pair (700 mm/700 mm) |
| 4 BP1: NVMe 6-7 | Retimer: C1 | |
| 5 BP2: NVMe 0-1 | Retimer: C0 | SlimSAS x8 to SlimSAS x8 pair (700 mm/700 mm) |
| 6 BP2: NVMe 2-3 | Retimer: C1 | |
| 7 BP2: NVMe 4-5 | Retimer: C0 | SlimSAS x8 to SlimSAS x8 pair (700 mm/700 mm) |
| 8 BP2: NVMe 6-7 | Retimer: C1 | |
| SAS/SATA cable routing | ||
|---|---|---|
Note Depending on your configuration, the adapter will be installed in top PCIe zone or bottom PCIe zone. Figure 22. SAS/SATA cable routing to top PCIe zone Figure 23. SAS/SATA cable routing to bottom PCIe zone | ||
| From | To | Cable |
| 1 BP3: SAS/SATA |
|
|
| 2 BP4: SAS/SATA |
|
|
4 x retimers + 1 x 16i RAID/HBA
| NVMe cable routing | ||
|---|---|---|
Note Depending on your configuration, the adapter will be installed in top PCIe zone or bottom PCIe zone. Figure 24. NVMe cable routing to top PCIe zone Figure 25. NVMe cable routing to bottom PCIe zone | ||
| From | To | Cable |
| 1 BP1: NVMe 0-1 | Retimer: C0 | SlimSAS x8 to SlimSAS x8 pair (700 mm/700 mm) |
| 2 BP1: NVMe 2-3 | Retimer: C1 | |
| 3 BP1: NVMe 4-5 | Retimer: C0 | SlimSAS x8 to SlimSAS x8 pair (700 mm/700 mm) |
| 4 BP1: NVMe 6-7 | Retimer: C1 | |
| 5 BP2: NVMe 0-1 | Retimer: C0 | SlimSAS x8 to SlimSAS x8 pair (700 mm/700 mm) |
| 6 BP2: NVMe 2-3 | Retimer: C1 | |
| 7 BP2: NVMe 4-5 | Retimer: C0 | SlimSAS x8 to SlimSAS x8 pair (700 mm/700 mm) |
| 8 BP2: NVMe 6-7 | Retimer: C1 | |
| SAS/SATA cable routing | ||
|---|---|---|
Figure 26. SAS/SATA cable routing to PCIe slot 9 | ||
| From | To | Cable |
| 1 BP3: SAS/SATA |
|
|
| 2 BP4: SAS/SATA |
|
|
4 x retimers + 1 x 24i RAID/HBA
| NVMe cable routing | ||
|---|---|---|
Note Depending on your configuration, the adapter will be installed in top PCIe zone or bottom PCIe zone. Figure 27. NVMe cable routing to top PCIe zone Figure 28. NVMe cable routing to bottom PCIe zone | ||
| From | To | Cable |
| 1 BP1: NVMe 0-1 | Retimer: C0 | SlimSAS x8 to SlimSAS x8 pair (700 mm/700 mm) |
| 2 BP1: NVMe 2-3 | Retimer: C1 | |
| 3 BP1: NVMe 4-5 | Retimer: C0 | SlimSAS x8 to SlimSAS x8 pair (700 mm/700 mm) |
| 4 BP1: NVMe 6-7 | Retimer: C1 | |
| 5 BP2: NVMe 0-1 | Retimer: C0 | SlimSAS x8 to SlimSAS x8 pair (700 mm/700 mm) |
| 6 BP2: NVMe 2-3 | Retimer: C1 | |
| 7 BP2: NVMe 4-5 | Retimer: C0 | SlimSAS x8 to SlimSAS x8 pair (700 mm/700 mm) |
| 8 BP2: NVMe 6-7 | Retimer: C1 | |
| SAS/SATA cable routing | ||
|---|---|---|
Figure 29. SAS/SATA cable routing to PCIe slot 9 | ||
| From | To | Cable |
| 1 BP3: SAS/SATA | 24i G3: C0, C1 | Gen 3: Mini-SAS x4*2 to SlimSAS x8 (930 mm) |
| 2 BP4: SAS/SATA | 24i G3: C2, C3 | Gen 3: Mini-SAS x4*2 to SlimSAS x8 (930 mm) |
4 x retimers + 1 x 32i RAID/HBA
| NVMe cable routing | ||
|---|---|---|
Note Depending on your configuration, the adapter will be installed in top PCIe zone or bottom PCIe zone. Figure 30. NVMe cable routing to top PCIe zone Figure 31. NVMe cable routing to bottom PCIe zone | ||
| From | To | Cable |
| 1 BP1: NVMe 0-1 | Retimer: C0 | SlimSAS x8 to SlimSAS x8 pair (700 mm/700 mm) |
| 2 BP1: NVMe 2-3 | Retimer: C1 | |
| 3 BP1: NVMe 4-5 | Retimer: C0 | SlimSAS x8 to SlimSAS x8 pair (700 mm/700 mm) |
| 4 BP1: NVMe 6-7 | Retimer: C1 | |
| 5 BP2: NVMe 0-1 | Retimer: C0 | SlimSAS x8 to SlimSAS x8 pair (700 mm/700 mm) |
| 6 BP2: NVMe 2-3 | Retimer: C1 | |
| 7 BP2: NVMe 4-5 | Retimer: C0 | SlimSAS x8 to SlimSAS x8 pair (700 mm/700 mm) |
| 8 BP2: NVMe 6-7 | Retimer: C1 | |
| SAS/SATA cable routing | ||
|---|---|---|
Figure 32. SAS/SATA cable routing to PCIe slot 9 | ||
| From | To | Cable |
| 1 BP3: SAS/SATA | 32i G4: C0 | SlimSAS x8 to SlimSAS x8 (720 mm) |
| 2 BP4: SAS/SATA | 32i G4: C1 | SlimSAS x8 to SlimSAS x8 (880 mm) |
4 x retimers + 1 x CFF RAID/HBA
| NVMe cable routing | ||
|---|---|---|
Note Depending on your configuration, the adapter will be installed in top PCIe zone or bottom PCIe zone. Figure 33. NVMe cable routing to top PCIe zone Figure 34. NVMe cable routing to bottom PCIe zone | ||
| From | To | Cable |
| 1 BP1: NVMe 0-1 | Retimer: C0 | SlimSAS x8 to SlimSAS x8 pair (700 mm/700 mm) |
| 2 BP1: NVMe 2-3 | Retimer: C1 | |
| 3 BP1: NVMe 4-5 | Retimer: C0 | SlimSAS x8 to SlimSAS x8 pair (700 mm/700 mm) |
| 4 BP1: NVMe 6-7 | Retimer: C1 | |
| 5 BP2: NVMe 0-1 | Retimer: C0 | SlimSAS x8 to SlimSAS x8 pair (700 mm/700 mm) |
| 6 BP2: NVMe 2-3 | Retimer: C1 | |
| 7 BP2: NVMe 4-5 | Retimer: C0 | SlimSAS x8 to SlimSAS x8 pair (700 mm/700 mm) |
| 8 BP2: NVMe 6-7 | Retimer: C1 | |
| SAS/SATA cable routing | ||
|---|---|---|
Figure 35. SAS/SATA cable routing to system board and CFF RAID/HBA adapter  | ||
| From | To | Cable |
| 1 BP3: SAS/SATA | CFF RAID/HBA: C0, C1 | SlimSAS x4*2 to SlimSAS x8 (430 mm/430 mm) |
| 2 BP4: SAS/SATA | CFF RAID/HBA: C2, C3 | SlimSAS x4*2 to SlimSAS x8 (430 mm/430 mm) |