Setting up the VX Deployer
Before running the VX Deployer to deploy a vSAN cluster, make sure that you have cabled the VX appliances to the network.
For information about cabling the VX appliances, see the following topic:
Configure the networking for the XClarity Controller on the host where the VX Deployer appliance will be run. All ThinkAgile VX appliances have the same image preinstalled. Therefore, you can choose any of the hosts that will be deployed in the vSAN cluster.
Power on the host.
When the host is powered on, the XClarity Controller (XCC) will attempt to obtain an IP address from DHCP if one is set up in your network. If you do not have DHCP set up in your network, you will need to set up a KVM console to connect to the XCC.
Log in to the XCC.
For more information about connecting to the XCC, see the following topic:
From the XCC, launch a remote console to the ESXi host.
For more information about working with the remote console, see the following topic:
From the ESXi welcome page, log in using the default password (P@ssw0rd).
ImportantDo not change the factory password for ESXi at this time. It must be the same password for all hosts in the vSAN cluster when you start the VX Deployer. You will change the ESXi password for the ESXi host during the deployment process.Click Configure Management Network to begin the network configuration.
Click the first IPv4 interface and provide an IP address, subnet mask, and default gateway and click Enter. The best practice is to configure a static IP address for the host.
ImportantThis host will be included in the vSAN cluster. Therefore, make sure that you configure an IP address that can be used as the final IP address for this host.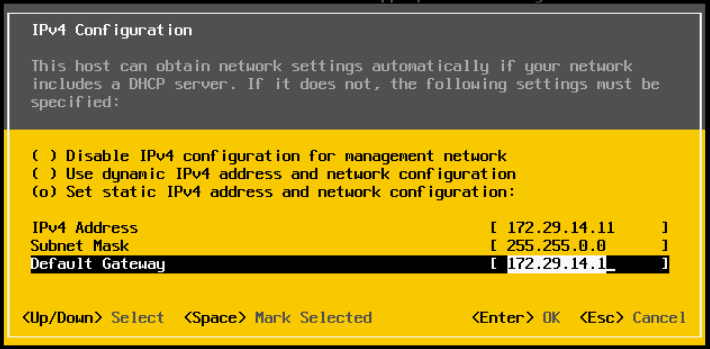
Click DNS configuration to specify the primary DNS server (and optionally, the secondary DNS server). In addition, you need to specify a fully qualified host name for the host.
NoteThe hostname and IP address for this host must already be configured in the DNS server and should be identical with that used in Deployment Wizard.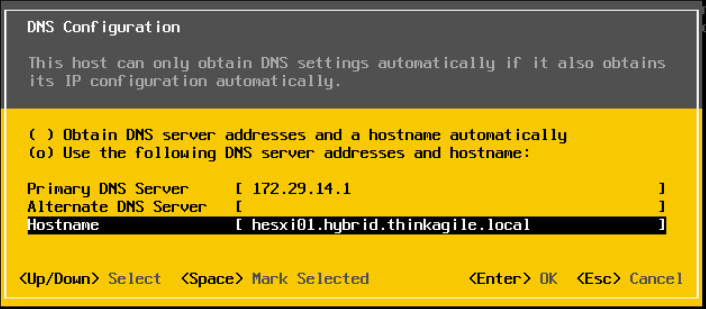
Click Custom DNS Suffixes to specify the suffix that can be used by all nodes in the cluster.
Click Test Management Network to make sure that the DNS server and default gateway are valid, and that the hostname can be reached.
Configure the networking for the ESXi host to set up the port groups that will be used by the VX Deployer.
From a browser, log in to web interface for the ESXi host. The VX Deployer appliance is listed under Virtual Machines.
NoteIf you do not see the VX Deployer appliance listed under Virtual Machines, contact Lenovo Support.Click Networking to set up the port groups.
Create an XCC Management port group. If a VLAN is configured for the XCC Management network, make sure that you specify the VLAN ID.
NoteThe XCC Management network is required only while using the VX Deployer for the initial deployment of the vSAN cluster. That network can be removed after the deployment is completed, if desired.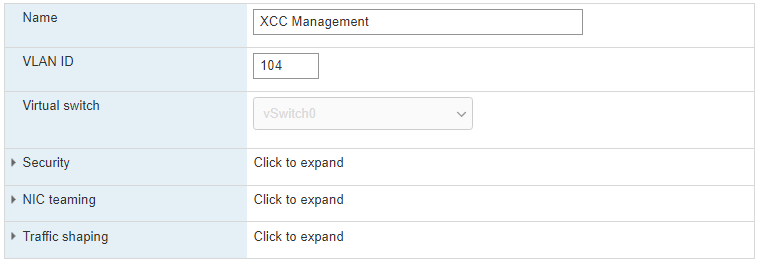
Create the VM Network port group, which is used for ESXi access.
Configure the networking for the ThinkAgile VX Deployer.
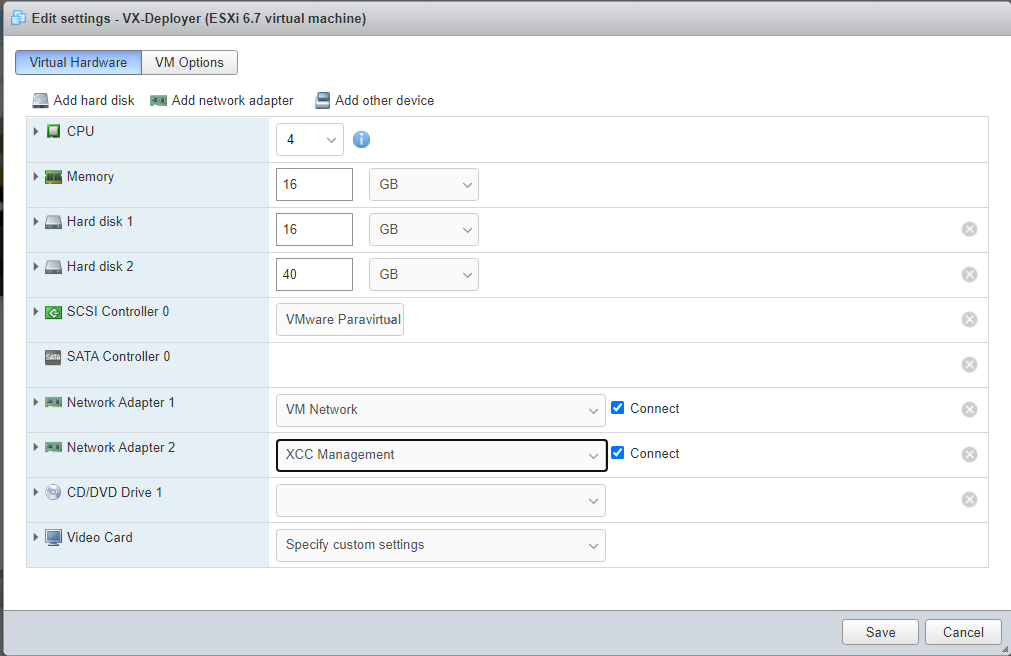
From the ESXi web interface, edit the settings for the ThinkAgile VX Deployer VM.
Make sure that the VX Deployer is connected to the port groups:
The first interface (Network Adapter 1) should be connected to the VM Network port group.
The second interface (Network Adapter 2) should be connected to the XCC Management port group.
Power on the VX Deployer VM.
During the VM boot process, you are prompted to configure the VX Deployer networking (Configure network).
NoteThis networking configuration step is for the VX Deployer VM, which is not the same as the ESXi networking configuration.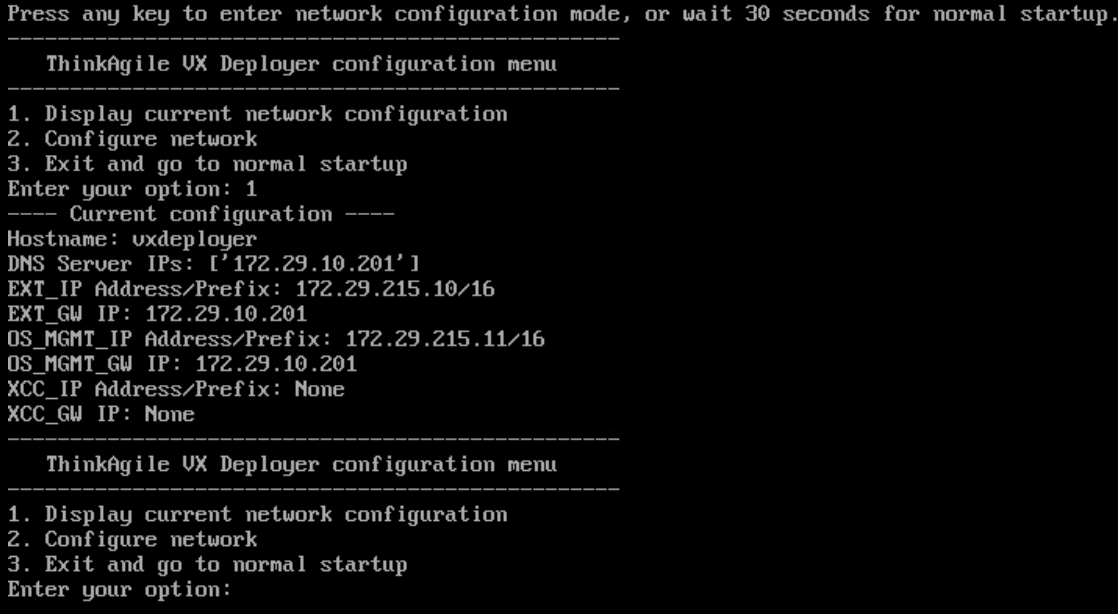
Property name Description Hostname
Hostname to be configured on the VX Deployer appliance. This is just the host part of the name, without the domain name suffix.
External Network IP
IPv4 address of the external network interface of the appliance. This is the IP address used to access the VX Deployer user interface. This is also the interface for the deployer to access vCenter and ESXi hosts that are being installed.
External Network Netmask
Netmask for the IPv4 address of the external interface.
External Network Gateway
Gateway IPv4 address for the external interface.
XCC Network IP
IPv4 address of the internal network interface used to access the XCC modules.
NoteSpecify the XCC IP type, address, and netmask only if the XCC Management network is different from the ESXi Management network.
- Leave the XCC fields blank if:
The XCC and ESXi management networks are on the same subnet.
The XCC and ESXi management networks are on different subnets, you have configured routing between the two networks, and you do not want to use separate IP addresses for the XCC network.
XCC Network Netmask
Netmask for the IPv4 address of the XCC interface.
OS management Network IP
IPv4 address of the internal network interface used to deploy the operating system.
OS management Network Netmask
Netmask for the IPv4 address of the OS management interface.
OS management Network Gateway
Gateway IPv4 address for OS management interface.
DNS Server #1
DNS server IP address which should resolve FQDN of vCenter Server Appliance (VCSA).
DNS Server #2
DNS server IP address #2 (optional).
Note10.42.0.0/16 is the network CIDR reserved by the VX deployer. Make sure that you do not have overlapping IP ranges defined.
After confirming the settings, click “y” to save them. The URL for the VX Deployer is displayed.
From your browser, navigate to the URL for the VX Deployer to begin the deployment process.