Installing a hot-swap hard disk drive
This procedure applies only to the 5U server model with hot-swap power supplies (Model name: 2582-F4x).
If you are replacing a drive, make sure that:
- The hot-swap drives must be either all SAS hard disk drives or all SATA hard disk drives; the two types cannot be combined.
- Inspect the drive tray for signs of damage.
- To maintain proper system cooling, do not operate the server for more than 10 minutes without at least one hard disk drive installed in the drive bay.
- You do not have to turn off the server to install hot-swap drives in the hot-swap drive bays.
To install a hot-swap hard disk drive on the 5U server model that have hot-swap power supplies (Model name: 2582-F4x), complete the following steps.
- Touch the static-protective package that contains the drive to any unpainted metal surface on the server; then, remove the drive from the package and place it on a static-protective surface.
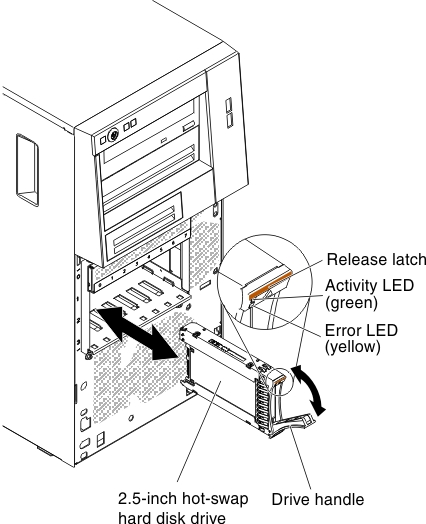
- Make sure that the drive tray handle is in the open position.
- Align the drive assembly with the guide rails in the bay; then, carefully slide the drive assembly into the drive bay until the drive stops.
- Rotate the drive tray handle to the closed position.
- Check the hard disk drive status indicator to make sure that the hard disk drive is operating correctly. (You might have to restart the server for the drive to be recognized.) If the yellow hard disk drive status LED for a drive is lit continuously, it indicates that the drive is faulty and must be replaced. If the green hard disk drive activity LED is flashing, this indicates that the drive is being accessed.NoteIf the server is configured for RAID operation using a ServeRAID controller, you might have to reconfigure the disk arrays after you replace hard disk drives. See the ServeRAID documentation for additional information about RAID operation and complete instructions for using ServeRAID Manager.
If you have other devices to install, do so now. Otherwise, go to Completing the installation.
Give documentation feedback