Installing a simple-swap hard disk drive
This procedure applies only to 4U server models with non-hot-swap power supplies.
For 4U server models with non-hot-swap power supplies, the server supports up to four 3.5-inch simple-swap SATA hard disk drives, which are accessible from the front of the server. You must disconnect all power from the server before you remove or install simple-swap drives. Before you install a simple-swap SATA hard disk drive, read the following information:
Install the drives starting from the top bay to the bottom bay (bay 3, 4, 5, and then 6). The following tables list the IDs of the hard disk drives:
| Drive bay | HDD ID |
|---|---|
| 3 | 0 |
| 4 | 1 |
| 5 | 2 |
| 6 | 3 |
- The simple-swap SATA hard disk drives connect to the SATA 0 through SATA 3 connectors on the system board as follows:
- System board end cable connector 0 connects to the SATA 0 connector on the system board.
- System board end cable connector 1 connects to the SATA 1 connector on the system board.
- System board end cable connector 2 connects to the SATA 2 connector on the system board.
- System board end cable connector 3 connects to the SATA 3 connector on the system board.
- Hard disk drive 0 connects to the SATA 0 connector on the simple-swap hard disk drive backplate.
- Hard disk drive 1 connects to the SATA 2 connector on the simple-swap hard disk drive backplate.
- Hard disk drive 2 connects to the SATA 1 connector on the simple-swap hard disk drive backplate.
- Hard disk drive 3 connects to the SATA 3 connector on the simple-swap hard disk drive backplate.
- In uEFI setup menu:
- Drive 0 indicates hard disk drive 0.
- Drive 1 indicates hard disk drive 2.
- Drive 2 indicates hard disk drive 1.
- Drive 3 indicates hard disk drive 3.
- In MegaRAID Storage Manager utility:
- Slot 0 indicates hard disk drive 0.
- Slot 1 indicates hard disk drive 2.
- Slot 2 indicates hard disk drive 1.
- Slot 3 indicates hard disk drive 3.
To install a simple-swap SATA hard disk drive on 4U server models with non-hot-swap power supplies, complete the following steps.
- Read the safety information in Safety and Installation guidelines.
- Turn off the server and peripheral devices and disconnect all external cables and power cords.
- Remove the bezel (see Removing the bezel).
- Touch the static-protective package that contains the drive to any unpainted metal surface on the server; then, remove the drive from the package and place it on a static-protective surface.
- Align the drive assembly with the guide rails in the bay (the connector end of the drive goes in first).
- Pull the round blue loops of the drive assembly toward each other; then, carefully slide the drive assembly into the drive bay until it stops, and release the loops.
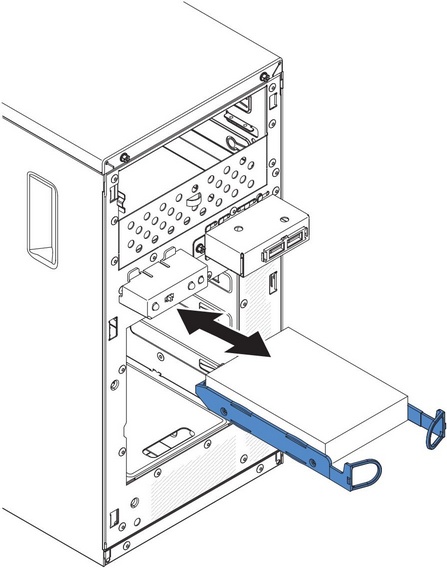 NoteDo not release the loops on the drive assembly until it is completely seated.
If you have other devices to install, do so now. Otherwise, go to Completing the installation.
| OS | Support limitation | Support status |
|---|---|---|
| Windows 2008R2 SP1 64bit uEFI | Support | |
| Windows 2008R2 SP1 64bit legacy | Support with disk partitions less than 2 TB | Support with limitation |
| Windows 2008 SP2 64bit uEFI | Support | |
| Windows 2008 SP2 64bit legacy | Support with disk partitions less than 2 TB | Support with limitation |
| Windows 2008 SP2 32bit legacy | Support with disk partitions less than 2 TB | Support with limitation |
| RHEL 6.1 64bit uEFI | Support | |
| RHEL 6.1 64bit legacy | Support | |
| RHEL 6.1 32bit legacy | Support | |
| RHEL 5.6 64bit legacy RHEL 5.6 32bit legacy | Do not support, partition not allowed | Do not support |
| RHEL 5.6 64bit legacy RHEL 5.6 32bit legacy | Do not support, partition not allowed | Do not support |
| SLES11 SP1 64bit uEFI | Support | |
| SLES11 SP1 64bit legacy | Support | |
| SLES11 SP1 32bit legacy | Support | |
| SLES10 SP4 64bit legacy | Support with disk partitions less than 2 TB | Support with limitation |
| SLES10 SP4 32bit legacy | Support with disk partitions less than 2 TB | Support with limitation |
| ServeRAID adapter | Support limitation | Comment |
|---|---|---|
| ServeRAID M5014 | Support 3TB HDD, Virtual disk supports up to 12TB | Support |
| ServeRAID M1015 | Support 3TB HDD, Virtual disk supports up to 12TB | Support |
| ServeRAID-BR10il | Virtual disk only supports up to 8TB. | LSI chip limitation. Support with limitaton. |
| ServeRAID H1110 | Support 3TB HDD, Virtual disk supports up to 12TB | Support |
| ServeRAID C100 | Support 3TB HDD, Virtual disk supports up to 12TB | Support |