
Installing a USB embedded hypervisor flash device

Use this information to install a USB embedded hypervisor flash device.

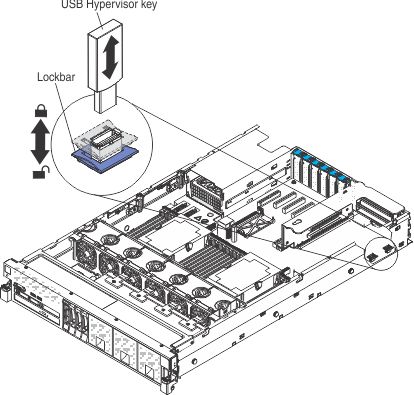
To install a hypervisor flash device, complete the following steps:

  1. Read the safety information and installation guidelines, see Safety and Installation guidelines.
  2. Turn off the server (see Turning off the server) and all attached peripheral devices. Disconnect all power cords; then, disconnect all external cables from the server.
  3. Remove the top cover (see Removing the server top cover).
    Note
    You might have to remove the PCIe riser-card assembly to access the USB (hypervisor) connectors.
  4. Locate the USB (hypervisor) connector on the system board in which you want to install the flash device (see System-board internal connectors for the location of the connectors for the embedded hypervisor USB flash device).
  5. Make sure that the lockbar on the USB (hypervisor) connector is in the unlock position (down).
  6. Align the USB flash device with the connector on the system board and push it into the connector until it is firmly seated.
  7. Slide the lockbar up to the locked position until the lockbar is seated firmly.

    lockbar

If you have other devices to install or remove, do so now. Otherwise, go to Completing the installation.