
Installing a RAID cache card

Use this information to install a RAID cache card.

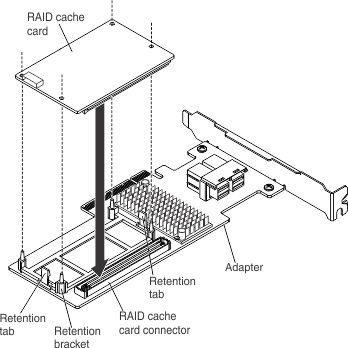
The server supports optional RAID cache cards that you can install on the RAID cache card connector on the system board or on the RAID adapters to upgrade to RAID levels 5 and 50 support. See Supported RAID cache cards for more information about the cache cards and which cache card is supported on the RAID adapters.

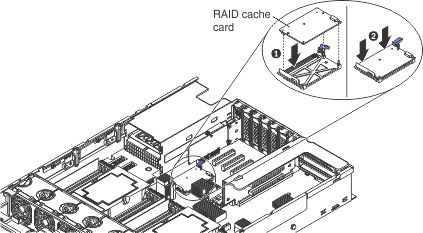
To install a RAID cache card, complete the following steps:

  1. Read the safety information and installation guidelines, see Safety and Installation guidelines.
  2. Turn off the server (see Turning off the server) and all attached peripheral devices. Disconnect all power cords; then, disconnect all external cables from the server.
  3. Remove the top cover (see Removing the server top cover).
  4. Remove the fan cage assembly (see Removing the fan cage assembly).
  5. Remove the microprocessor and memory expansion tray (see Removing the microprocessor and memory expansion tray assembly) or DIMM air baffle (see Removing the DIMM air baffle), whichever one is installed.
  6. Pull the tabs on the SAS cable guide back toward the chassis wall and open the cable guide cover.
  7. Make sure the release tab on the RAID cache card slot is in the open position.
  8. Touch the static-protective package that contains the cache card to any unpainted surface on the outside of the server; then, grasp the cache card by the edges and remove it from the package.
  9. Connect one end of the flash power module cable to the cache card.
  10. Align the cache card with the RAID cache card slot on the system board or adapter and insert it onto the connector.
    Note
    To assist in aligning the cache card if installing the RAID cache card on the RAID cache card connector on the system board, you can align the cache card holes with the two RAID cache card connector Guide Pins; then, lower the cache card onto the connector.

    install raid card

    raid cache card

  11. Gently press down on the touch points of the cache card until it clicks into place on the connector and is firmly seated.
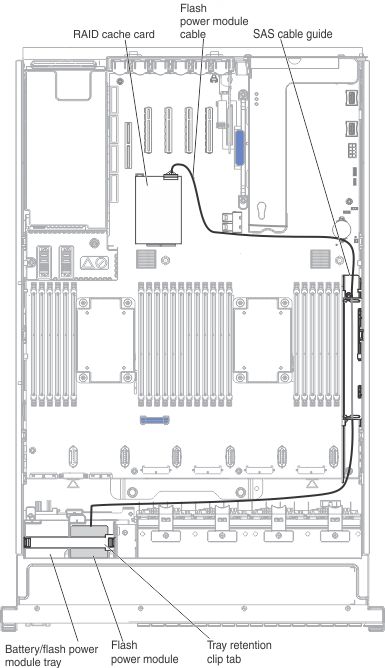
  12. Route the flash power module cable along the side of the chassis and through the SAS cable guide.

    cabling RAID card and flash power module

  13. Press the tray retention clip tab outward to release the retention clip that secures flash power modules in the battery/flash power module trays (on the top of the USB/video assembly near the front of the server).
    Note
    If the RAID cache card is installed in the connector on the system board, place the flash power module in the battery/flash power module tray slot closest to drive bay 0.
  14. Place the flash power module into the battery/flash power module tray (install the flash power modules in the trays starting from top to bottom).
  15. Connect the other end of the flash power module cable to the flash power module.
  16. Reinstall the retention clip to secure the flash power module in place.
  17. Close the SAS cable guide cover.

If you have other devices to install or remove, do so now. Otherwise, go to Completing the installation.