
Installing the optional ServeRAID N2215 Host Bus Adapter

Use this information to install the ServeRAID N2215 Host Bus Adapter.

You can purchase an optional ServeRAID N2215 Host Bus Adapter. This adapter provides no RAID support; however, it helps to provide optimized performance for applications that do not need a RAID support. This adapter can be installed in the PCIe slots listed in Supported adapters. For configuration information, see the documentation that comes with the adapter.

Attention
Some cluster solutions require specific code levels or coordinated code updates. If the device is part of a cluster solution, verify that the latest level of code is supported for the cluster solution before you update the code.

For additional information and notes about installing the adapters see Installing an adapter.

To install the adapter, complete the following steps:

  1. Read the safety information and installation guidelines, see Safety and Installation guidelines.
  2. Turn off the server (see Turning off the server) and all attached peripheral devices. Disconnect all power cords; then, disconnect all external cables from the server.
  3. Remove the top cover (see Removing the server top cover).
  4. Remove the fan cage assembly (see Removing the fan cage assembly).
  5. Remove the microprocessor and memory expansion tray (see Removing the microprocessor and memory expansion tray assembly) or DIMM air baffle (see Removing the DIMM air baffle), whichever one is installed.
  6. Touch the static-protective package that contains the adapter to any unpainted surface on the outside of the server; then, grasp the adapter by the top edge or upper corners of the adapter and remove it from the package.
  7. To install the adapter on the PCIe riser-card assembly, complete the following steps:
    1. Carefully grasp the riser-card assembly by the blue touch points and pull it up until the riser-card assembly disengages from the connector on the system board.
    2. Open the PCIe retention latch.
    3. Remove the PCIe filler bracket from the slot in which you want to install the adapter.
    4. Align the adapter so that the keys align correctly with the connector on the riser-card assembly.
    5. Insert the adapter into the connector on the riser-card until it is firmly seated.
      Attention
      Make sure that the adapter is seated correctly. Incomplete insertion might cause damage to the system board, the adapter, and the PCIe riser-card assembly.
    6. Close the PCIe retention latch.
    7. Reinstall the riser-card assembly onto the system board.
    8. Connect the internal cables to the adapter.
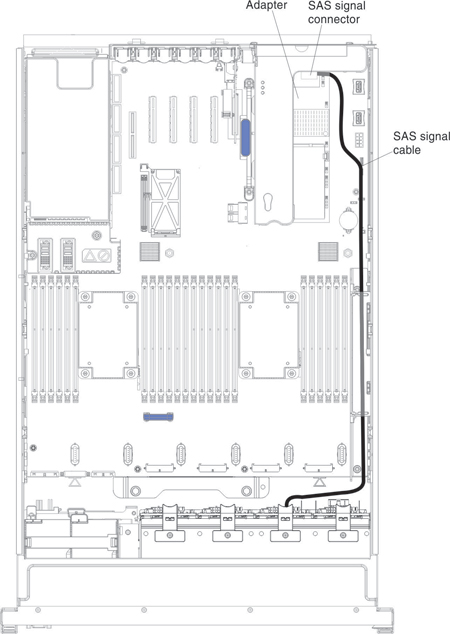
  8. Route the signal cables through the SAS cable guide and connect the signal cables to the drive backplane.
    cabling the 8x1.8 inch backplane and adapter

If you have other devices to install or remove, do so now. Otherwise, go to Completing the installation.