
Adapter installation instructions

Use this information to install an adapter.

Note
  • The instructions in this section apply to any supported adapter (for example, network adapters).
  • The server does not support any high-definition video-out connector.
  • The server supports an add-on video adapter in slot 1 of the two slot riser-card.

To install an adapter, complete the following steps:

Note
If your adapter was previously configured, backup or record its configuration information, if possible, before replacing the adapter. See the documentation for your adapter for information and instructions.
  1. Read the safety information and installation guidelines, see Safety and the Installation guidelines.
  2. Turn off the server (see Turning off the server) and all attached peripheral devices. Disconnect all power cords; then, disconnect all external cables from the server.
  3. Remove the top cover (see Removing the server top cover).
  4. Remove the microprocessor and memory expansion tray (see Removing the microprocessor and memory expansion tray assembly) or DIMM air baffle (see Removing the DIMM air baffle), whichever one is installed.
  5. Follow the cabling instructions, if any come with the adapter. Route the adapter cables before you install the adapter.
    Note
    The cables should be routed through the SAS cable guide.
  6. To install an adapter on the system board, complete the following steps:
    1. Open the PCIe retention latch and remove the PCIe filler bracket from the connector in which you want to install the adapter.
    2. Insert the adapter into the PCIe slot, aligning the edge connector on the adapter with the connector on the system board. Press the edge of the connector on the adapter firmly into the connector on the system board. Make sure that the adapter snaps into the PCIe connector securely.

      Attention: Make sure that the adapter is correctly seated. An incorrectly seated adapter might cause damage to the system board or the adapter.

    3. Close the PCIe retention latch.
    4. Skip to8.
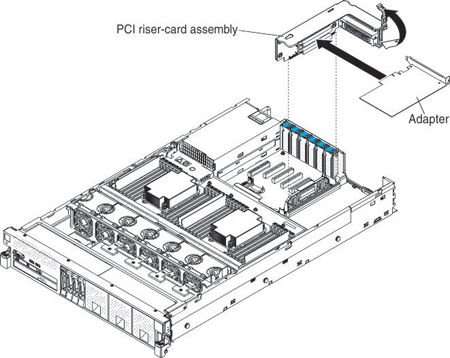
  7. To install an adapter on the PCIe riser-card assembly, complete the following steps:
    1. Grasp the riser-card assembly by the blue touch points and pull it up until it disengages from the connector on the system board.
    2. Open the PCIe retention latch.
    3. Remove the PCIe filler bracket from the slot in which you want to install the adapter.
    4. Make sure that the PCIe retention latch is in the open position.
    5. Insert the adapter into the connector on the riser-card assembly, aligning the edge connector on the adapter with the connector on the riser-card assembly. Press the edge of the connector on the adapter firmly into the riser-card assembly connector. Make sure that the adapter snaps into the connector on the riser-card assembly securely.

      Attention: Make sure that the adapter is correctly seated into the riser-card assembly connector and that the riser-card assembly is correctly seated into the connector on the system board before you turn on the server. An incorrectly seated adapter might cause damage to the system board, the riser-card, or the adapter.

      install adapter
    6. Close the PCIe retention latch.
    7. Install the riser-card assembly in the server (see Installing a PCIe riser-card assembly).
  8. Perform any configuration tasks that are required for the adapter.
  9. If you are replacing a ServeRAID adapter, import your RAID configuration to the replacement adapter as a foreign configuration. See ServeRAID-M Software User's Guide for instructions.

If you have other devices to install or remove, do so now. Otherwise, go to Completing the installation.