
Replacing the midplane

Use this information for instructions on how to replace the chassis midplane.

To replace the chassis midplane, complete the following steps:

Note
This procedure for replacing the midplane apply to both the 4-socket and the 8-socket configurations of the server, unless otherwise specified.
  1. Record (take a photograph of the barcode label or write down the barcode number) the 11S and FRU barcode information for the existing and replacement 4-socket or 8-socket midplane. The label with this information is on the midplane printed circuit board. This information is required to update the customer records, service offering support information, and component VPD.
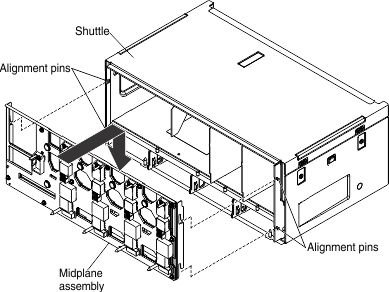
  2. Align the slots on the sides of the midplane with the alignment pins on the shuttle and lower the midplane onto the pins until the midplane is seated in place.

    Illustration of installing the midplane
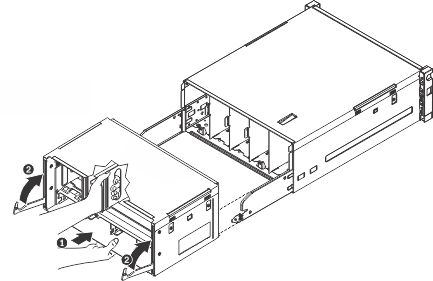
  3. Grasp the shuttle with your hand through the hole on the center of the shuttle and grasp the bottom of the shuttle with your other hand and align it with the shuttle slot; then, slide the shuttle into the chassis until it is seated firmly.

    Illustration of replacing the shuttle
  4. Rotate the shuttle cam handles up until they lock in place on the chassis.
  5. Reinstall all of the components in the rear of the server.
  6. Slide the components in the front of the server back into the server.
  7. Reconnect the power cords and any cables that you removed.
  8. Turn on the peripheral devices and the server.
  9. Update the midplane part number, FRU part number, serial number, and prefix serial number in the customer records, service offering support information, and component Vital Product Data (VPD) using the Advanced Settings Utility (ASU) program. For more information about using ASU and additional command options, see Advanced Settings Utility program.
    1. Update component part number in customer records and service offering support information

      The component part number is the first seven characters following the “11S” of the 11S barcode. In the following example, the component part number is shown in bold:

      11S12X4567YJ1105A34567
    2. Update component part number VPD

      Use the following ASU command to update the component VPD:

      asu64 set VPD.CompVPD_PartNumber.#<p/n>[sp][sp][sp][sp][sp]

      where:

      • # is 1 for a 4-socket midplane and 2 for an 8-socket midplane.

      • <p/n> is the 7–character component part number followed by five padding spaces.

    3. Update component serial number and prefix serial number in customer records and service offering information

      The serial number is the last six characters of the 11S barcode. In the following example, the serial number is shown in bold:

      11S12X4567YJ1105A34567

      The prefix serial number is the six characters of the 11S barcode that follow the first 10 characters of the 11S barcode (the six characters preceding the component serial number portion of the 11S barcode). In the following example, the prefix serial number is shown in bold:

      11S12X4567YJ1105A34567
    4. Update component serial number and prefix serial number VPD

      Use the following ASU command to update the component serial number and prefix serial number VPD:

      asu64 set VPD.CompVPD_SerialNumber.# <s/n>

      asu64 set VPD.CompVPD_PrefixSerialNumber.# <prefix_s/n>

      where:

      • # is 1 for a 4-socket midplane and 2 for an 8-socket midplane.

      • <s/n> is the 6–character component serial number.

      • <prefix_s/n> is the 6–character component prefix serial number.

    5. Update FRU part number in customer records and service offering information

      The FRU part number is the first seven characters following the “FRU:” of the FRU barcode. In the following example, the FRU part number is shown in bold:

      FRU:12X4567
    6. Update FRU part number VPD

      Use the following ASU command to update the FRU part number VPD:

      asu64 set VPD.CompVPD_FRUNumber.#<fru_number>[sp][sp][sp][sp][sp]

      where:

      • # is 1 for a 4-socket midplane and 2 for an 8-socket midplane.

      • <fru_number> is the 7–character FRU part number above followed by five padding spaces.

  10. Restart the IMM2; then, restart the server.