Use this information for instructions on how to remove the chassis shuttle.
To remove the chassis shuttle, complete the following steps:
- Before you begin, read Safety and Installation guidelines .
- Turn off the server (see Turning off the server) and all attached peripheral devices. Disconnect all power cords; then, disconnect all external cables from the server.
- Slide all of the components in the front of the server out slightly
- Remove all of the components from the rear of the server.
- Remove the shuttle.
- For the 4U server configuration, do the following:
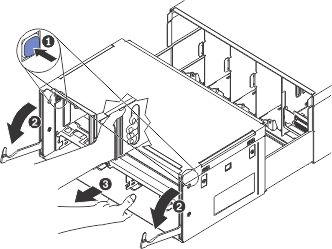
- Press the blue buttons on the interior wall of the shuttle to release the shuttle cam handles and rotate the handles all the way down.
- Grasp the shuttle with your hand through the hole on the center of the shuttle and grasp the bottom of the shuttle with your other hand and slide the shuttle out of the chassis.
- For the 8U server configuration, do the following:
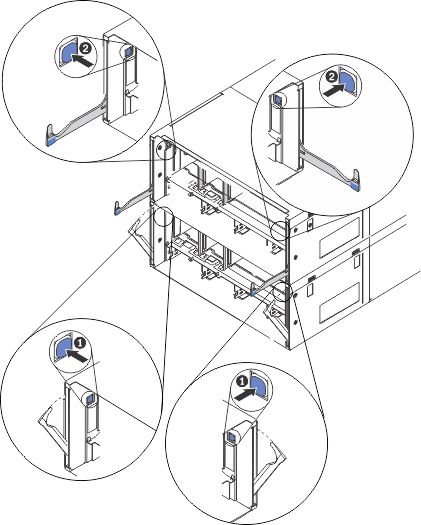
- Press the blue buttons on the interior wall of the bottom node shuttle to release the shuttle cam handles (do not rotate the handles down).
- Press the blue buttons on the interior wall of the top node shuttle to release the shuttle cam handles and rotate the handles all the way down.
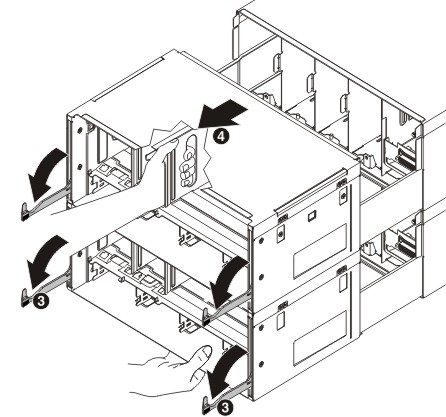
- Now rotate the cam handles on the bottom node shuttle all the way down.
- Grasp the shuttle with your hand through the hole on the center of the shuttle and grasp the bottom of the shuttle with your other hand and slide the shuttle out of the chassis.
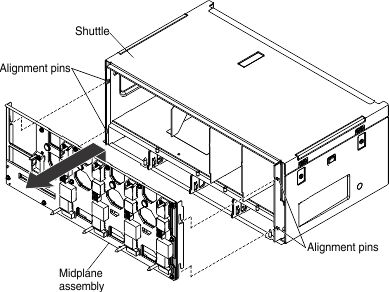
- Lift the midplane all the way up (off the alignment pins on the shuttle) and remove it from the shuttle.
If you are instructed to return the shuttle, follow all packaging instructions, and use any packaging materials for shipping that are supplied to you.


