Installing a concurrent KVM card

To install a cKVM card, complete the following steps.
Note
  1. The following illustration shows how to install the cKVM in the system board.
  2. The illustrations in this document might differ slightly from your hardware.
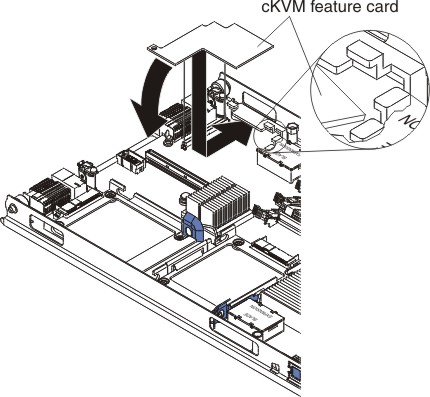
Graphic illustrating installing a concurrent KVM card

  1. Before you begin, read Safety and Installation guidelines.
  2. If the blade server is installed in a BladeCenter unit, remove it (see Removing the blade server from the BladeCenter unit).
  3. Remove the blade server cover (see Removing the blade server cover for instructions).
  4. If an optional expansion unit is installed, remove it (see Removing an optional expansion unit).
  5. Touch the static-protective package that contains the expansion card to any unpainted metal surface on the BladeCenter unit or any unpainted metal surface on any other grounded rack component; then, remove the cKVM card from the package.
  6. Locate the cKVM connector and orient the cKVM card.
  7. Slide the right side of the card (the side of the card that is away from the cKVM connector) between the two tabs at the right side of the expansion card bracket; then, gently pivot the card into the connector.
    Note
    For device-driver and configuration information to complete the installation of the cKVM card, see the documentation that comes with the card.
  8. Install the optional expansion unit, if you removed one from the blade server when you removed the cKVM card (see Installing an optional expansion unit).
  9. If you removed an I/O expansion card, reinstall it (see Removing an I/O expansion card.
  10. Install the blade server cover (see Installing the blade server cover).
  11. Install the blade server into the BladeCenter unit (see Installing the blade server in a BladeCenter unit).