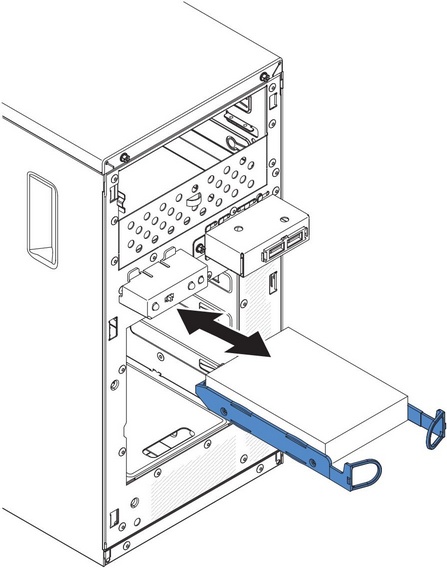
Replacing a simple-swap hard disk drive
This procedure applies only to 4U server models with non-hot-swap power supplies.
For 4U server models with non-hot-swap power supplies, the server supports up to four 3.5-inch simple-swap SATA hard disk drives, which are accessible from the front of the server. You must disconnect all power from the server before you remove or install simple-swap drives. Before you install a simple-swap SATA hard disk drive, read the following information:
Install the drives starting from the top bay to the bottom bay (bay 3, 4, 5, and then 6). The following tables list the IDs of the hard disk drives:
| Drive bay | HDD ID |
|---|---|
| 3 | 0 |
| 4 | 1 |
| 5 | 2 |
| 6 | 3 |
- The simple-swap SATA hard disk drives connect to the SATA 0 through SATA 3 connectors on the system board as follows:
- System board end cable connector 0 connects to the SATA 0 connector on the system board.
- System board end cable connector 1 connects to the SATA 1 connector on the system board.
- System board end cable connector 2 connects to the SATA 2 connector on the system board.
- System board end cable connector 3 connects to the SATA 3 connector on the system board.
- Hard disk drive 0 connects to the SATA 0 connector on the simple-swap hard disk drive backplate.
- Hard disk drive 1 connects to the SATA 2 connector on the simple-swap hard disk drive backplate.
- Hard disk drive 2 connects to the SATA 1 connector on the simple-swap hard disk drive backplate.
- Hard disk drive 3 connects to the SATA 3 connector on the simple-swap hard disk drive backplate.
Note
Under RAID mode:
- In uEFI setup menu:
- Drive 0 indicates hard disk drive 0.
- Drive 1 indicates hard disk drive 2.
- Drive 2 indicates hard disk drive 1.
- Drive 3 indicates hard disk drive 3.
- In MegaRAID Storage Manager utility:
- Slot 0 indicates hard disk drive 0.
- Slot 1 indicates hard disk drive 2.
- Slot 2 indicates hard disk drive 1.
- Slot 3 indicates hard disk drive 3.
Attention
Simple-swap hard disk drives are not hot-swappable. Disconnect all power from the server before you remove or install a simple-swap hard disk drive
Note
If you installed a ServeRAID adapter in the server, connect the other end of the SATA signal cable to the connector on the ServeRAID adapter.
To install a simple-swap SATA hard disk drive on 4U server models with non-hot-swap power supplies, complete the following steps.
- Read the safety information in Safety and Installation guidelines.
- Turn off the server and peripheral devices and disconnect all external cables and power cords.
- Remove the bezel (see Removing the bezel).
- Touch the static-protective package that contains the drive to any unpainted metal surface on the server; then, remove the drive from the package and place it on a static-protective surface.
- Align the drive assembly with the guide rails in the bay (the connector end of the drive goes in first).
- Pull the round blue loops of the drive assembly toward each other; then, carefully slide the drive assembly into the drive bay until it stops, and release the loops.
 NoteDo not release the loops on the drive assembly until it is completely seated.
 - If you have another drive to install or remove, do so now.
- Install the bezel (see Replacing the bezel).
- Reconnect the external cables and power cords; then, turn on the attached devices and turn on the server.
| OS | Support limitation | Support status |
|---|---|---|
| Windows 2008R2 SP1 64bit uEFI | Support | |
| Windows 2008R2 SP1 64bit legacy | Support with disk partitions less than 2 TB | Support with limitation |
| Windows 2008 SP2 64bit uEFI | Support | |
| Windows 2008 SP2 64bit legacy | Support with disk partitions less than 2 TB | Support with limitation |
| Windows 2008 SP2 32bit legacy | Support with disk partitions less than 2 TB | Support with limitation |
| RHEL 6.1 64bit uEFI | Support | |
| RHEL 6.1 64bit legacy | Support | |
| RHEL 6.1 32bit legacy | Support | |
| RHEL 5.6 64bit legacy RHEL 5.6 32bit legacy | Do not support, partition not allowed | Do not support |
| RHEL 5.6 64bit legacy RHEL 5.6 32bit legacy | Do not support, partition not allowed | Do not support |
| SLES11 SP1 64bit uEFI | Support | |
| SLES11 SP1 64bit legacy | Support | |
| SLES11 SP1 32bit legacy | Support | |
| SLES10 SP4 64bit legacy | Support with disk partitions less than 2 TB | Support with limitation |
| SLES10 SP4 32bit legacy | Support with disk partitions less than 2 TB | Support with limitation |
Note
3TB hard disk drives are not supported in OS 4690.
| ServeRAID adapter | Support limitation | Comment |
|---|---|---|
| ServeRAID M5014 | Support 3TB HDD, Virtual disk supports up to 12TB | Support |
| ServeRAID M1015 | Support 3TB HDD, Virtual disk supports up to 12TB | Support |
| ServeRAID-BR10il | Virtual disk only supports up to 8TB. | LSI chip limitation. Support with limitaton. |
| ServeRAID H1110 | Support 3TB HDD, Virtual disk supports up to 12TB | Support |
| ServeRAID C100 | Support 3TB HDD, Virtual disk supports up to 12TB | Support |
Give documentation feedback