
Installing a hot-swap hard disk drive

Use this information to a hot-swap hard disk drive into the server.

The following notes describe the type of hard disk drives that the server supports and other information that you must consider when you install a drive. For a list of supported drives, see https://static.lenovo.com/us/en/serverproven/index.shtml

  • Locate the documentation that comes with the hard disk drive and follow those instructions in addition to the instructions in this chapter.
  • The system supports support up to fourteen 3.5-inch hot-swap SAS/SATA hard disk drives (two 3.5-inch hot-swap SAS/SATA hard disk drives are located at the rear of the server).
  • All hot-swap drives in the server should have the same throughput speed rating. Using hard disk drives with different speed ratings will cause all drives to operate at the throughput speed of the slowest drive.
Attention
To maintain proper system cooling, do not operate the server for more than 10 minutes without either a drive or a filler panel installed in each bay.

To install a drive in a hot-swap bay, complete the following steps:

  1. Read the safety information that begins on page Safety and Installation guidelines.
  2. Touch the static-protective package that contains the drive to any unpainted metal surface on the server; then, remove the drive from the package and place it on a static-protective surface.
  3. Remove the drive filler panel from one of the empty hot-swap bays.
  4. Install the hard disk drive in the hot-swap bay:
    1. Orient the drive as shown in the illustration.
    2. Make sure that the tray handle is open.
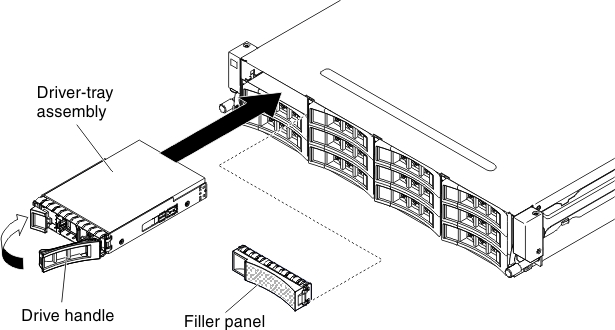
    3. Align the drive assembly with the guide rails in the bay.
      Figure 1. Hot-swap hard disk drive installation
      Hot-swap hard disk drive installation
    4. Gently push the drive assembly into the bay until the drive stops.
    5. Push the tray handle to the closed (locked) position.
    6. If the system is turned on, check the hard disk drive status LED to verify that the hard disk drive is operating correctly.
  5. Check the drive status LED to verify that the drive is operating correctly. If the yellow drive status LED for a drive is lit continuously, that drive is faulty and must be replaced. If the green drive activity LED is flashing, the drive is being accessed.
    Note
    If the server is configured for RAID operation using a ServeRAID adapter, you might have to reconfigure your disk arrays after you install drives. See the ServeRAID adapter documentation for additional information about RAID operation and complete instructions for using the ServeRAID adapter.
  6. If you are installing additional hot-swap drives, do so now.
  7. Restart the server. Confirm that it starts correctly and recognizes the newly installed devices, and make sure that no error LEDs are lit.
  8. Complete the additional steps in Instructions for Business Partners.

If you have other devices to install or remove, do so now. Otherwise, go to Completing the installation.