Performing staged update for a remote server
The UpdateXpress application supports to perform staged updates for a remote server.
The UpdateXpress application is running on a server installed with a supported operating system. For details of supported operating systems, see Supported operating systems.
- Launch the UpdateXpress application. See Launching the UpdateXpress application.
- In the Welcome window, click Next.
- In the Target Server window, select Manage the remote server, input the following information, and click Next.
IP address or Host name: BMC IP address or host name of the target system.
User Name: BMC user name of the target system.
Password: BMC password of the target system.
Port: BMC CIM or RSET port number. If users do not input, the default port is used.
NoteIf users are not intended to check the BMC server certificate, selectAccept BMC server's certificate by default, and click Next. - In the Task window, select Perform updating on target server, and click Next.
- In the Update Setting window, select one or more of the options and click Next.Note
- If Use a separate remote server instead of the BMC one is selected, input the following information:
IP address or Host name: BMC IP address or host name of the target system.
User Name: BMC user name of the target system.
Password: BMC password of the target system.
Port: BMC CIM or RSET port number. If users do not input, the default port is used.
Directory: Full path on the SFTP server. The updates file will be upload to that directory. Ensure that the directory is accessible. For example: /payload
Not to check the SFTP/HTTPS server key fingerprint, select Skip check SFTP server's key fingerprint.
- In the Updates Location window, select Check the Lenovo Support web site, and click Next.
- In the Target Directory window, specify the location for the updates to be downloaded or accept the default location, and click Next.
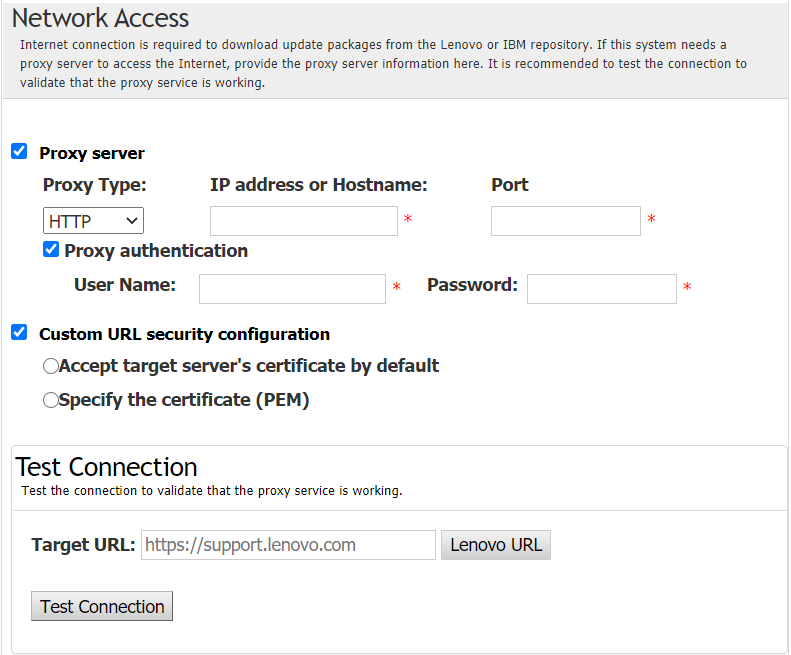
- On the Internet Access page, if users have no special requirement for security access, click Test Connection to check the network connection of the target URL, and click Next. If users have more security concerns, before clicking Test Connection, configure Proxy server and/or Custom URL security configuration depending on the security requirements as follows:
Proxy server
Select Proxy Server if users require an HTTP/HTTPS proxy to connect to the Web, and complete the following fields:
Proxy Type The proxy type of the proxy server. IP address or Hostname The host name, IP address, or domain name of the proxy server. Port The port number of the proxy server. Select Proxy authentication if credentials must be specified to authenticate to the proxy server, and complete the following fields:
User Name The user name for authenticating to the proxy server. Password The password for the specified user name.
Custom URL security configuration
Select Custom URL security configuration if users require a reverse proxy, and select one of the following options:Accept target server’s certificate by default
Specify the certificate (PEM)

- In the Update Type window, select the target update type, and click Next.
- In the Update Recommendation window, do one or more of the following:
To display all update packages, select Show updates of undetected devices.
To update the component, select the target component, and click Next.
- In the Acquire Updates window, the acquisition table displays the acquiring progress of the packages. When the progress is completed, click Next.
- In the Running updates window, click Begin Update > Yes > Next.NoteTo update the firmware with bundled packages, select
Update firmware with bundled package(s). This checkbox and its suboptions only support XCC2., and set the apply time. OnReset: Update the packages when the system is restarted next time.
Immediate: Update the packages immediately. The system might be restarted immediately.
OnStartUpdateRquest: Update the packages through managing the stage update or running OneCLI commands.
- In the Finish window, click the log to check the updates, and click Close to exit.