Removing the system board

Before you start, notice the following information:
  • After you replace the system board, you must either update the server with the latest firmware or restore the pre-existing firmware that the customer provides on a CD image. Make sure that you have the latest firmware or a copy of the pre-existing firmware before you proceed.

  • When you replace the system board, make sure that you remove the Integrated Management Module 2.1 (IMM2.1) Advanced Upgrade and place it on the new system board.

  • Before you replace the system board, make sure that you back up any Features on Demand (FoD) keys that were enabled. Reactivate FoD after replacing the system board. To activate FoD and install activation keys automatically, refer to the instructions in the Lenovo Features on Demand User's Guide. To download the document, go to the Lenovo Features on Demand website, log in, and click Help.

Note
After you remove the system board, you need to install a new one. See Installing the system board.
To remove the system board, do the following:
  1. Turn off the server. Then, disconnect all external cables and remove all peripheral devices.
  2. Remove the server cover. See Removing the server cover.
  3. Remove the air baffle. See Removing the air baffle.
  4. Remove the PCI riser-card assembly. See Removing the PCI riser-card assembly.
  5. Record where the cables are connected to the system board; then, disconnect them.
    Attention
    Disengage all latches, cable clips, release tabs, or locks on cable connectors beforehand. See Internal cable routing. Failing to release them before removing the cables will damage the cable connectors on the system board. Any damage to the cable connectors may require replacing the system board.
  6. Remove any of the following components that are installed on the system board and put them in a safe, static-protective place:
  7. Remove the system board.
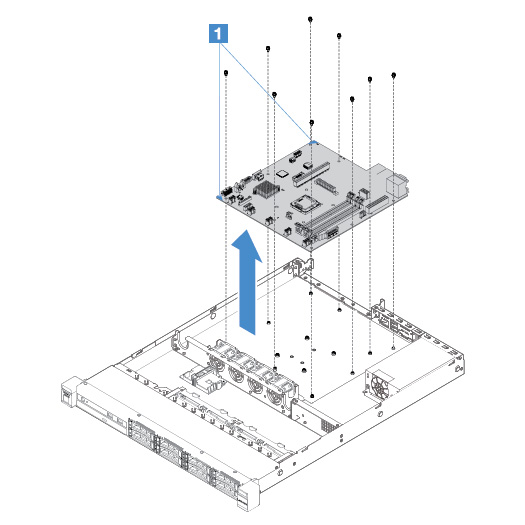
    1. Remove the nine screws that secure the system board to the chassis, and put the screws in a safe place.
    2. Hold the two corners 1 of the system board carefully. Avoid touching the connectors on the system board.
    3. Lift and tilt the system board upwards and slightly pull the system board towards the front of the server.
    4. Lift and remove the system board from the server carefully.
    Note
    When you remove the system board from the server, avoid touching the cable clips on the side of the chassis and the connectors on the system board. Do not damage any surrounding components inside the chassis.
    Figure 1. System board removal
    System board removal

If you are instructed to return the server component or optional device, follow all packaging instructions, and use any packaging materials for shipping that are supplied to you.

Before returning the failing system board, ensure that you remove the microprocessor socket cover from the new system board and install it onto the failing system board.