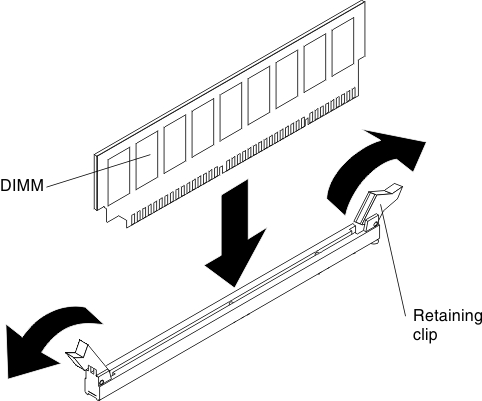
Installing a DIMM

Use this information to install a DIMM.

Note
The odd-numbered DIMM connectors are white-colored, while the even-numbered DIMM connectors are black-colored.
  1. Read the safety information that begins in Safety and Installation guidelines.
  2. Turn off the server (see Turning off the server) and all attached peripheral devices. Disconnect all power cords; then, disconnect all external cables as necessary to replace the device.
  3. Remove the server top cover (see Removing the server top cover).
  4. If you have the optional hot-swap rear hard disk drive cage installed, rotate it up (see Rotating the optional hot-swap rear hard disk drive cage up.
  5. Remove the PCI riser-card assembly (see Removing a PCI riser-card assembly.
  6. Remove the air baffle (see Removing the air baffle.
  7. Carefully flip open the retaining clip on each end of the DIMM connector.
    Attention
    To avoid breaking the retaining clips or damaging the DIMM connectors, open and close the clips gently.


  8. Touch the static-protective package that contains the DIMM to any unpainted metal surface on the server. Then, remove the DIMM from the package.
  9. Turn the DIMM so that the DIMM keys align correctly with the connector.
  10. Insert the DIMM into the connector by aligning the edges of the DIMM with the slots at the end of the DIMM connector. Firmly press the DIMM straight down into the connector by applying pressure on both ends of the DIMM simultaneously. The retaining clips snap into the locked position when the DIMM is firmly seated in the connector.

    Important: If there is a gap between the DIMM and the retaining clips, the DIMM has not been correctly inserted; open the retaining clips, remove the DIMM, and then reinsert it.

If you have other devices to install or remove, do so now. Otherwise, go to Completing the installation.