This procedure describes how to update the CNOS on your ThinkAgile SXM Series TOR switches (Lenovo ThinkSystem NE2572 RackSwitch for Purley-based solutions and Lenovo RackSwitch G8272 for Broadwell-based solutions).
Examples in this topic might show slightly different results, depending on the version of CNOS against which the commands are run. Important aspects shown in examples are called out.
To update CNOS on your ThinkAgile SXM Series TOR switches, follow these steps on the TOR1 switch, then verify switch functionality before repeating the process on the TOR2 switch.
- Insert the USB thumb drive into the TOR switch.
- Connect to the TOR switch using the serial console from the HLH.
- Sign in to the TOR switch using the credentials admin/<password>.
- Use the following commands to copy the new switch firmware image file from the root of the USB thumb drive to the standby image slot on the TOR switch (replace the bracketed item with the actual switch image file name):
enable
cp usb1 <ImageFileName>.imgs system-image all
|
| Example |
|---|
TOR1 login: admin
Password:
...
TOR1#enable
TOR1#cp usb1 CNOS/G8272-CNOS-10.6.1.0.imgs system-image all
WARNING: This operation will overlay the currently booting image.
Confirm download operation (y/n)? y
TOR1#
|
- To verify that the switch is set to restart using the new standby image, run the following command:
| Example |
|---|
TOR1#display boot
Current ZTP State: Enable
Current FLASH software:
  active image: version 10.6.1.0, downloaded 20:49:51 UTC Tue Jan 16 2018
  standby image: version 10.8.1.0, downloaded 10:25:35 UTC Thu Jan 11 2018
  Uboot: version 10.8.1.0, downloaded 07:47:27 UTC Sun Jan 14 2018
  ONIE: empty
Currently set to boot software active image
Current port mode: default mode
Next boot port mode: default mode
Currently scheduled reboot time: none
|
In the above example, two key details are found:
- To change the image from which the switch will boot, run the following commands:
configure
startup image standby
exit
|
| Example |
|---|
TOR1#configure
TOR1(config)# startup image standby
TOR1(config)#exit
TOR1#display boot
Current ZTP State: Enable
Current FLASH software:
  active image: version 10.6.1.0, downloaded 20:49:51 UTC Tue Jan 16 2018
  standby image: version 10.8.1.0, downloaded 10:25:35 UTC Thu Jan 11 2018
  Uboot: version 10.8.1.0, downloaded 07:47:27 UTC Sun Jan 14 2018
  ONIE: empty
Currently set to boot software standby image
Current port mode: default mode
Next boot port mode: default mode
|
In the above example, running the display boot command again shows that the switch is now set to boot from the standby image, which contains the new switch firmware image.
- Before restarting the TOR switch to implement the changes, it is good practice to shut down all the ports on the switch and confirm that the other TOR switch has taken over and is processing all network traffic. To shut down the ports on the TOR switch that is being updated, run the following commands:
configure
interface ethernet 1/1-54
shutdown
exit
|
- Once the ports have been shut down, verify the failover of traffic to TOR2 by verifying connectivity. Follow these steps:
- Use the top menu of the XClarity Administrator browser interface to navigate to .
- Click the Test Connection button near the top of the interface.
- In the Host field, enter 8.8.8.8 and then click Test Connection.
- A Success window displays. Click Close to dismiss this window.
- As an additional verification step, sign in to the Azure Stack Hub Administrator Portal.
- Check the Azure Stack Hub Administrator Portal to ensure that no alerts are currently visible.
Figure 1. Checking Azure Stack Hub Administrator Portal for alerts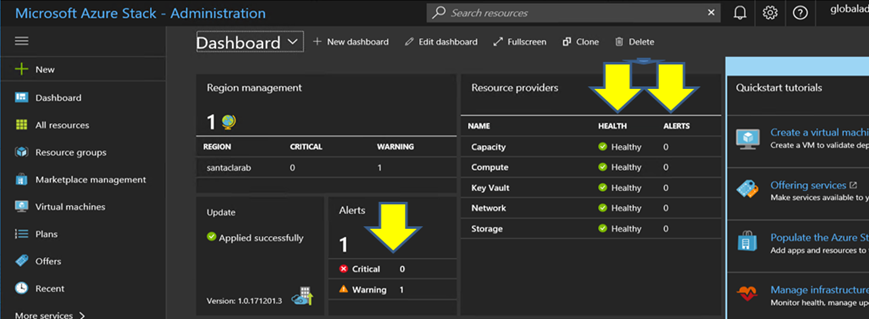
- Once switch failover is complete, restart the TOR switch that is being updated by issuing the following command: Reload
A warning is displayed since the current running configuration has all ports shut down, which is different from the current startup configuration. Enter y and press Enter to continue.
Do NOT save the running configuration at this point or all ports will remain shut down after the switch is reloaded.
| Example |
|---|
TOR1(config)#reload
WARNING: The running-config is different to startup-config.
Confirm operation without saving running-config to startup-config (y/n)? y
... After reload ...
TOR1 login: admin
Password:
...
TOR1#enable
|
- Once the switch has come back online, sign in to the switch using the serial console.
- Remove the USB thumb drive from the TOR switch.
Refer to
Verifying TOR switch functionality to ensure proper functionality of the updated TOR switch. Once verified, repeat the above process, including verification steps, on the other TOR switch. If the BMC switch also needs to be updated, proceed to
Updating BMC switch firmware using the CLI. Otherwise, the switch firmware update process is now complete.