Replacing a tape drive
Use this information to install a tape drive.
To install an optional DVD drive, complete the following steps:
- Read the safety information that begins on Safety and Installation guidelines.
- Turn off the server and peripheral devices and disconnect the power cords and all external cables.
- Remove the cover (see Removing the cover).
- If the tape drive came with metal spacers on the installed on the sides, remove the spacers.
- Install the drive tray on the new tape drive as shown, using the four screws that you removed from the former drive.Figure 1. Screws installation

- Prepare the drive according to the instructions that come with the drive, setting any switches or jumpers.
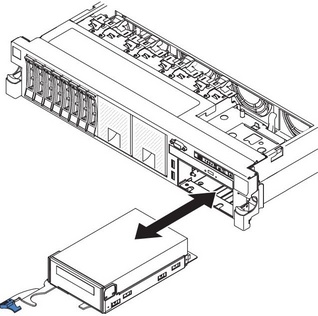
- Slide the tape-drive assembly most of the way into the tape-drive bay.Figure 2. Tape drive installation

- Using the cables from the former tape drive, connect the signal and power cables to the back of the tape drive.
- Make sure all the cables are out of the way, and slide the tape-drive assembly the rest of the way into the tape-drive bay.
- Push the tray handle to the closed (locked) position.
- Replace the cover (see Replacing the cover).
- Slide the server into the rack.
- Reconnect the power cords and any cables that you removed.
- Turn on the peripheral devices and the server.
Give documentation feedback