
Removing a tape drive

Use this information to remove a tape drive.

To remove an optional tape drive, complete the following steps:

  1. Read the safety information that begins on Safety and Installation guidelines.
  2. Turn off the server and peripheral devices and disconnect all power cords.
  3. Remove the server cover (see Removing the cover).
  4. Open the tape drive tray release latch and slide the drive tray out of the bay approximately 25 mm (1 inch).
  5. Disconnect the power and signal cables from the rear of the tape drive.
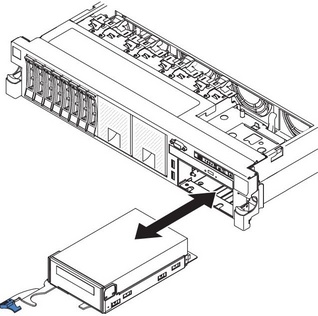
  6. Pull the drive completely out of the bay.
    Figure 1. Tape drive removal
    Tape drive removal
  7. Remove the tape drive from the drive tray by removing the four screws on the sides of the tray.
    Figure 2. Screws removal
    Screws removal
  8. If you are not installing another drive in the bay, insert the tape drive filler panel into the empty tape drive bay.
  9. If you are instructed to return the drive, follow all packaging instructions, and use any packaging materials for shipping that are supplied to you.