Setting up Lenovo SDI Management Platform on a local system
Install and configure the Lenovo SDI Management Platform virtual appliance on a system in your local environment.
About this task
You can assign the virtual appliance IP address using a static IP address on the eth0 port during configuration.
If you do not assign the IP address during configuration, IP settings are assigned using Dynamic Host Configuration Protocol (DHCP) by default when you initially start the virtual appliance. You can configure the IP settings of Lenovo SDI Management Platform when you initially start the virtual appliance. Ensure that you have the required IP information before starting. You have a maximum of 60 seconds to enter settings at each prompt.
For static IPv4 settings, you can change the IP address, subnet mask, gateway IP address, DNS 1 IP address (optional), and DNS 2 IP address (optional).
For static IPv6 settings, you can change the IP address, prefix length, DNS 1 IP address (optional), and DNS 2 IP address (optional).
For DHCP settings, you can change the primary and loopback interface settings (auto lo, iface lo inet loopback, auto eth0, and iface eth0 inet dhcp).
Procedure
To install the Lenovo SDI Management Platform virtual appliance, complete the following steps:
Download the Lenovo SDI Management Platform image (OVF template) to the local system.
Install and configure the virtual appliance on the local system.
For ESXi using VMware vSphere
Connect to the host through the VMware vSphere Client.
Right-click Virtual Machines > **Create/Register VM** > Deploy a virtual machine from an OVF or OVA file.
Complete each step in the virtual appliance deployment wizard. Keep the following considerations in mind as you progress through the wizard:
Device Name. Specify a unique name for the host.
Disk Size. Select a datastore with an available space of at least 351 GB.
Disk Format. Select the disk format that meets the needs of your organization. Select Think Provision if you are not sure which format to use.
Additional Settings. Optionally update the network configuration for the virtual appliance.
For ESXi using VMware vCenter
Connect to the host through VMware vCenter.
Under "Hosts and Clusters" or "VMs and Templates", right-click the host, and select Deploy OVF Template.
Complete each step in the virtual appliance deployment wizard. Keep the following considerations in mind as you progress through the wizard:
Device Name. Specify a unique name for the host.
Disk Size. Select a datastore with an available space of at least 351 GB.
Disk Format. Select the disk format that meets the needs of your organization. Select Think Provision if you are not sure which format to use.
Customize template. Optionally update the network configuration for the virtual appliance to set a static IP address for the eth0 interface.
If you choose to set the static IP address for the virtual appliance, complete the following steps:
Select the VM in the Inventory.
Click Configuration > vApp, and then select Enable vApp Options.
After that, select OVF environment for the IP allocation scheme.
On the OVF Details tab, select "VMware Tools” for OVF environment transport.

Power on the virtual appliance. When the virtual appliance is started, the IPv4 and IPv6 addresses assigned for each interface are listed, as shown in the following example.
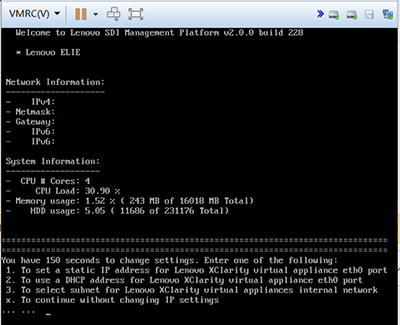
Optional: Configure the IP address for the virtual appliance.
Use the default IP address. If you do not make a selection within 150s or if you enter x, the initial startup continues using the IP address that is assigned by default.
Assign a static IP address for the eth0 port. Enter 1, and then follow the prompts to change the settings.
Assign a new IP address for the eth0 port using DHCP. Enter 2, and then follow the prompts to change the settings.
Select the subnet for the virtual appliance internal network. Enter 3, and then follow the prompts to change the settings.
By default, Lenovo SDI Management Platform uses the following subnets for its internal network. If these subnets overlap with the host network, change the subnets to one of the available options to avoid network issues.
192.168.56.0/24
192.168.128.0/18
192.168.192.0/18
Important: If you specify an invalid value, an error is returned. You have up to four attempts to enter a valid value.
After you finish
- (Optional) Installing Lenovo XClarity Administrator.
- (Optional) Installing Lenovo XClarity Integrator for VMware vCenter.
- Log in to and configure Lenovo SDI Management Platform.