Configure for CentOS 6 instances
There is a known issue with cloning CentOS 6 machines wherein the resulting machine retains information regarding the ETH0 network interface (including MAC address) of the original. As a result, it labels the new network interface as eth1 and is unable to start it because there are no network scripts referencing eth1.
Method 1. Click Run sysprep when creating a CentOS 6 instance from the template. This will prevent the problem from occurring.
For more information about creating an application instance from a template, see the following topic:
- Method 2. After creating a CentOS 6 instance without running sysprep, complete the following steps:
In the ThinkAgile CP Cloud Controller management console, go to the Profile tab of the CentOS 6 instance. Make note of the MAC Address (we will use 76:00:00:00:00:00 for this example).
Log in to the CentOS instance and run the following command:
vi /etc/udev/rules.d/70-persistent-net.rules
There will be two entries: eth0 and eth1.
Type i to input data, and delete the entry with the MAC address that does not match the one that you recorded from the Profile tab. If the remaining entry is for eth1, change it to eth0.
Press ESC and type :wq to write the changes and exit.
Run the following command:
ls /etc/sysconfig/network-scripts
If ifcfg-eth1 is present, delete it:
rm -d /etc/sysconfig/network-scripts/ifcfg-eth1
Run the following commands:
Type i to input data.
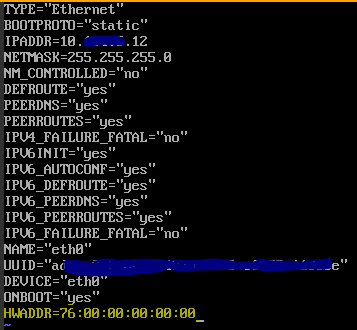
Add aHWADDR={MAC Address} entry.
Set ONBOOT=yes if it is not set already.
Press ESC and type :wq to write the changes and exit.
To start the network interface, Run the command to start the network interface:
ifup eth0