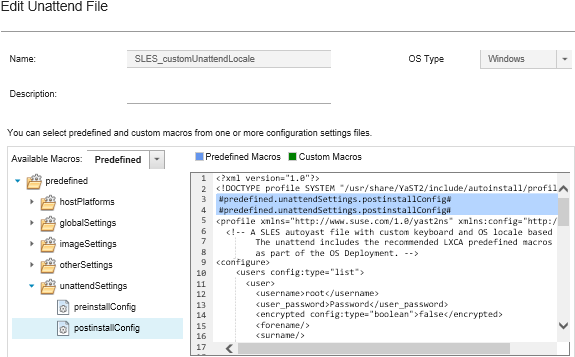
Injecting predefined and custom macros to an unattend file
You can add predefined and custom macros to an unattend file.
About this task
Macros give you the ability to add dynamic data (configuration settings) to an unattend file. You provide the data values when the OS-image profile is deployed.
Lenovo XClarity Administrator provides a set of predefine macros that you can add to an unattend file without associating a custom configuration-settings file. For a list of predefined macros, see Predefined macros.
#predefined.unattendSettings.preinstallConfig# and #predefined.unattendSettings postinstallConfig#. Used to communicate status from the OS installer, as well as several other critical installation steps.
See the following example OS-deployment scenarios for more information about how to include the installation-configuration macros.
#predefined.unattendSettings.networkConfig#. (For ESXi and RHEL only) Enables XClarity Administrator to configure the network. This macro uses the network settings that are specified on the Deploy OS Images page. If you do not include this macro in the unattend file or if the network settings are not defined in XClarity Administrator, you must configure the IP interface as part of the unattend file so that the host has a network route back to XClarity Administrator.
See the following example OS-deployment scenarios for more information about how to include the network-configuration macro.
#predefined.unattendSettings.storageConfig#. (For ESXi and RHEL only) Enables XClarity Administrator to configure storage on the host. This macro uses the storage settings that are specified on the Deploy OS Images page. If you do not include this macro in the unattend file or if the storage settings are not defined in XClarity Administrator, you must specify the storage configuration in unattend file.
See the following example OS-deployment scenarios for more information about how to include the storage-configuration macro.
You can create custom macros by creating a configuration-settings file and then associating the unattend file with a custom configuration-settings file. When you import the custom configuration-settings file, XClarity Administrator creates a macro for each configuration setting in the file.
Procedure
Complete the following steps to add macros to an unattend file.
