Removing an optional tape drive

Use this information to remove an optional tape drive.

Read the safety information in Safety and Installation guidelines.

If you are replacing a server component in the server, you need to turn off the server and peripheral devices, and disconnect the power cords and all external cables.

To remove an optional full-height tape drive, complete the following steps.

  1. Unlock and remove the left-side cover (see Removing the left-side cover).
  2. Open the bezel (see Opening the bezel media door).
  3. Remove the air baffle if installed (see Removing the air baffle).
  4. Remove the fan cage assembly (see Removing the fan cage assembly).
  5. Disconnect the power and signal cables from the back of the tape drive.
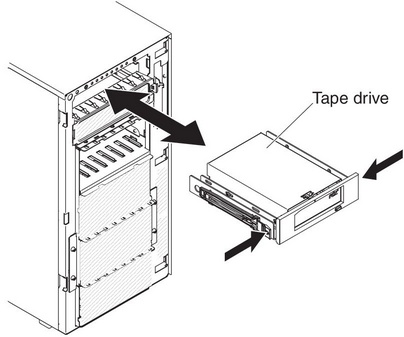
  6. Grasp the blue tabs on each side of the tape drive and press them inward while you pull the drive out of the server.
    Figure 1. Slide the tape drive out of the drive bay
    Slide the tape drive out of the drive bay
  7. Note the location of the blue rails on the tape drive; then, remove the blue rails and save them for future use.
  8. Gently pull the tape drive out of the server.

If you are instructed to return the server component or optional device, follow all packaging instructions, and use any packaging materials for shipping that are supplied to you.