Managing host disks
This topic describes how to manage host disks by using wizards, for example, adding, replacing, or removing disks for vSAN Express Storage Architecture clusters and vSAN Original Storage Architecture clusters.
Replacing a vSAN disk
Replace an existing disk used as a vSAN datastore with a new one.
Before you begin
Ensure that the target disk has already been used as a vSAN datastore.
Procedure
In the host hardware topology, select the target disk.
Click the Replace Disk button to display the Replace Disk wizard.
In the first step of Verification, the location of the target disk in the hardware topology and its details will be displayed. The hardware topology highlights the target disk and other members of the disk group where it is located; the target disk details show its detailed information. Check whether the target disk information is correct and click Next.
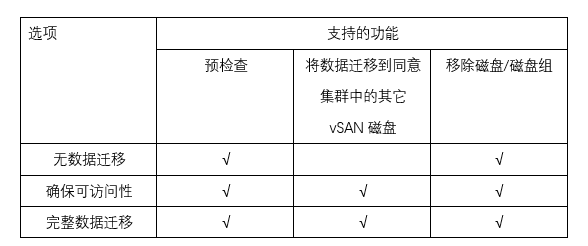
In the second step of Migrate Data, select one of the following required modes for disk data migration from the drop-down list of Select the data migration mode:
Click Execute Now, wait for the process of removing the disk from the disk group or disk pool to complete, and click Next.
In the third step of Replace Disk, the hardware topology of the host will be displayed, with the target disk highlighted. Click **Disk LED and Host LED** below the topology to assist remote personnel in identifying the target disk and pulling it out from the disk slot.
Insert a new disk into the same disk slot and click Detect New Disk. Wait for the detection process to complete. Information about the new disk and old disk will be displayed in the table below. Please confirm that the information is correct.
Click Auto Claim New Disk to automatically add the new disk to the disk group or disk pool. :::note Note:
If the disk being replaced is the cache disk or the last capacity disk in the disk group, the entire disk group will be removed. If you click Automatically declare new disks at this time, the system will match other disks in the removed disk group and automatically rebuild a new disk group.
:::
Click Finish to complete the disk replacement.
Removing a vSAN disk
Remove an existing disk used as a vSAN datastore.
Before you begin
Ensure that the target disk has already been used as a vSAN datastore.
If data deduplication and compression are enabled on the vSAN host, removing the high-speed cache disk or the last capacity disk from the disk group will remove the entire disk group. If necessary, manually recreate a disk group.
A physical disk removed from the slot will be represented by a dotted line and its status will be empty.
Procedure
In the host hardware topology, select the target disk.
Click the Remove Disk button to display the Remove Disk Wizard.
In the first step of Verification, the location of the target disk in the hardware topology and its details will be displayed. The hardware topology highlights the target disk and other members of the disk group where it is located; the target disk details show its detailed information. Check whether the target disk information is correct and click Next.
In the second step of Migrate Data, select one of the following required modes for disk data migration from the drop-down list of Select the data migration mode:
Click Execute Now, wait for the process of removing the disk from the disk group or disk pool to complete, and click Next.
In the third stepRemove diskOn the page, the host’sHardware topology diagram, the hardware topology diagram will be highlightedtarget disk, at this time you can click on the **Disk LED under the topology as well asHost LED ** to assist remote personnel to identify the correct disk and perform removal operations.
Click Finish to complete disk removal.
Adding a vSAN disk
Add a disk to a vSAN datastore.
Before you begin
The target disk must be an unclaimed disk.
Procedure
In the host hardware topology, select the target disk.
Click the Add Disk button to display the Add Disk Wizard.
in the first stepverify, the location of the target disk in the hardware topology map will be highlighted, the disk's detailed information will be displayed in the list, and it will automatically check whether it is allowed to be added to the VSAN data store. Check whether the target disk information is correct and click Next.
For the second step of Operation, do either of the following:
a. If the current host is in an ESA cluster, the Operation page only displays the Add Disk button. Click Add Disk directly and wait for the process to complete.
b. If the current host is in a non-ESA cluster, the Operation page displays a list of disk groups for the host. Select a disk group from the disk group list, click Add Disk, and wait for the process to complete.
Click Finish to complete disk addition.
Turning on/off disk LED
Turn on/off the LED of a disk.
Before you begin Select a disk.
Procedure
- Click Disk LED: On to turn on the disk LED.
- Click Disk LED: Off to turn off the disk LED.