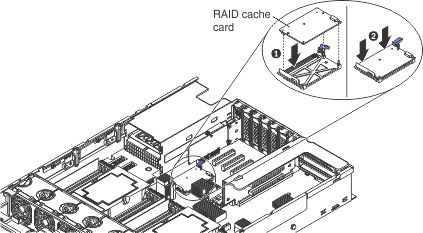
Use this information to replace a RAID cache card.
To install a RAID cache card, complete the following steps:
- Read the safety information and installation guidelines, see Safety and Installation guidelines.
- Touch the static-protective package that contains the new RAID cache card to any unpainted surface on the outside of the server; then, grasp the card by the top edge or upper corners of the card and remove it from the package.
- If you are replacing a cache card that is installed on the system board, complete the following steps.
- Connect the flash power module cable to the cache card.
- Align the cache card with the RAID cache card slot on the system board and lower it onto the connector.
To assist in aligning the cache card, you can align the cache card holes with the two RAID cache card connector Guide Pins; then, lower the cache card onto the connector.

- Gently press down on the touch points of the cache card until it clicks into place on the connector and is firmly seated.
- Reconnect the cache card cable to the flash power module in the battery/flash power module tray.
- Continue tostep 5.
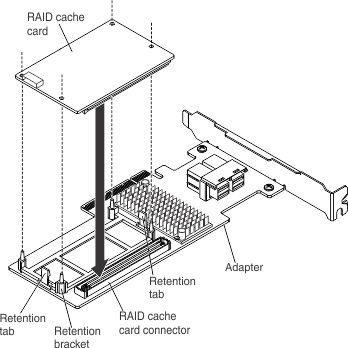
- If you are replacing a cache card on the RAID adapter, complete the following steps:
- Align the cache card with the RAID cache card slot on the RAID adapter and lower it onto the connector.
- Gently press down on the touch points of the cache card until it clicks into place on the connector and is firmly seated
- Reconnect the flash power module cable to the cache card.
- Align the PCI riser-card assembly with the PCI slot connector on the system board and align slots on the PCI riser-card assembly with the hinges on the chassis; then, press down firmly until the riser-card assembly is seated correctly in the connector on the system board.
- Insert the adapter into the connector on the riser-card until it is firmly seated.
- Reconnect the flash power module cable to the flash power module in the battery/flash power module tray located on top of the USB/video assembly near the front of the server.
- Go tostep 5.
- Replace the cover (see Replacing the server top cover).
- Slide the server in the rack.
- Reconnect the power cord and any cables that you removed.
- Turn on the peripheral devices and the server.

