For CentOS instances to use multiple vNICs, the network interfaces must be configured within the operating system.
Complete the following steps to configure the network interfaces:
- In the ThinkAgile CP Cloud Controller management console, go to the Profile tab of the instance. Make note of the MAC Addresses for each vNIC (in this example, B4:D1:35:00:03:6A for vNIC 0 and B4:D1:35:00:03:6B for vNIC 1).
- Log in to the CentOS instance.
- Run the following command:
cd /etc/sysconfig/network-scripts
and then:
ls
If there are no ifcfg-eth# files for all of the vNICs, those files will need to be created. For example, if two vNICs are attached, there should be ifcfg-eth0 and ifcfg-eth1.
- To create a copy of the ifcfg-eth0 file, run the following command:
- Edit the ifcfg-eth0 files
- Run the following command:
vi /etc/sysconfig/network-scripts/ifcfg-eth0
- Type i to input data.
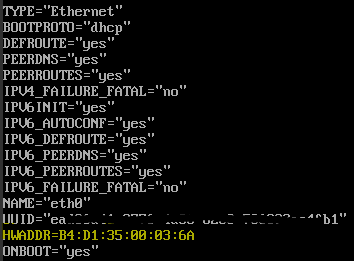
- Add the HWADDR={MAC Address} entry noted in the first step.
- Set ONBOOT=yes if it is not set already.
- Press ESC and type :wq to write the changes and exit.
Figure 1. Updated ifcfg-eth0 file 
- Edit the ifcfg-eth0 files
- Run the following command:
vi /etc/sysconfig/network-scripts/ifcfg-eth1
- Type i to input data.
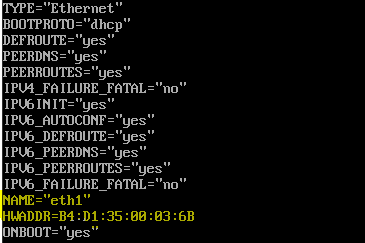
- Add the HWADDR={MAC Address} entry noted in the first step.
- Set ONBOOT=yes if it is not set already.
- Change DEVICE=eth0 to DEVICE=eth1
- Remove the UUID line so that it does not conflict with ETH0
- Press ESC and type :wq to write the changes and exit.
Figure 2. Updated ifcfg-eth1 file 
- Run the following commands to start the network interfaces:
These instructions will bring up the network interfaces and allow them to receive IPs. If additional networking configuration is required, refer to CentOS documentation.

