
Replacing the 8x1.8-inch SSD backplane assembly

Use this information to replace the 8x1.8-inch SSD backplane assembly.

Attention
  1. Before removing any components or disconnecting any cables, keep note of their respective locations and how they are connected to the system board.

To replace the 8x1.8-inch hot-swap SSD backplane assembly, complete the following steps:

  1. Read the safety information that begins on Safety and Installation guidelines.
  2. Turn off the server and peripheral devices and disconnect the power cords and all external cables, if necessary.
  3. Remove the cover (see Removing the cover).
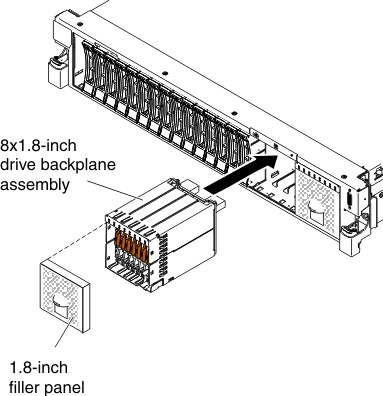
  4. Align the drive backplane assembly with the drive-bay slots in which you want to install the assembly.
    Figure 1. Backplane assembly installation Backplane assembly installation
  5. Slide the drive backplane assembly into the slot until it clicks into place.
  6. Connect the combination power/configuration cable to the connectors on the backplane assembly; then connect the signal cables to the backplane assembly (as shown in the illustration).
    Note
    You can reconnect the cables to the drive backplane before installing the backplane onto the cage or you can connect the cables after you install the backplane, if that is easier for you.
  7. Reinstall the drives that you removed from the old assembly into the new drive backplane assembly (see Replacing a hot-swap drive).
  8. Install the drive filler panel.
  9. Install the cover (see Replacing the cover).
  10. Slide the server into the rack.
  11. Reconnect the power cords and any cables that you removed.
  12. Turn on the peripheral devices and the server.