Configure migration workers
Follow these steps to configure your Migration Workers.
- Click Settings in the top navigation bar.Figure 1. Migration Manager menu - Settings

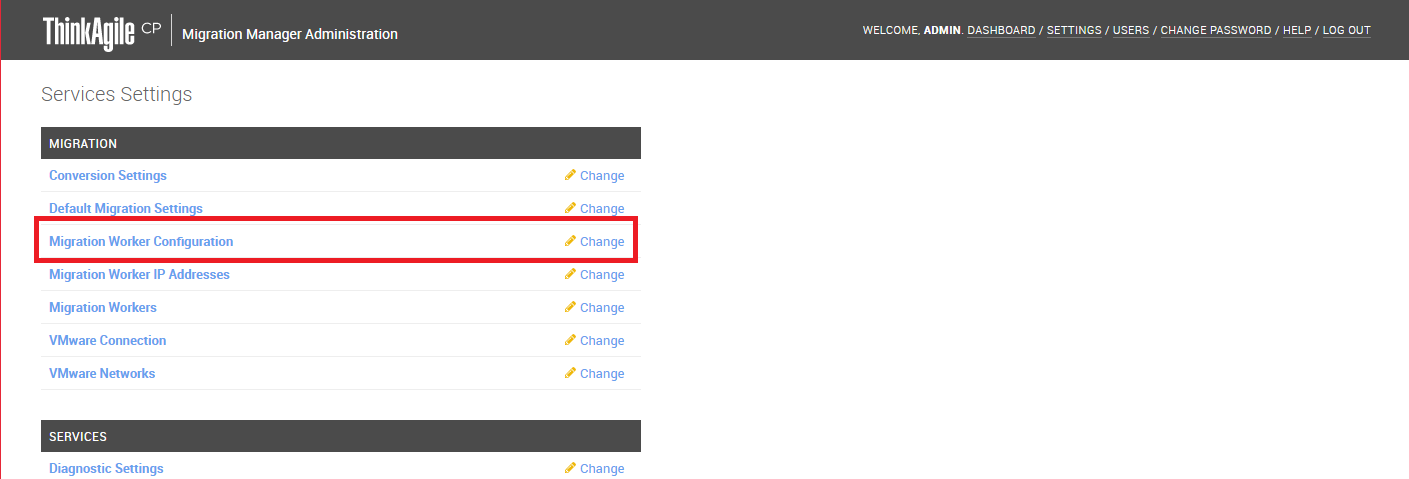
- On the Settings page, click Migration Worker Configuration.Figure 2. Migration Manager Settings
The Change Migration Worker Configuration page opens.
Figure 3. Migration Manager Settings - Migration Worker Configuration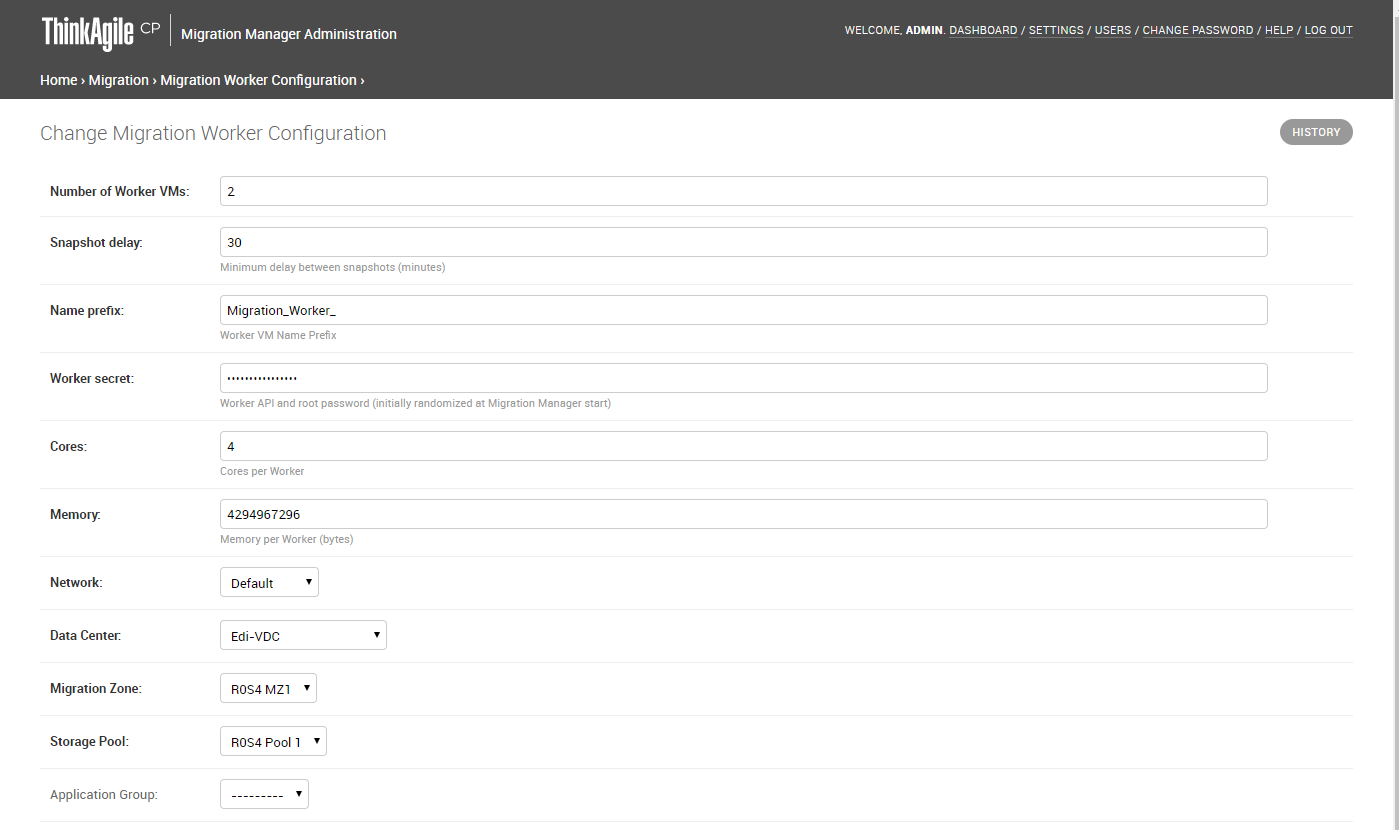 Figure 4. Migration manager Settings - Cont. (Worker IP Configuration Settings — optional)
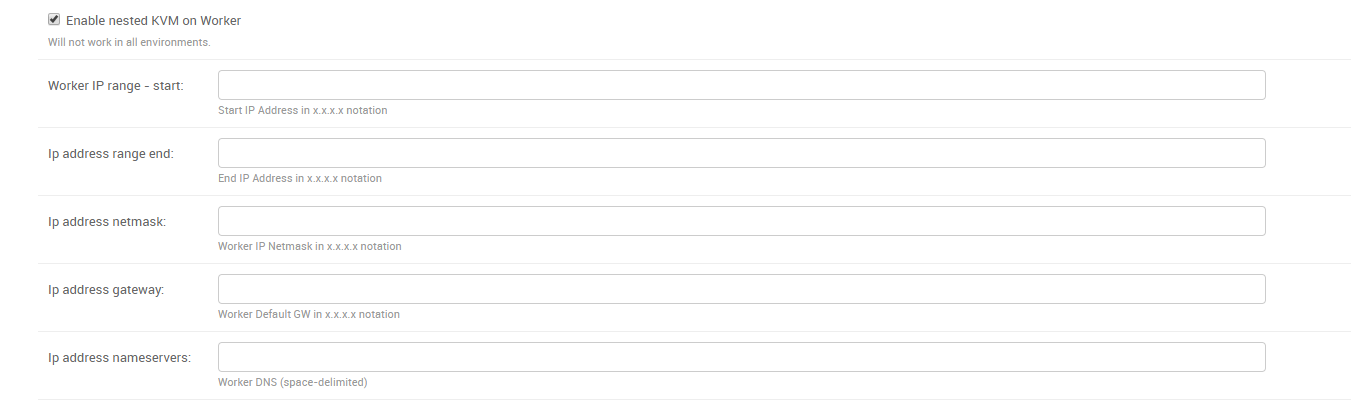
- Define the following settings to be used for and by Migration Workers.Note
In the current Migration Manager release, these defaults apply to all migrations, and you are not (yet) able to override them. If you want to target migrations to multiple virtual datacenters, migration zones, and storage pools, ThinkAgile CP recommends deploying multiple Migration Manager instances.
Number of Worker VMs – Enter the number of workers to create as a pool of VMs for migrations. One worker is assigned one VMware VM for synchronization and conversion, so the number of workers drives the number of parallel synchronizations and migrations that can occur. Once a VM has completed its Final Cutover, the worker is released and returned to the pool. For reasons of workload on the source side, we recommend starting with five (5) or less workers and scaling up as experience shows acceptable operational impacts.
NoteThe number of workers that may run in parallel is governed by the VMware Network File Copy (NFC) connection limits, which apply per vSphere server and per ESXi host. Assuming 3rd-party backup applications may also be using NFC, we recommend five (5) workers as a number unlikely to interfere with existing VDDK backup applications. For planning purposes, note that each worker consumes two (2) NFC connections per virtual disk per VM with the connections only open during active synchronization.
Snapshot Delay – Enter a snapshot interval, which is expressed as a minimum number of minutes between snapshots. If a sync takes more than this interval, the next sync will follow immediately. This delay is ignored during final cutovers, which happen immediately.
Name Prefix – Enter a name prefix for the worker applications that the Console spins up.
Worker Secret – Enter a worker API and root password. When the Migration Manager Instance firs initializes, the worker secret is randomly generated.
Cores – Enter a number of vCPUs to allocate to the workers. The default of four (4) makes sense to increase should a large number of source VMs have more than four virtual disks.
Memory – Enter the number of bytes of RAM to allocate to the worker VM.
Network – Select a network for the workers. This network must provide DHCP services for workers to be able to obtain an IP address and have name resolution with vSphere and ThinkAgile CP.
Data Center – Select the data center for the worker.
Migration Zone – Select the migration zone for the worker.
Storage Pool – Select the storage pool for the worker.
NoteWorkers can reside in different targets; but they all must be on the same storage pool.
Application Group (optional) – Select the application group in which the workers should run.
Enable nested KVM on Worker – Check to enable nested virtualization on the worker.
NoteThis option does not work in all virtualization environments.
Worker IP Settings - (optional) You can specify a range of IP addresses for workers. The workers will boot via DHCP on the specified network, and if static IP address ranges are specified, the VMs will be dynamically reconfigured to use an "in-range" IP address after they boot; a pool of IP addresses will be maintained and assigned to workers as they are created and released to be re-used when workers are removed.
Worker IP Range - Start - Enter the starting range of usable IP addresses for the workers.
IP Address Range - End - Enter the ending range of usable IP addresses for the workers.
IP Address Netmask - Enter the netmask address for the workers.
IP Address Gateway - Enter the default gateway address for the workers.
IP Address Nameserver - Enter the nameserver for the worker DNS.
Template – Select the Migration Worker template previously downloaded and prepped with VDDK.
- Click Save.