Kabelführung der E3.S-Rückwandplatine
In diesem Abschnitt wird die Kabelführung für E3.S-Rückwandplatinen beschrieben.
Stellen Sie beim Verlegen der Kabel sicher, dass alle Kabel ordnungsgemäß durch die entsprechenden Kabelführungen und Kabelklemmen geführt werden.
Nummerierung der Rückwandplatine
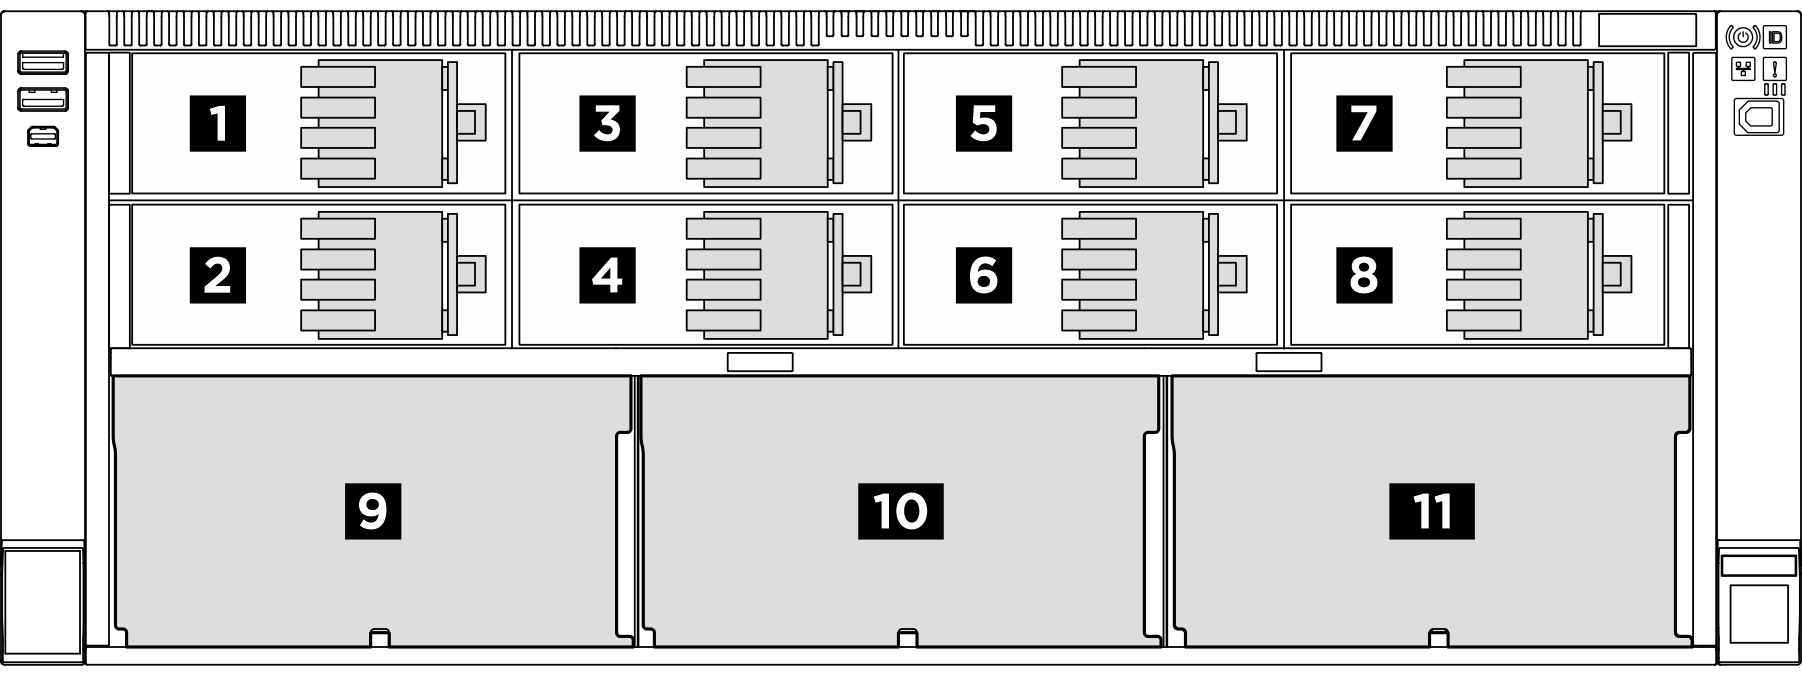
| Rückwandplatine für Laufwerke | E3.S 1T-Position | E3.S 2T-Position | 2,5-Zoll-SAS/SATA-Position |
|---|---|---|---|
| 1 Rückwandplatine 1 | 0 bis 3 | 1, 3 | |
| 2 Rückwandplatine 2 | 4 bis 7 | 5, 7 | |
| 3 Rückwandplatine 3 | 8 bis 11 | 9, 11 | |
| 4 Rückwandplatine 4 | 12 bis 15 | 13, 15 | |
| 5 Rückwandplatine 5 | 16 bis 19 | 17, 19 | |
| 6 Rückwandplatine 6 | 20 bis 23 | 21, 23 | |
| 7 Rückwandplatine 7 | 24 bis 27 | 25, 27 | |
| 8 Rückwandplatine 8 | 28 bis 31 | 29, 31 | |
| 9 Rückwandplatine 9 | 32 bis 39 | ||
| 10 Rückwandplatine 10 | 40 bis 47 | ||
| 11 Rückwandplatine 11 | 48 bis 55 |
E3.S 1T-Positionen unterstützen E3.S 1T-Laufwerke.
E3.S 2T-Positionen unterstützen CXL-Speichermodule (CMMs).
| Rückwandplatinentyp | Priorität der Rückwandplatinenpositionierung |
|---|---|
| E3.S-Rückwandplatine für E3.S 1T-Positionen | 1+2, 1+2+3+4, 1+2+3+4+5+6, 1+2+3+4+5+6+7+8 |
| E3.S-Rückwandplatine für E3.S 2T-Positionen | 1+2+3+4+5+6+7+8 |
| Rückwandplatine mit 8 Positionen für 2,5-Zoll-SAS/SATA-Laufwerke | 9, 10, 11 |
Netzkabelführung
| Netzkabelführung für E3.S-Rückwandplatine | Netzkabelführung für SAS/SATA-Rückwandplatine |
|---|---|
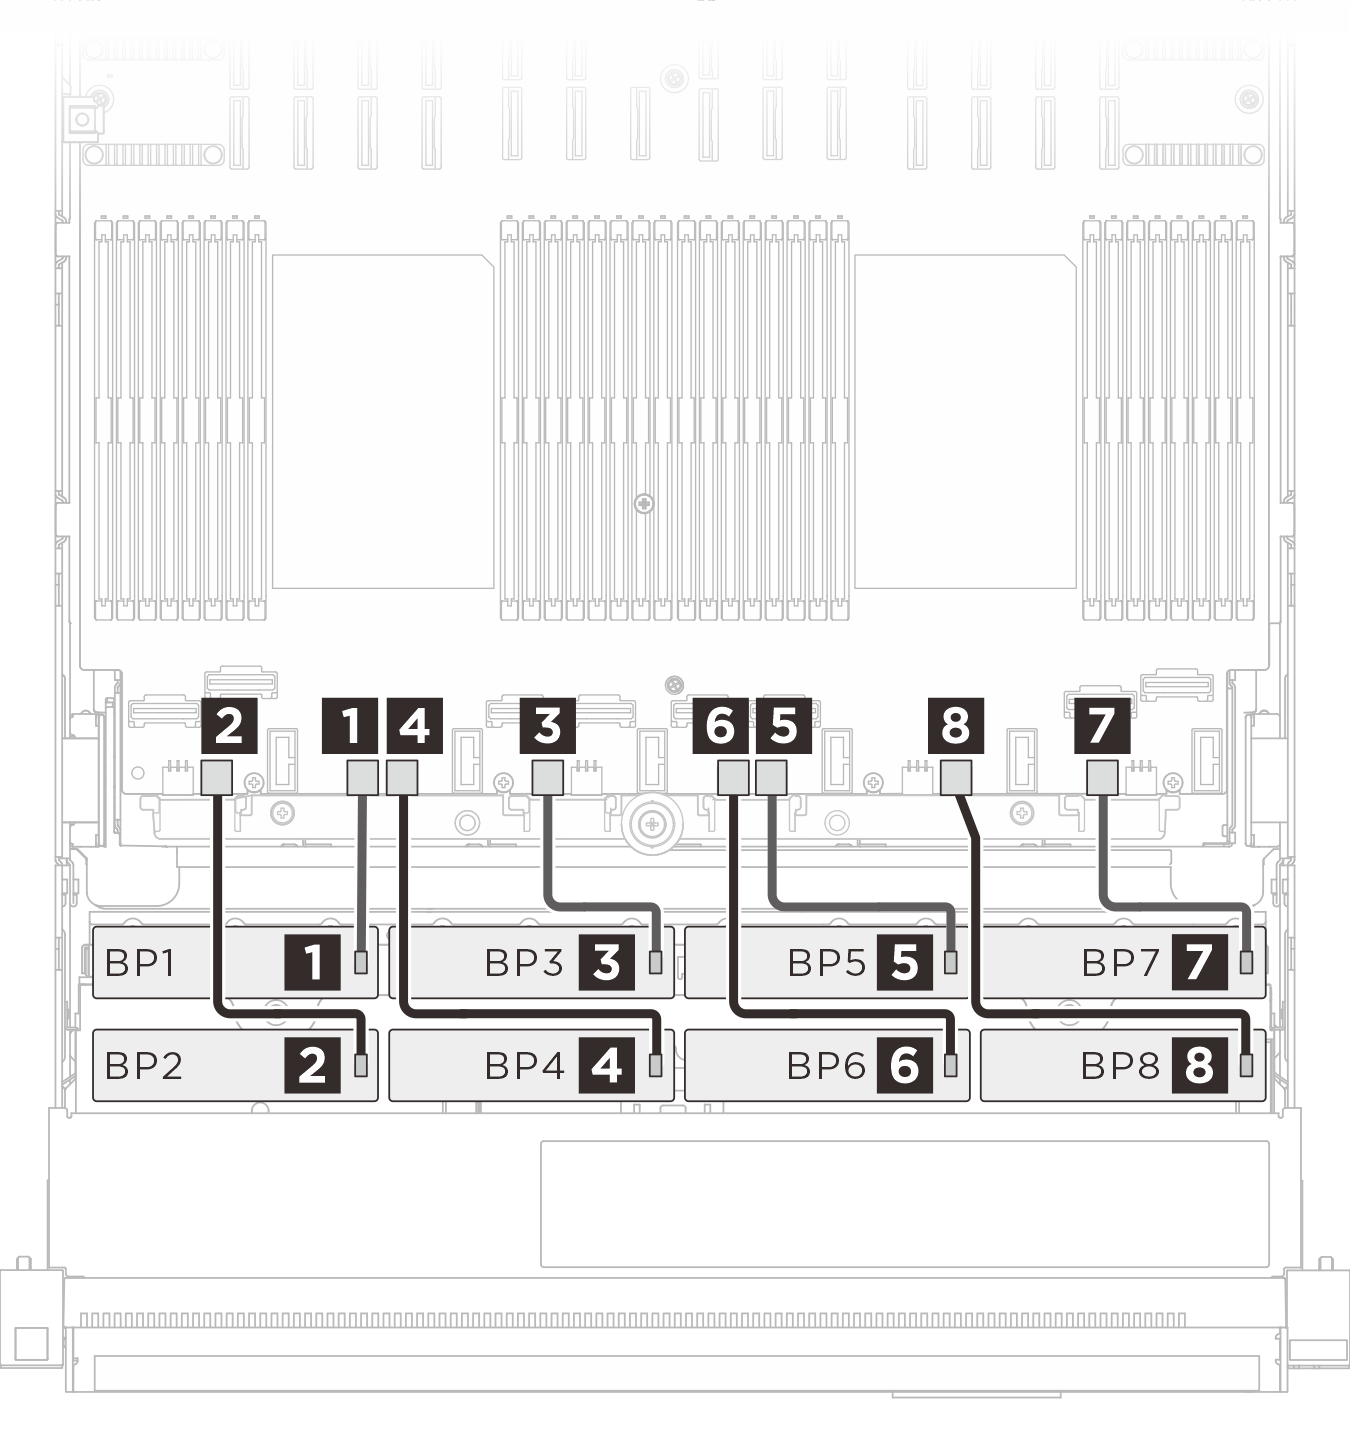 | 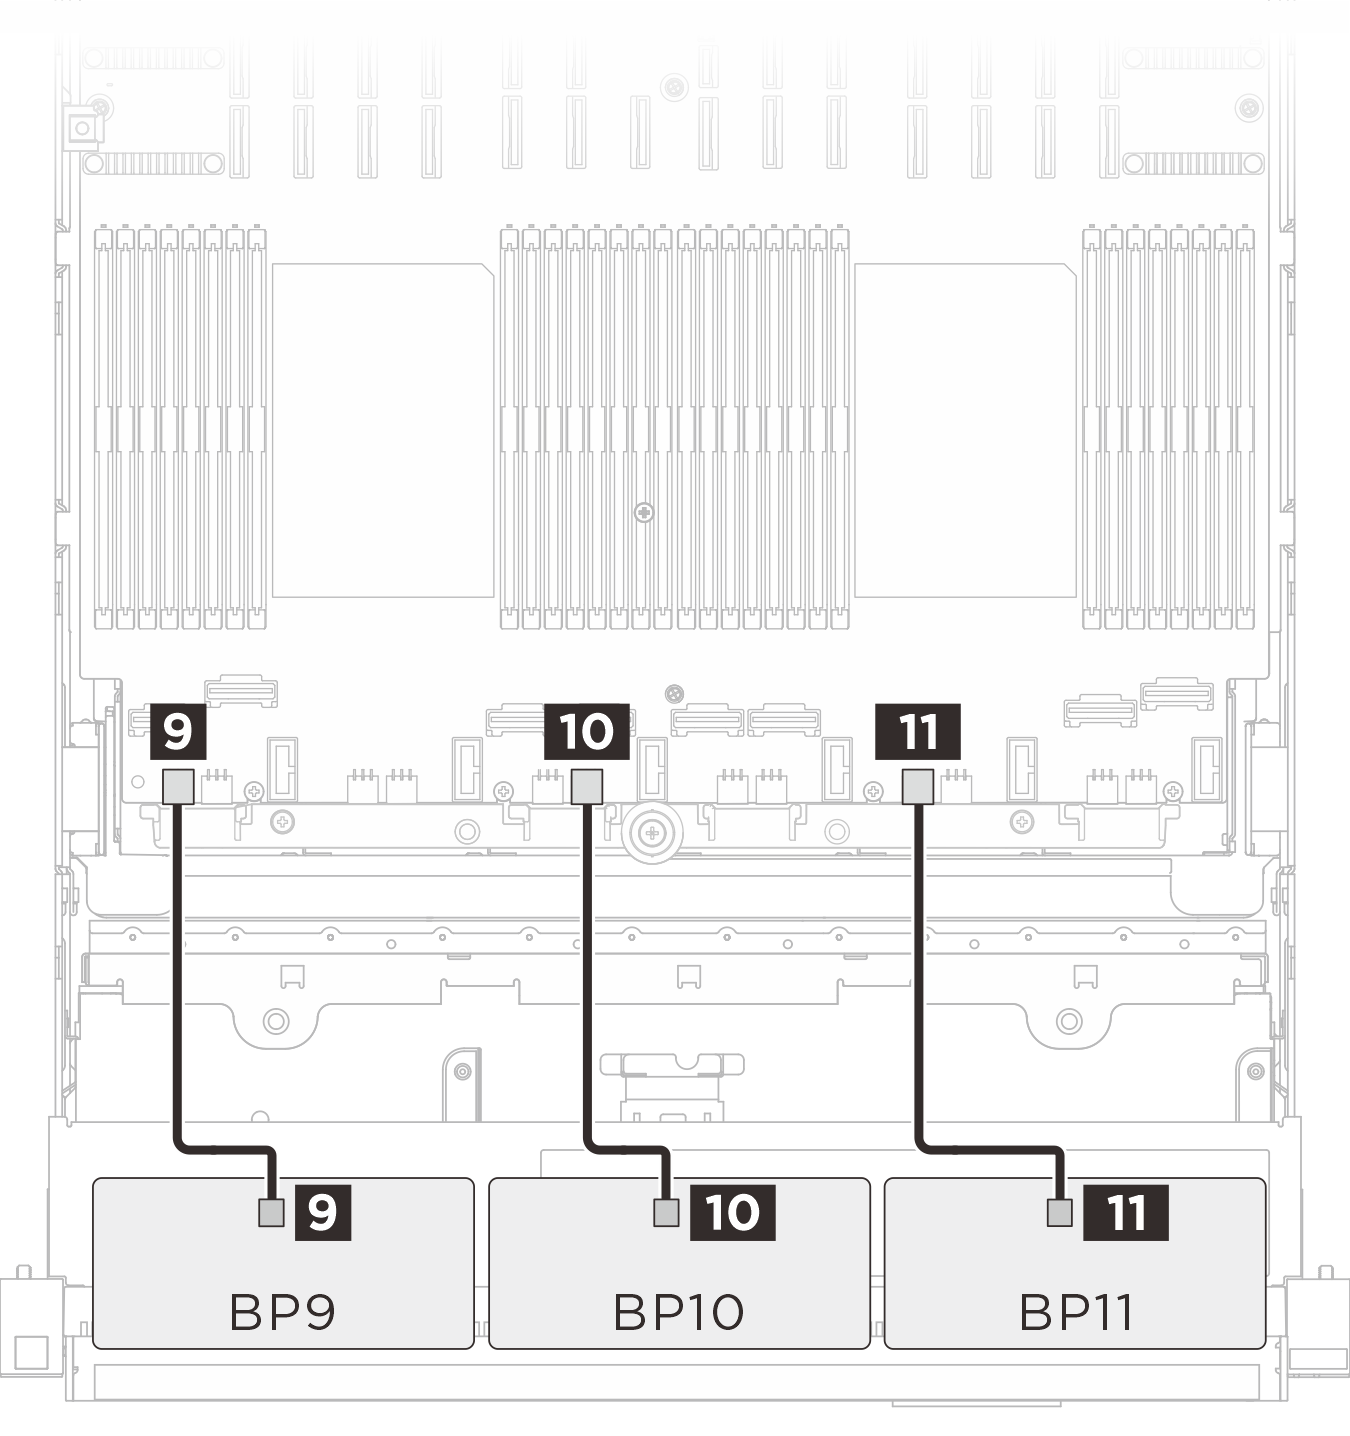 |
| Kabel | Von (Rückwandplatine) | Zu (Systemplatinenbaugruppe) |
|---|---|---|
| MPIC 6p+6s to MPIC 6p+6s (230 mm) | 1 BP 1: PWR | 1 BP 3 PWR |
| MPIC 6p+6s to MPIC 6p+6s (230 mm) | 2 BP 2: PWR | 2 BP 2 PWR |
| MPIC 6p+6s to MPIC 6p+6s (230 mm) | 3 BP 3: PWR | 3 BP 5 PWR |
| MPIC 6p+6s to MPIC 6p+6s (230 mm) | 4 BP 4: PWR | 4 BP 4 PWR |
| MPIC 6p+6s to MPIC 6p+6s (230 mm) | 5 BP 5: PWR | 5 BP 8 PWR |
| MPIC 6p+6s to MPIC 6p+6s (230 mm) | 6 BP 6: PWR | 6 BP 7 PWR |
| MPIC 6p+6s to MPIC 6p+6s (230 mm) | 7 BP 7: PWR | 7 BP 11: PWR |
| MPIC 6p+6s to MPIC 6p+6s (230 mm) | 8 BP 8: PWR | 8 BP 10: PWR |
| MPIC 6p+6s to MPIC 6p+6s (150 mm) | 9 BP 9: PWR | 9 BP 1: PWR |
| MPIC 6p+6s to MPIC 6p+6s (150 mm) | 10 BP 10: PWR | 10 BP 6: PWR |
| MPIC 6p+6s to MPIC 6p+6s (150 mm) | 11 BP 11: PWR | 11 BP 9: PWR |
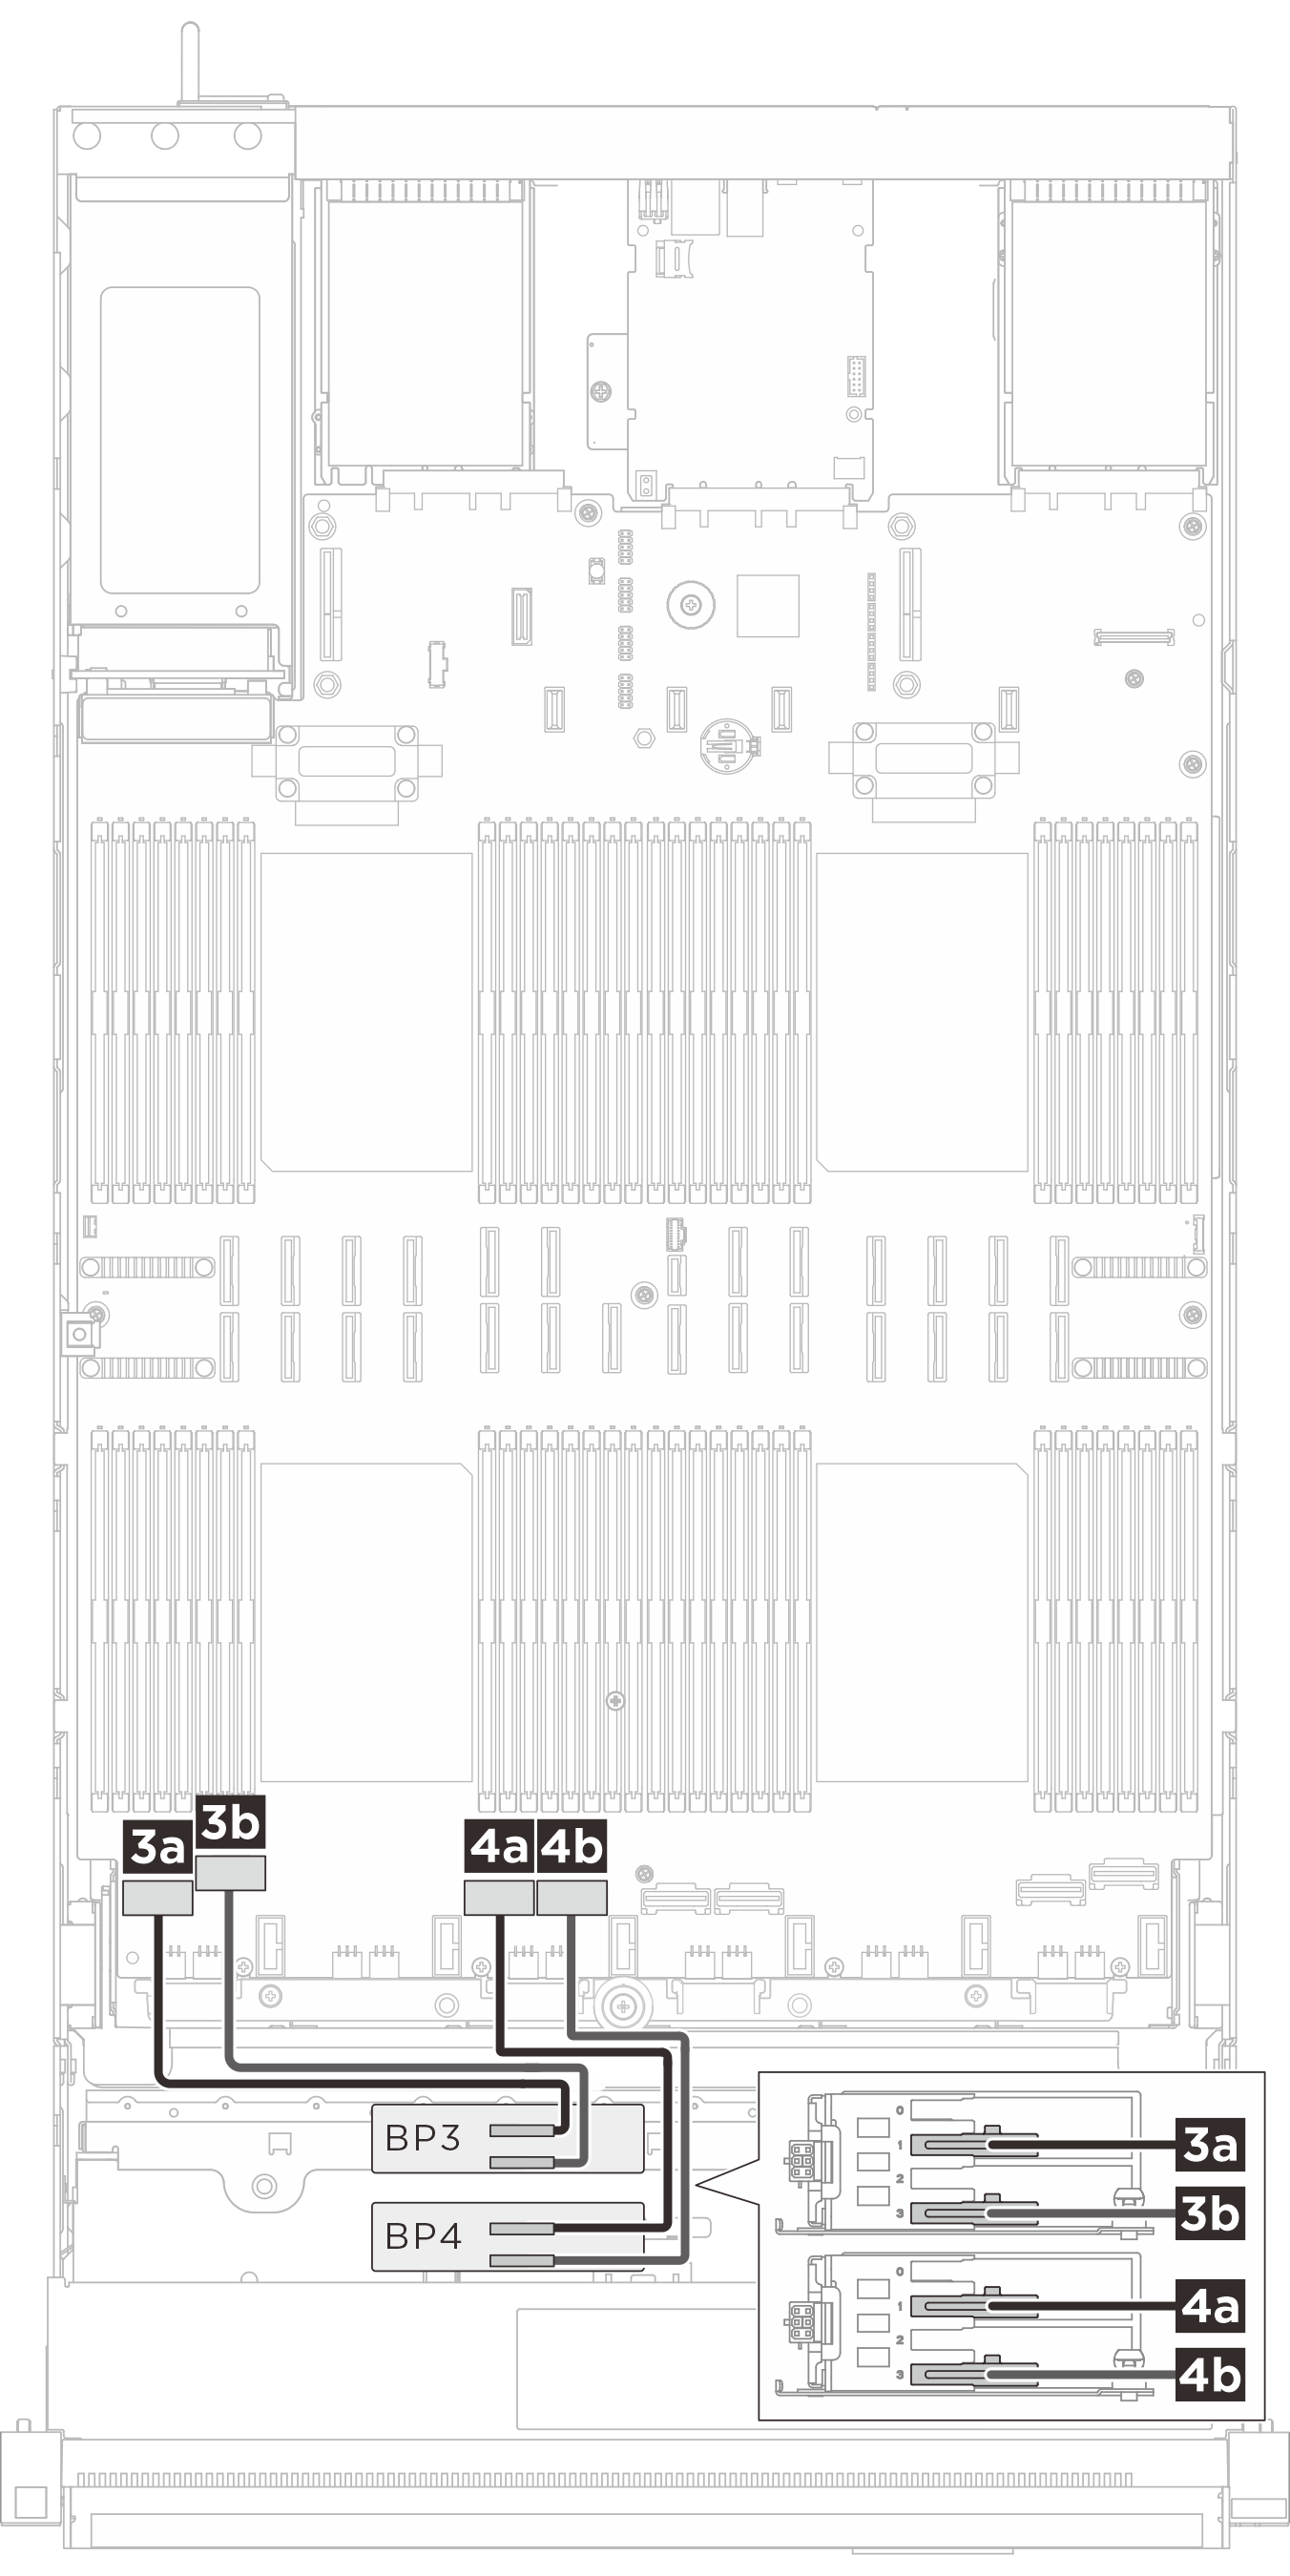
Kabelführung für E3.S-1T-Signalkabel
| Kabelführung für BP1/BP2-Signalkabel | Kabelführung für BP3/BP4-Signalkabel |
|---|---|
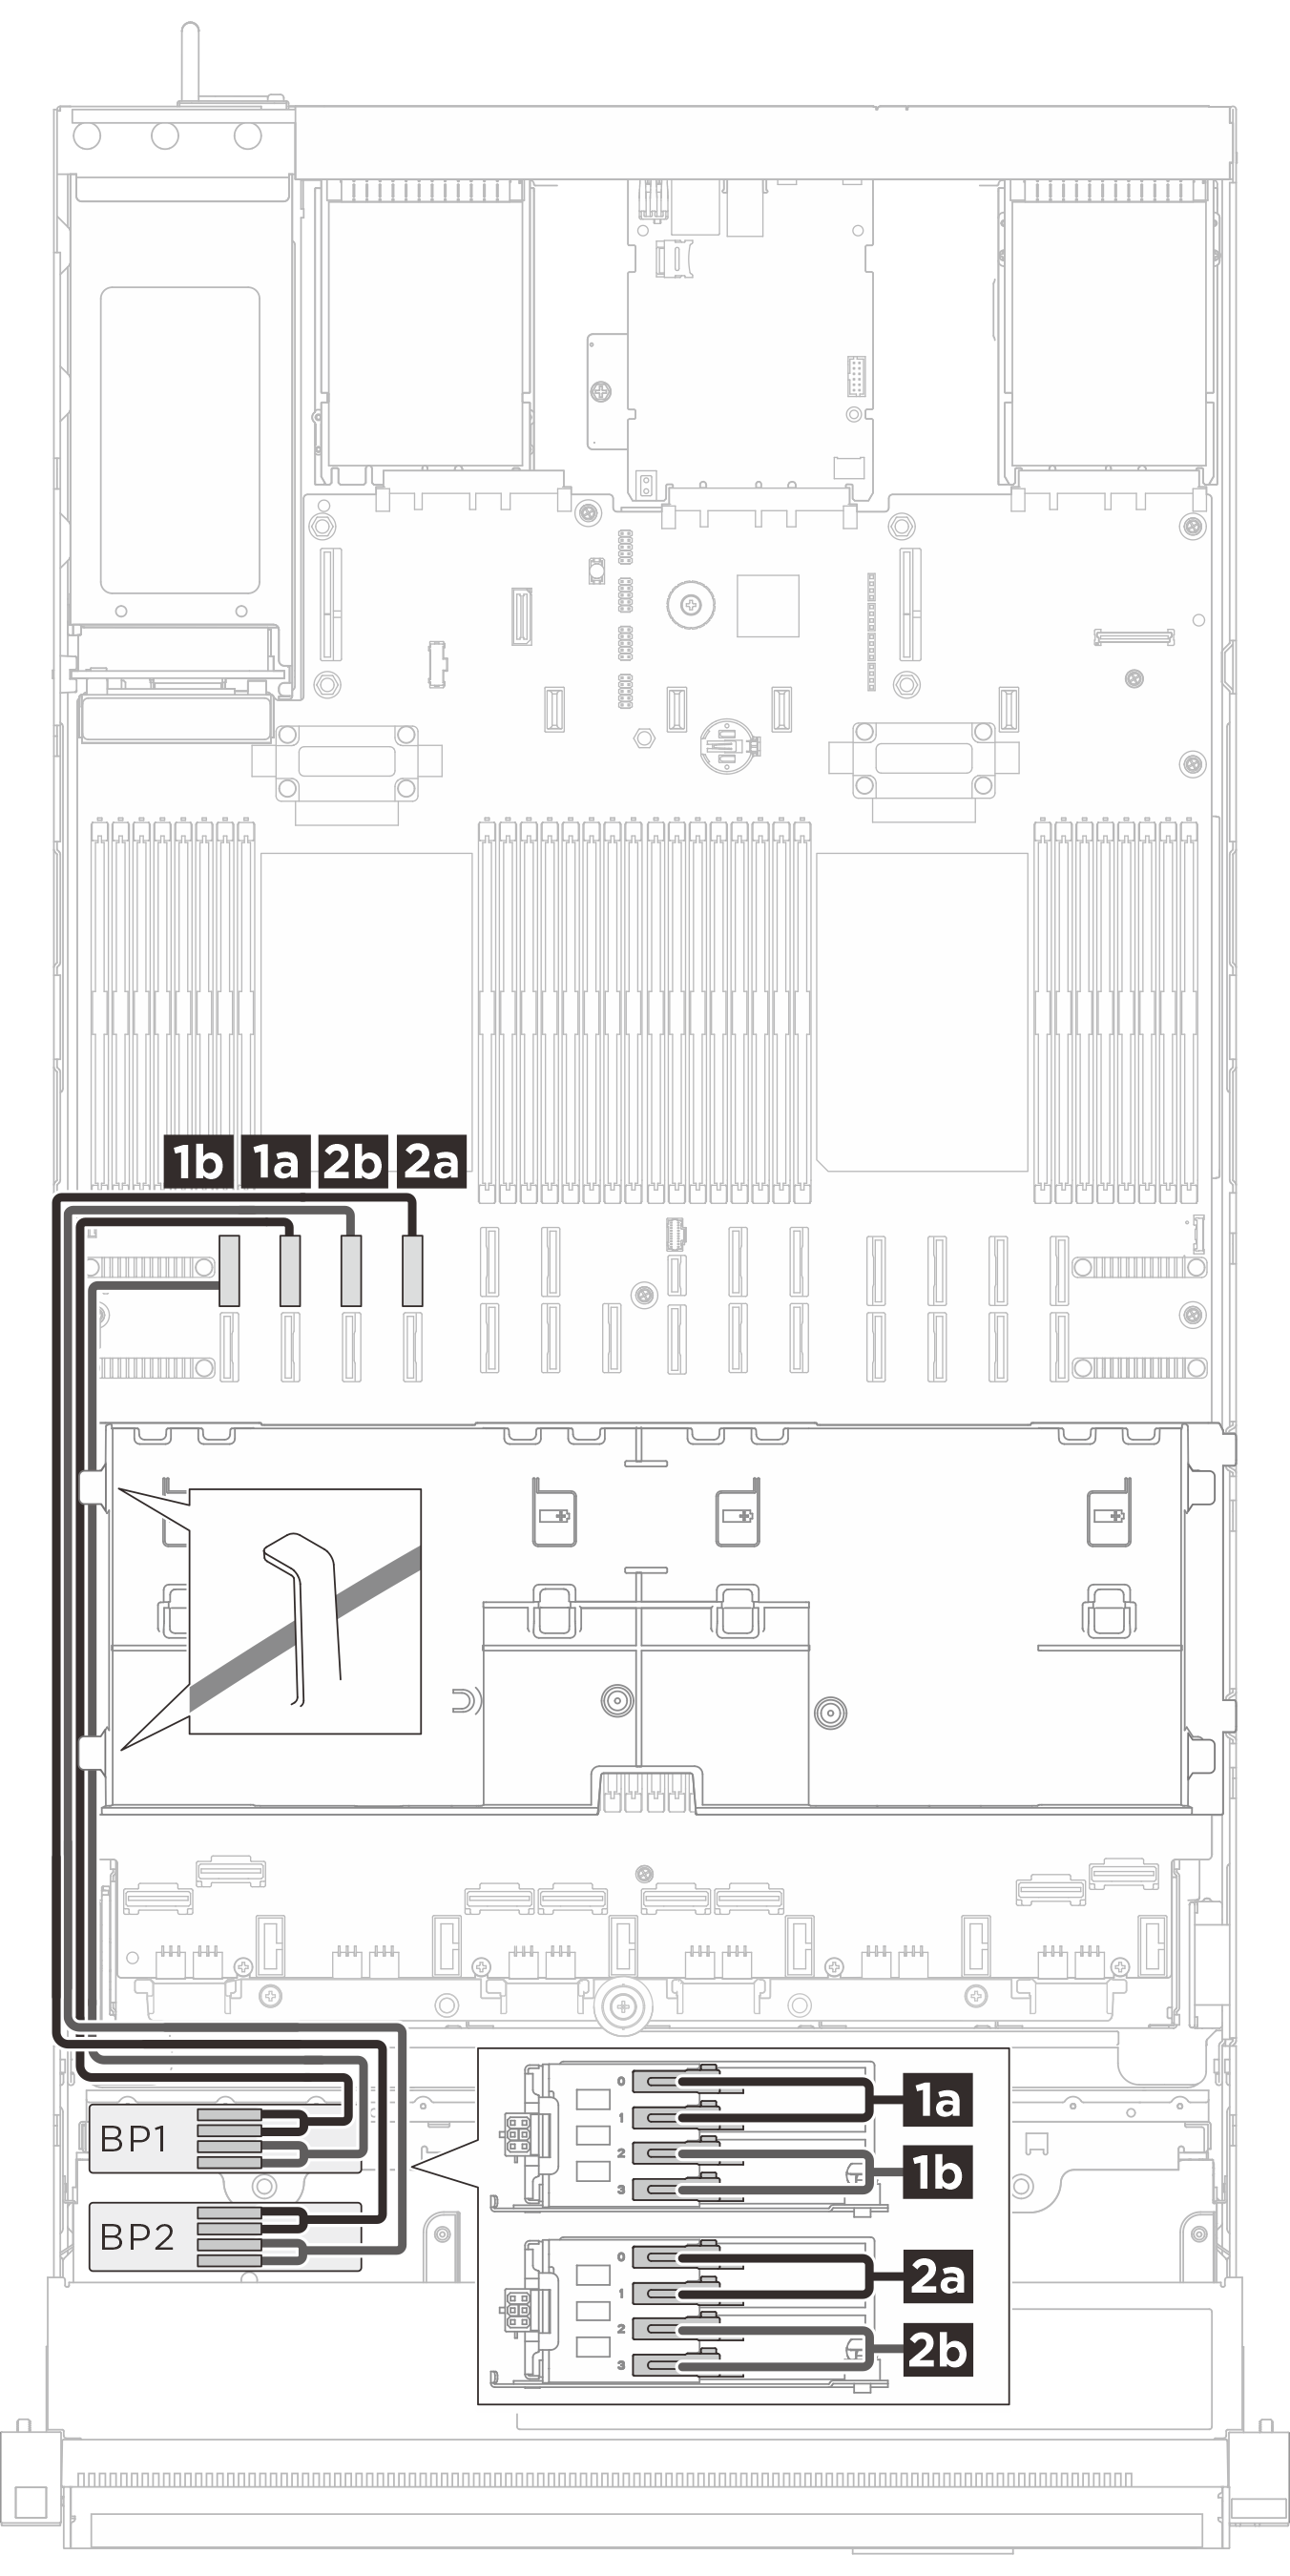 |  |
| Kabel | Von (Rückwandplatine) | Zu (Systemplatinenbaugruppe) |
|---|---|---|
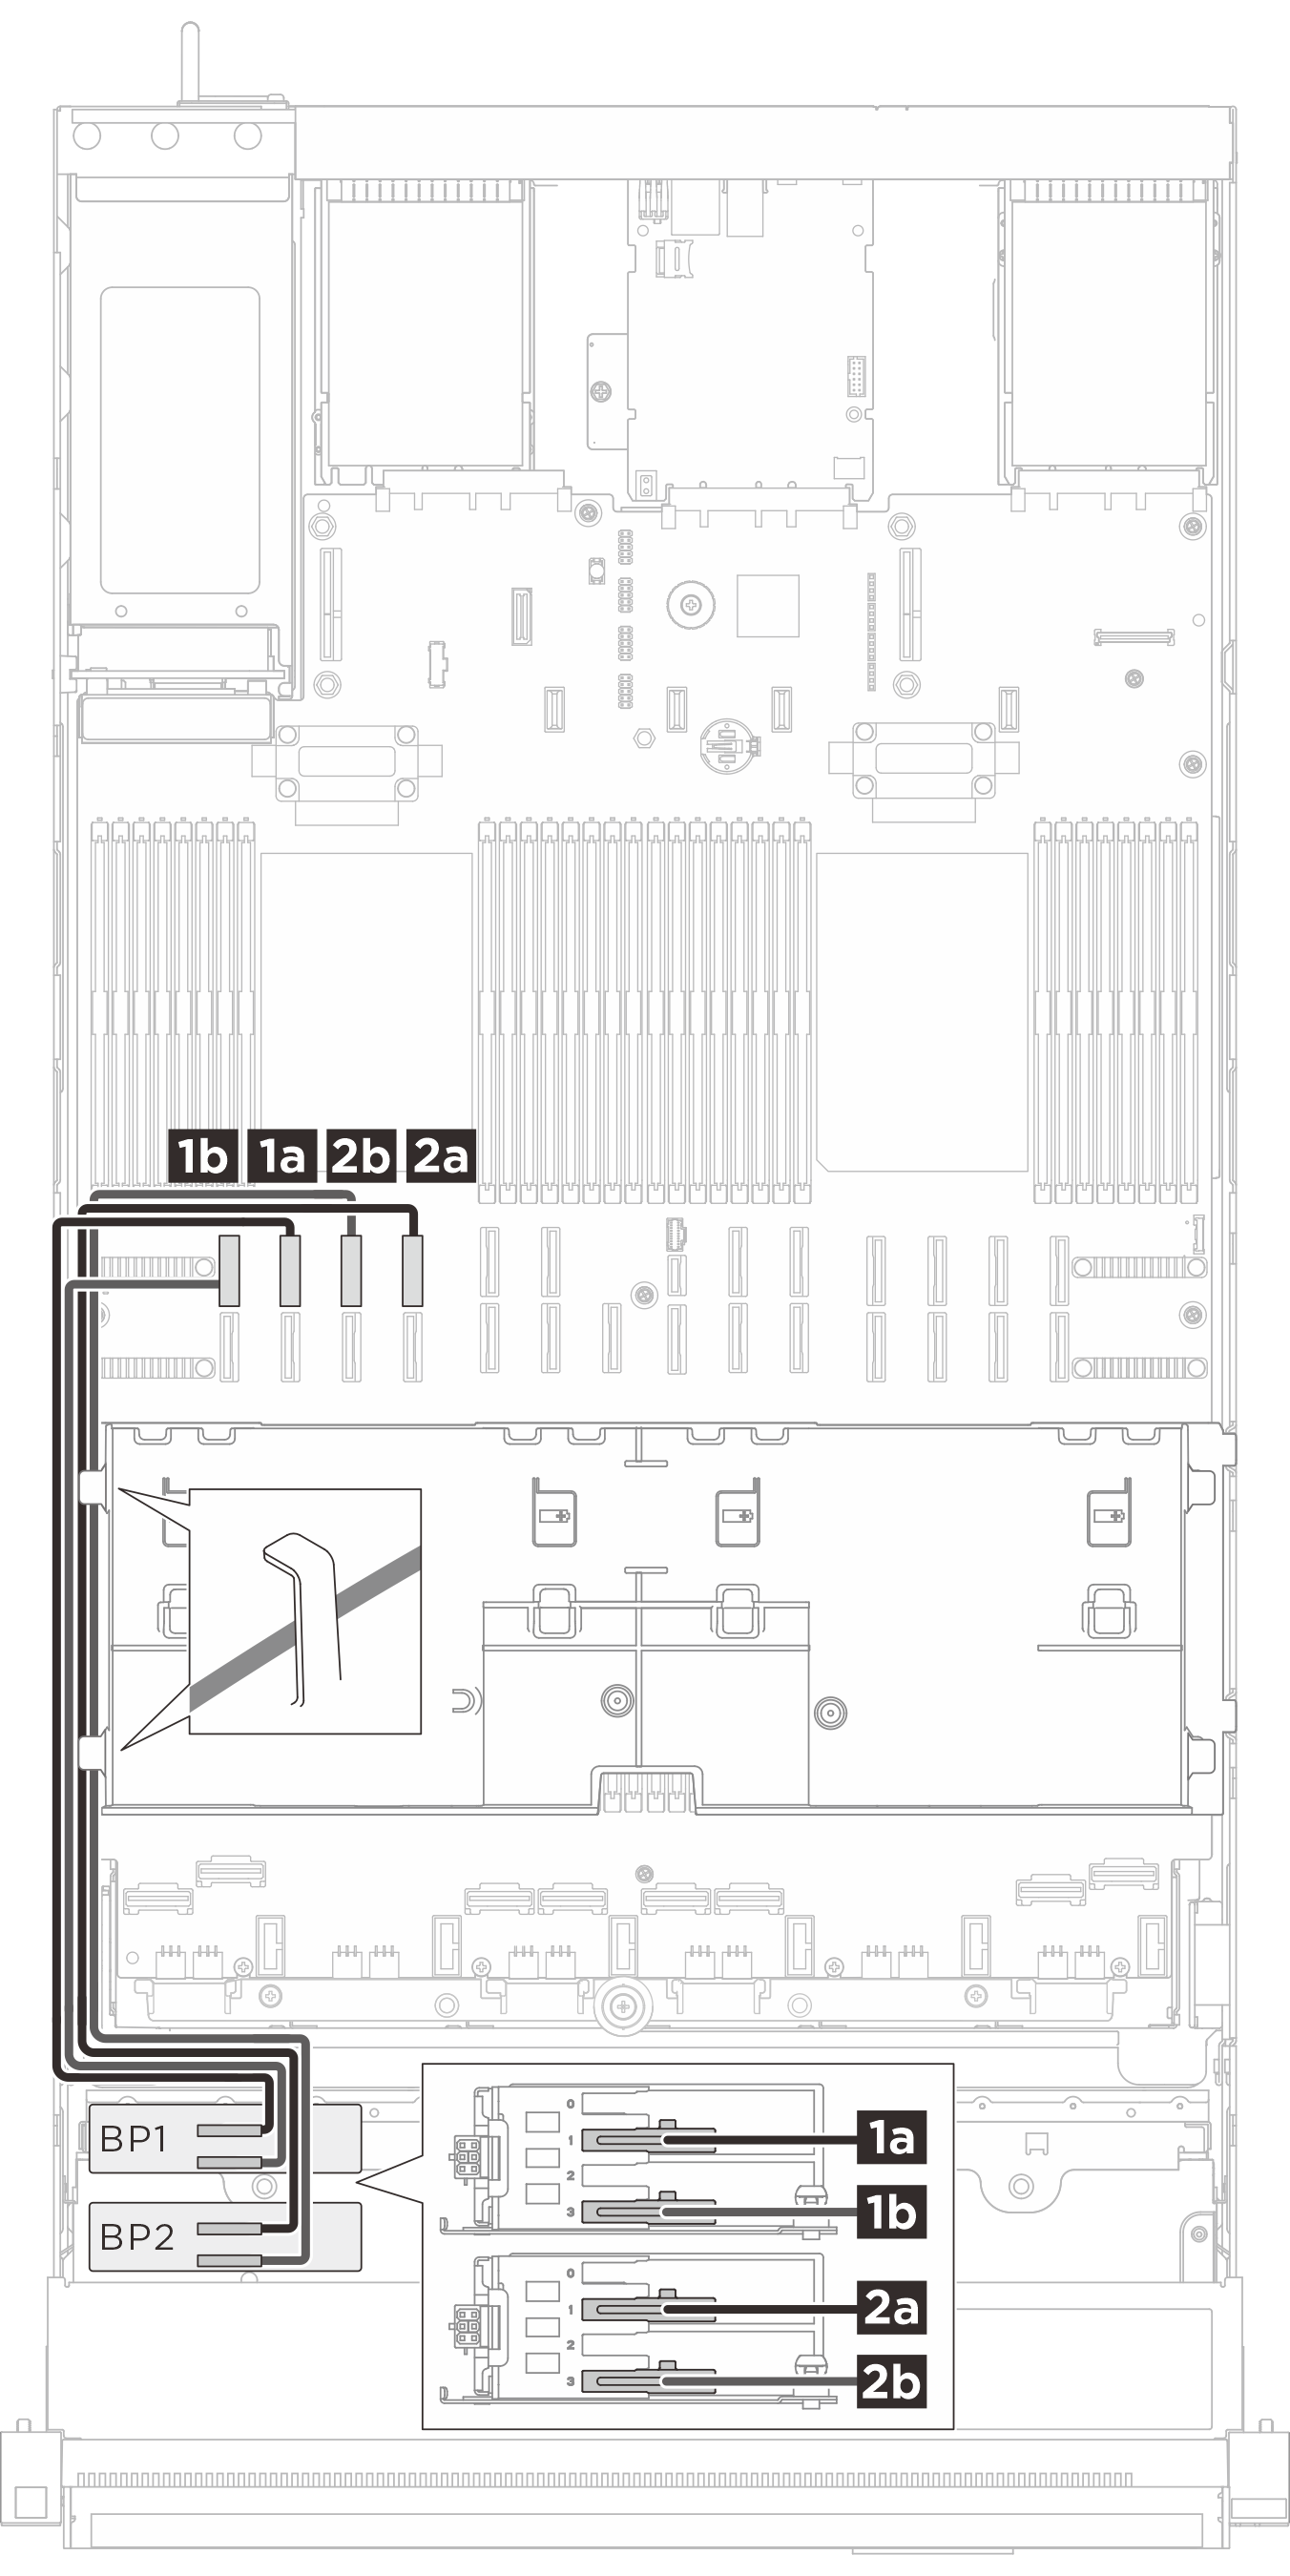
| MCIO x8 to Gen-Z 1C*2 (560 mm) | 1a BP 1: Bay 0, Bay 1 | 1a NVMe 10 |
| MCIO x8 to Gen-Z 1C*2 (560 mm) | 1b BP 1: Bay 2, Bay 3 | 1b NVMe 9 |
| MCIO x8 to Gen-Z 1C*2 (560 mm) | 2a BP 2: Bay 0, Bay 1 | 2a NVMe 14 |
| MCIO x8 to Gen-Z 1C*2 (560 mm) | 2b BP 2: Bay 2, Bay 3 | 2b NVMe 13 |
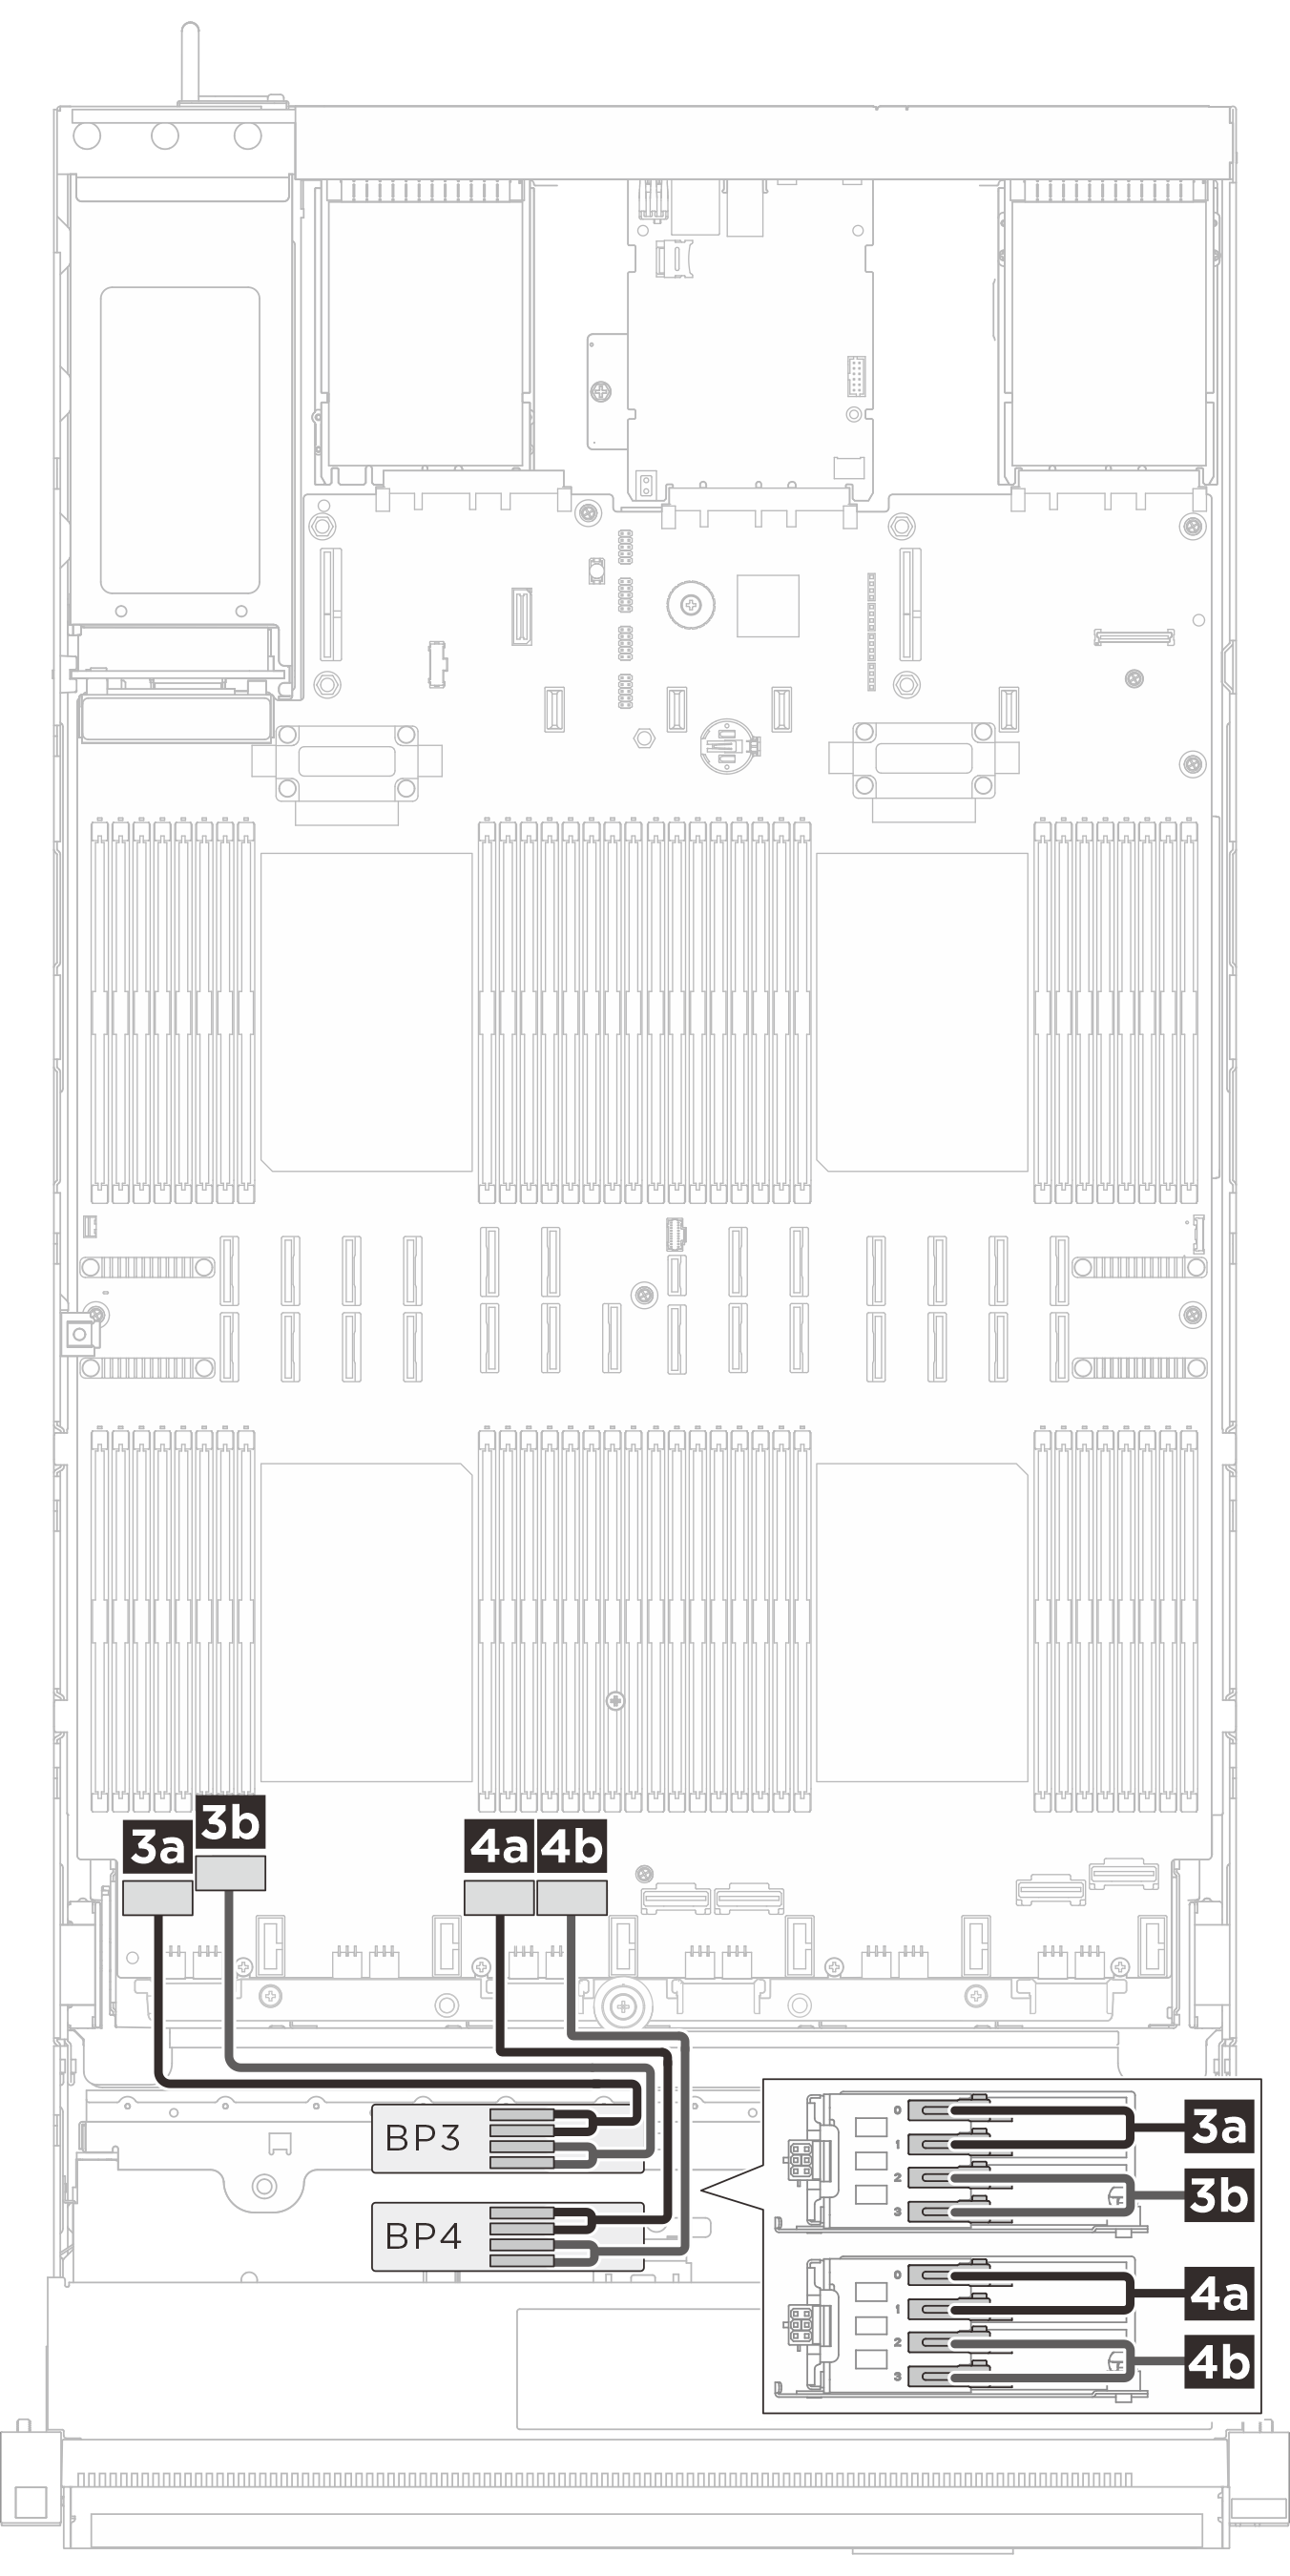
| Swift x8 to Gen-Z 1C*2 (330 mm) | 3a BP 3: Bay 0, Bay 1 | 3a NVMe 1 |
| Swift x8 to Gen-Z 1C*2 (330 mm) | 3b BP 3: Bay 2, Bay 3 | 3b NVMe 2 |
| Swift x8 to Gen-Z 1C*2 (330 mm) | 4a BP 4: Bay 0, Bay 1 | 4a NVMe 3 |
| Swift x8 to Gen-Z 1C*2 (330 mm) | 4b BP 4: Bay 2, Bay 3 | 4b NVMe 4 |
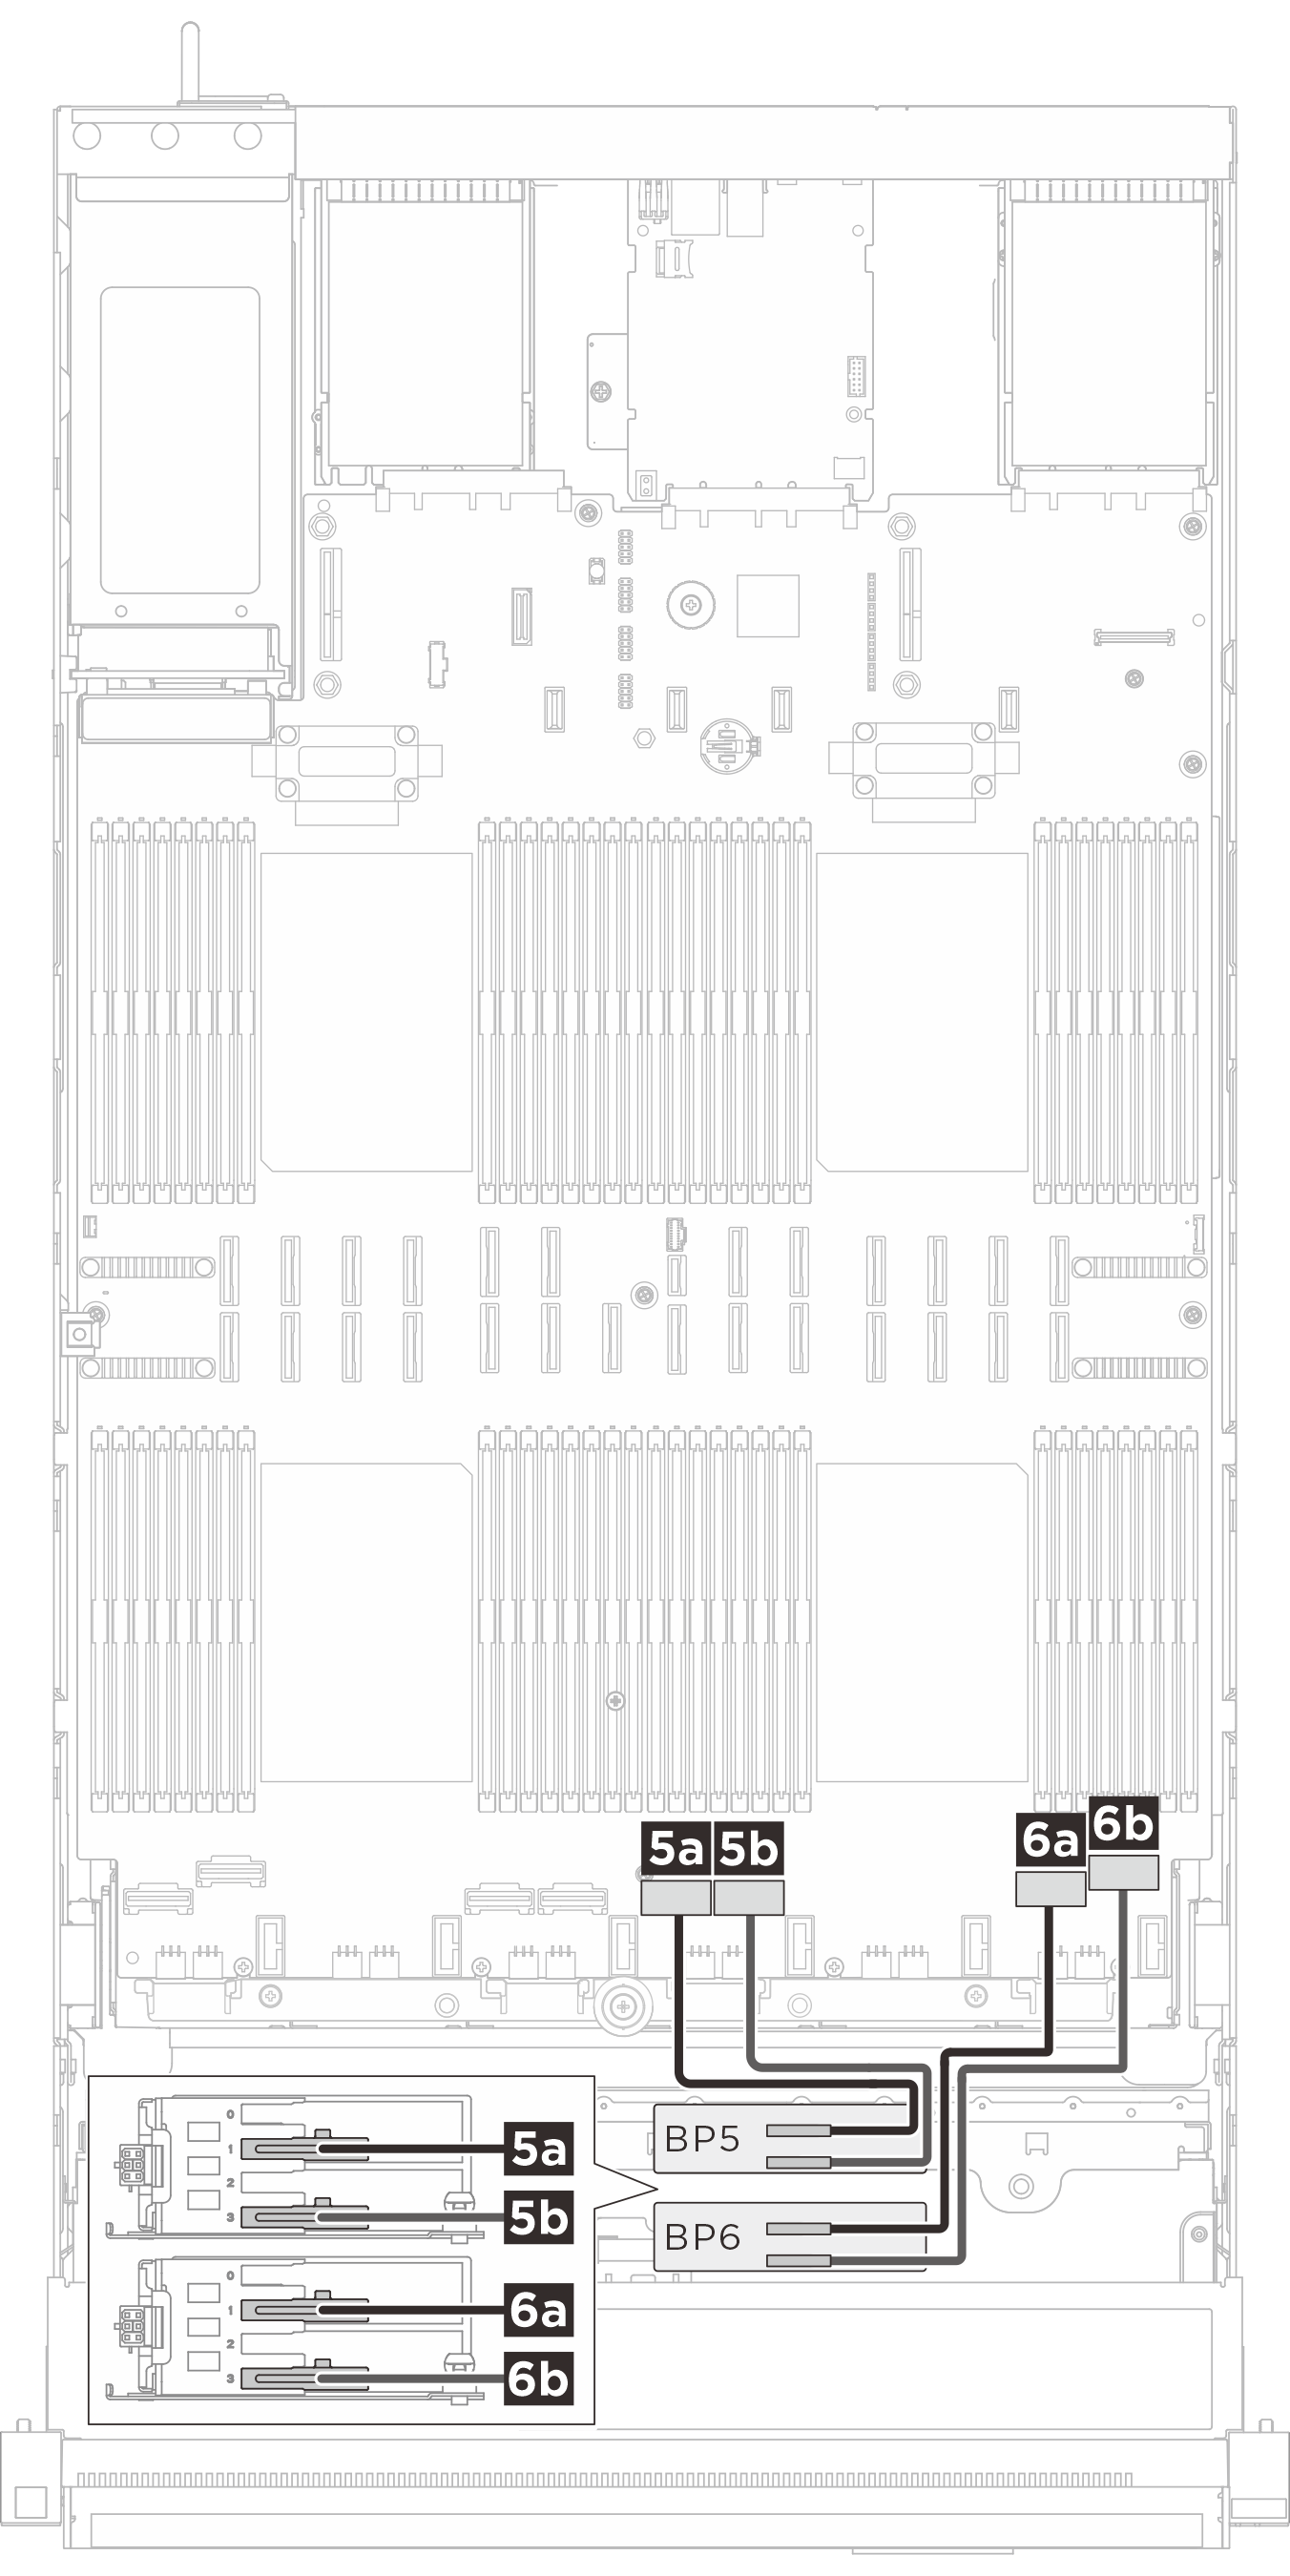
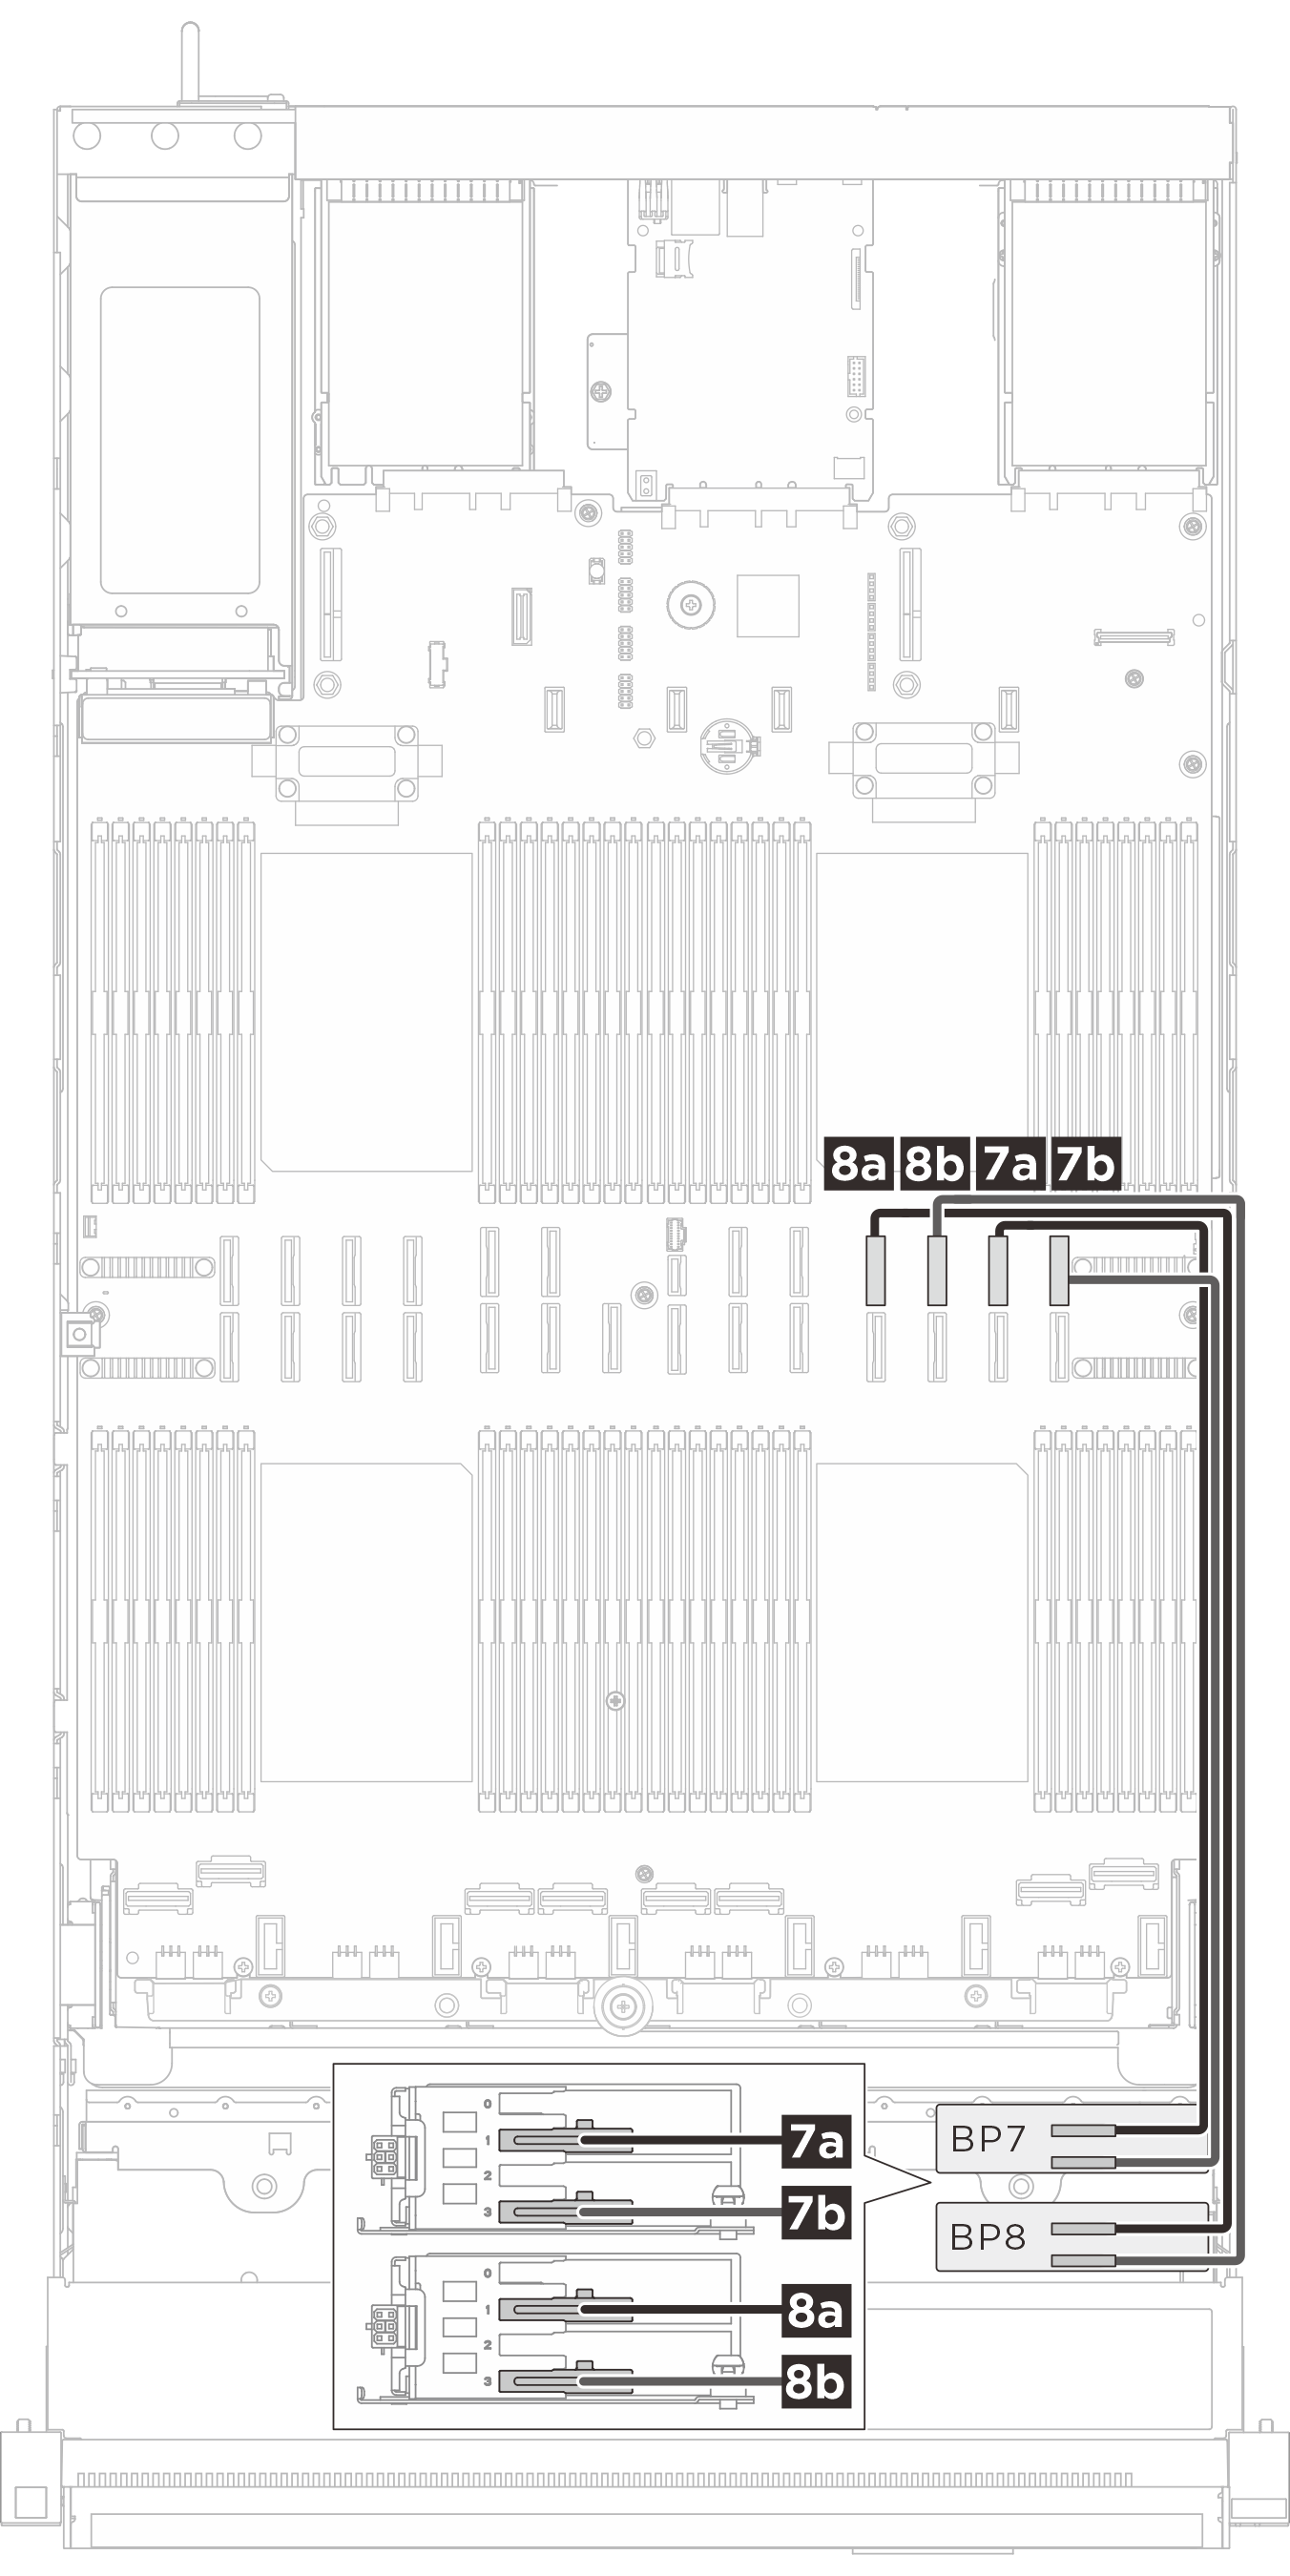
| Kabelführung für BP5/BP6-Signalkabel | Kabelführung für BP7/BP8-Signalkabel |
|---|---|
 |  |
| Kabel | Von (Rückwandplatine) | Zu (Systemplatinenbaugruppe) |
|---|---|---|
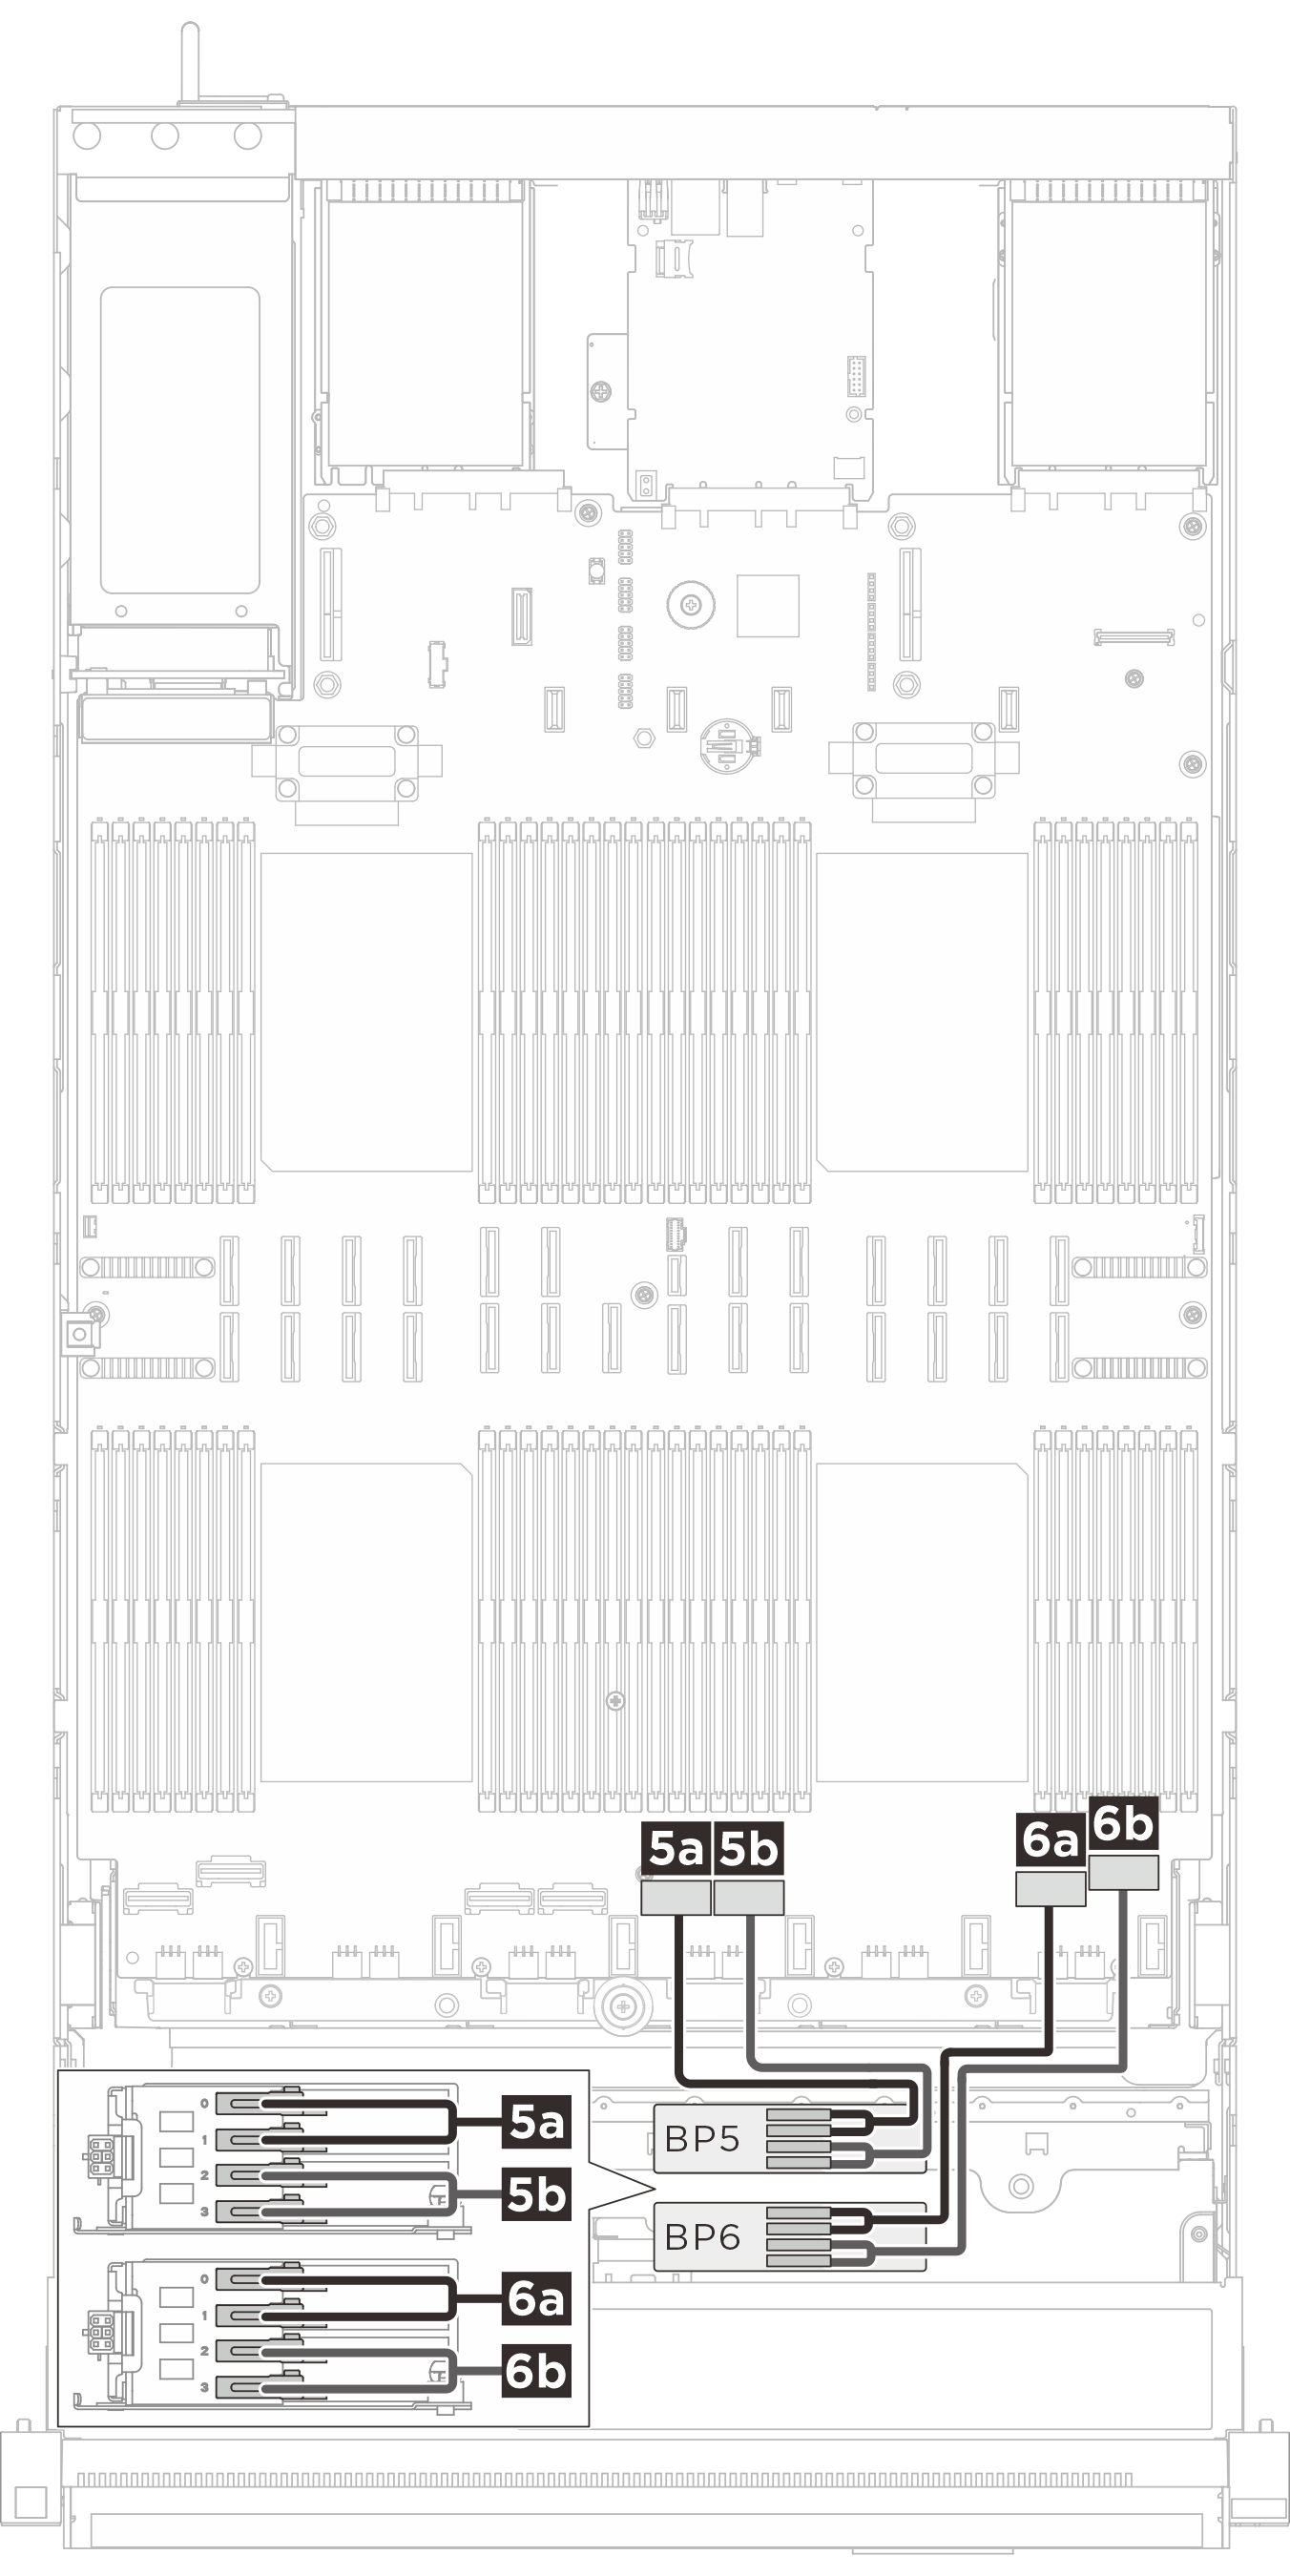
| Swift x8 to Gen-Z 1C*2 (330 mm) | 5a BP 5: Bay 0, Bay 1 | 5a NVMe 5 |
| Swift x8 to Gen-Z 1C*2 (330 mm) | 5b BP 5: Bay 2, Bay 3 | 5b NVMe 6 |
| Swift x8 to Gen-Z 1C*2 (330 mm) | 6a BP 6: Bay 0, Bay 1 | 6a NVMe 7 |
| Swift x8 to Gen-Z 1C*2 (330 mm) | 6b BP 6: Bay 2, Bay 3 | 6b NVMe 8 |
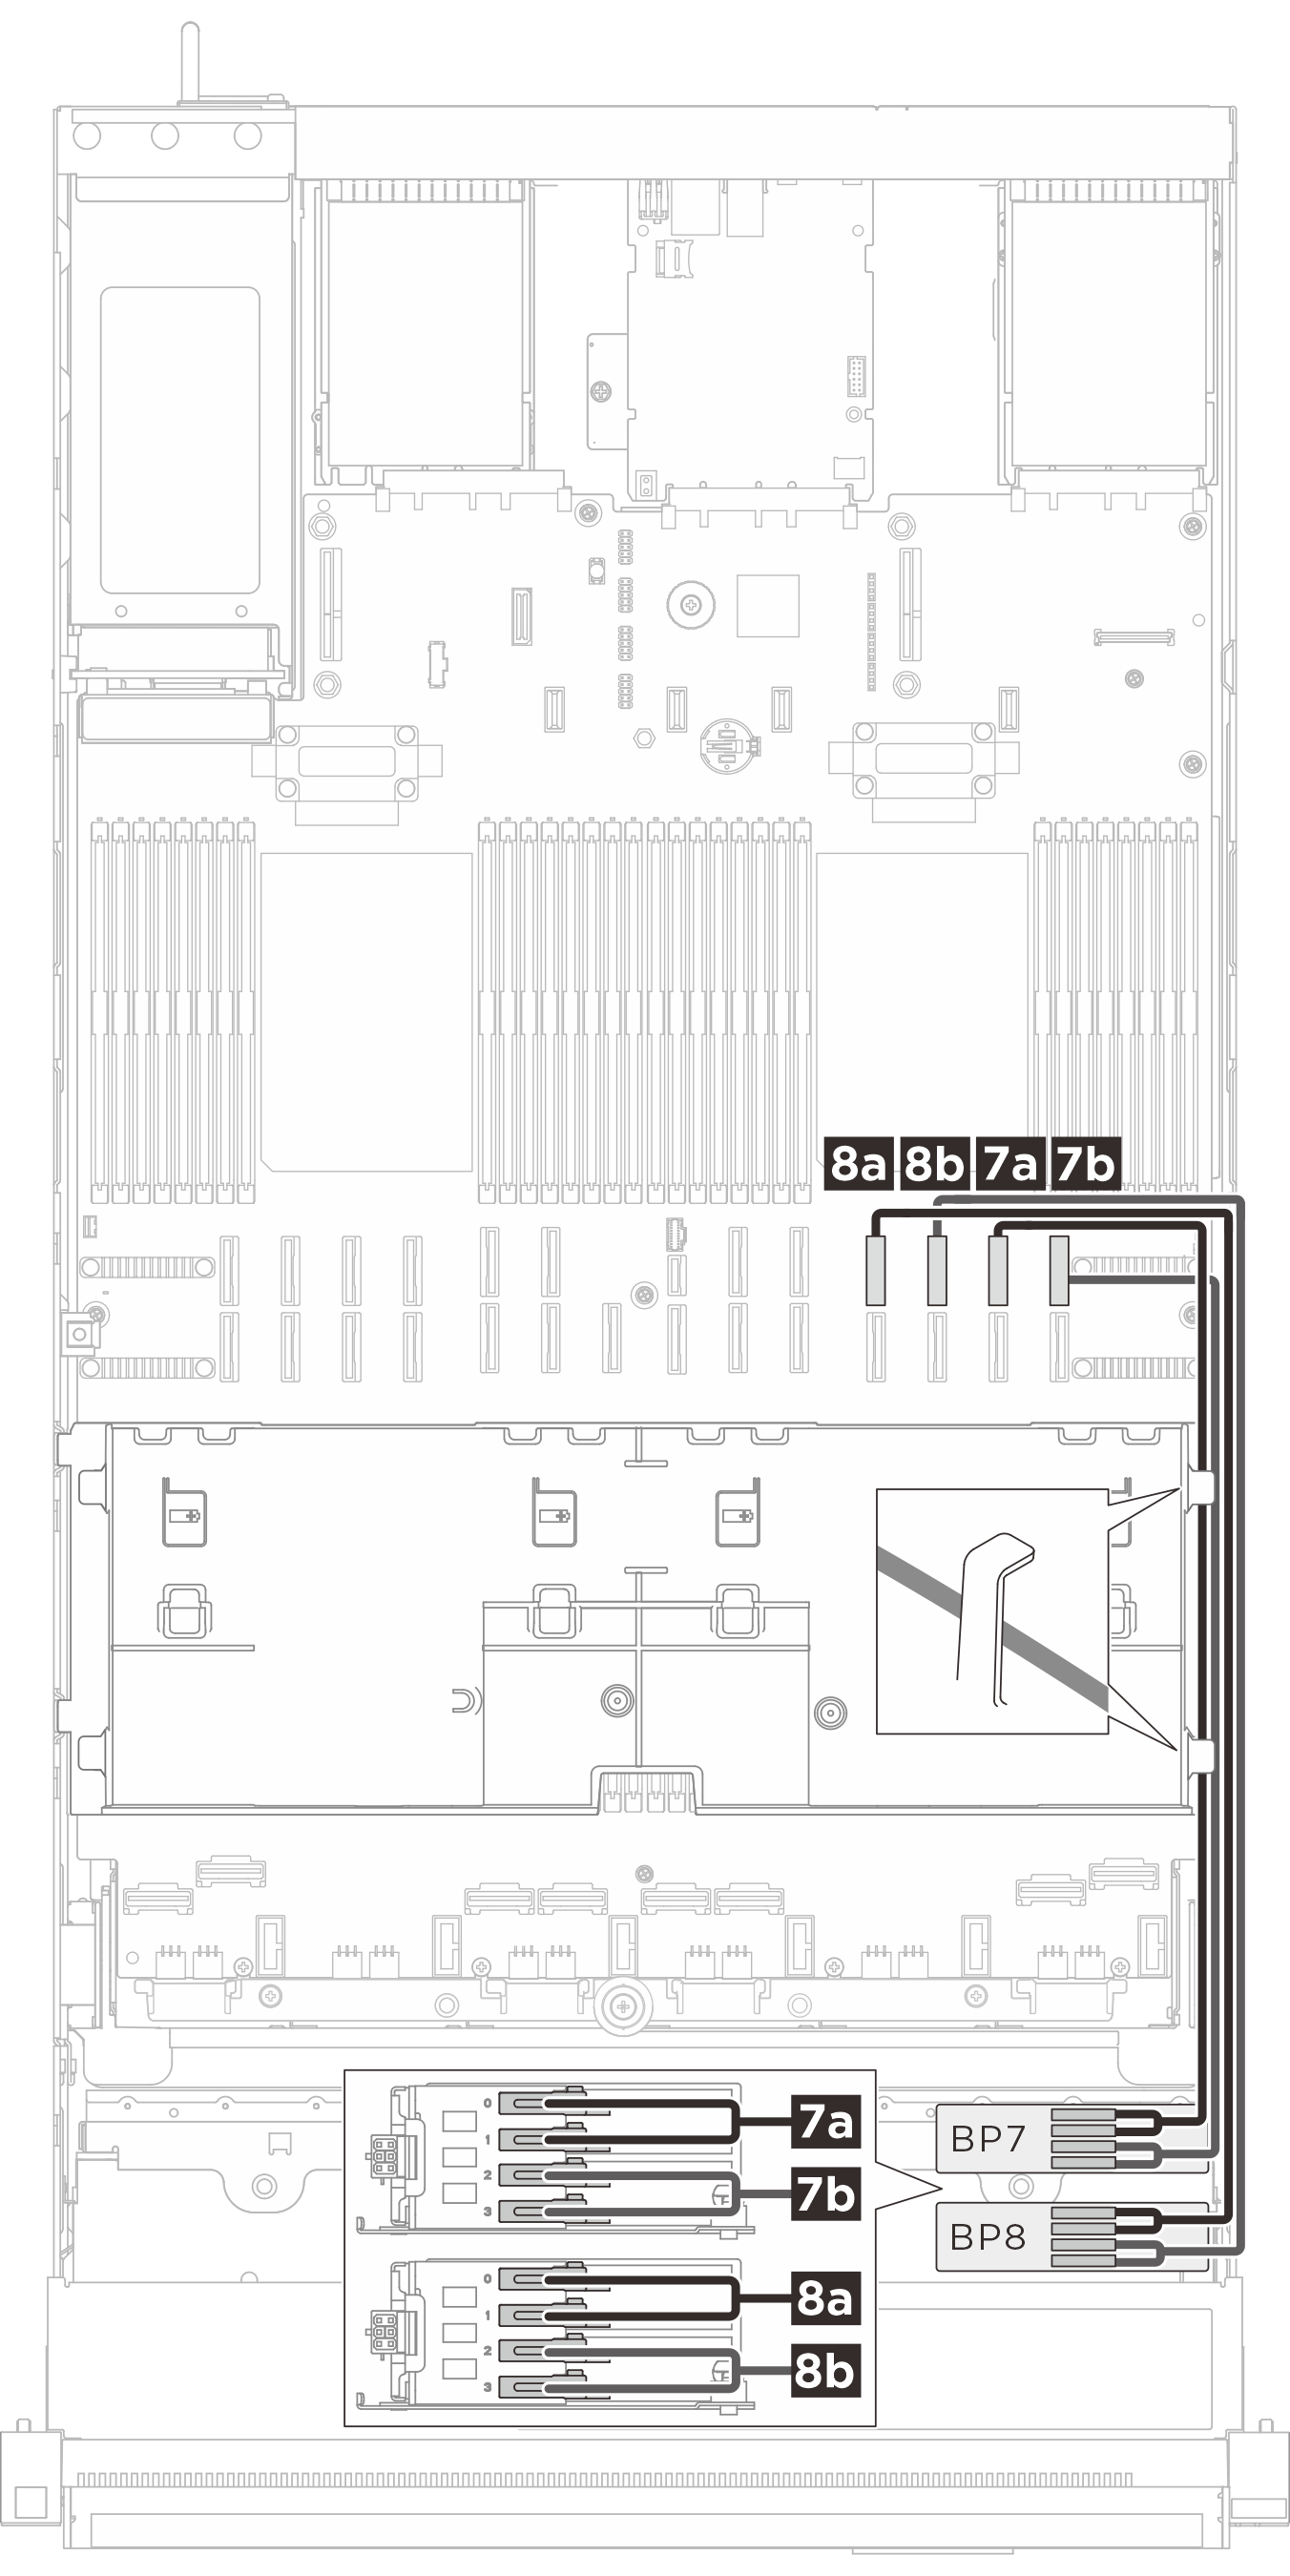
| MCIO x8 to Gen-Z 1C*2 (560 mm) | 7a BP 7: Bay 0, Bay 1 | 7a NVMe 11 |
| MCIO x8 to Gen-Z 1C*2 (560 mm) | 7b BP 7: Bay 2, Bay 3 | 7b NVMe 12 |
| MCIO x8 to Gen-Z 1C*2 (560 mm) | 8a BP 8: Bay 0, Bay 1 | 8a NVMe 15 |
| MCIO x8 to Gen-Z 1C*2 (560 mm) | 8b BP 8: Bay 2, Bay 3 | 8b NVMe 16 |
Kabelführung für E3.S-2T-Signalkabel
| Kabelführung für BP1/BP2-Signalkabel | Kabelführung für BP3/BP4-Signalkabel |
|---|---|
 |  |
| Kabel | Von (Rückwandplatine) | Zu (Systemplatinenbaugruppe) |
|---|---|---|
| MCIO x8 to Gen-Z 2C (560 mm) | 1a BP 1: Bay 1 | 1a NVMe 10 |
| MCIO x8 to Gen-Z 2C (560 mm) | 1b BP 1: Bay 3 | 1b NVMe 9 |
| MCIO x8 to Gen-Z 2C (560 mm) | 2a BP 2: Bay 1 | 2a NVMe 14 |
| MCIO x8 to Gen-Z 2C (560 mm) | 2b BP 2: Bay 3 | 2b NVMe 13 |
| Swift x8 to Gen-Z 2C (330 mm) | 3a BP 3: Bay 1 | 3a NVMe 1 |
| Swift x8 to Gen-Z 2C (330 mm) | 3b BP 3: Bay 3 | 3b NVMe 2 |
| Swift x8 to Gen-Z 2C (330 mm) | 4a BP 4: Bay 1 | 4a NVMe 3 |
| Swift x8 to Gen-Z 2C (330 mm) | 4b BP 4: Bay 3 | 4b NVMe 4 |
| Kabelführung für BP5/BP6-Signalkabel | Kabelführung für BP7/BP8-Signalkabel |
|---|---|
 |  |
| Kabel | Von (Rückwandplatine) | Zu (Systemplatinenbaugruppe) |
|---|---|---|
| Swift x8 to Gen-Z 2C (330 mm) | 5a BP 5: Bay 1 | 5a NVMe 5 |
| Swift x8 to Gen-Z 2C (330 mm) | 5b BP 5: Bay 3 | 5b NVMe 6 |
| Swift x8 to Gen-Z 2C (330 mm) | 6a BP 6: Bay 1 | 6a NVMe 7 |
| Swift x8 to Gen-Z 2C (330 mm) | 6b BP 6: Bay 3 | 6b NVMe 8 |
| MCIO x8 to Gen-Z 2C (560 mm) | 7a BP 7: Bay 1 | 7a NVMe 11 |
| MCIO x8 to Gen-Z 2C (560 mm) | 7b BP 7: Bay 3 | 7b NVMe 12 |
| MCIO x8 to Gen-Z 2C (560 mm) | 8a BP 8: Bay 1 | 8a NVMe 15 |
| MCIO x8 to Gen-Z 2C (560 mm) | 8b BP 8: Bay 3 | 8b NVMe 16 |
Signalkabelführung für SAS/SATA-Rückwandplatine
Gen 4 RAID/HBA-Adapter: 545-8i/940-8i/940-16i/440-16i
1 x Rückwandplatine: 1 x RAID/HBA 8i
2 x Rückwandplatinen: 1 x RAID/HBA 16i
3 x Rückwandplatinen: 1 x RAID/HBA 8i + 1 x RAID/HBA 16i
Je nach Konfiguration werden die RAID/HBA-Adapter an unterschiedlichen Adapterkarten installiert. Wählen Sie je nach Position des RAID/HBA-Adapters den entsprechenden Kabelführungsplan aus der folgenden Tabelle aus.
| Kabelführung zu Adapterkarte 3 | Kabelführung zu Adapterkarte 2 | Kabelführung zu Adapterkarte 1 |
|---|---|---|
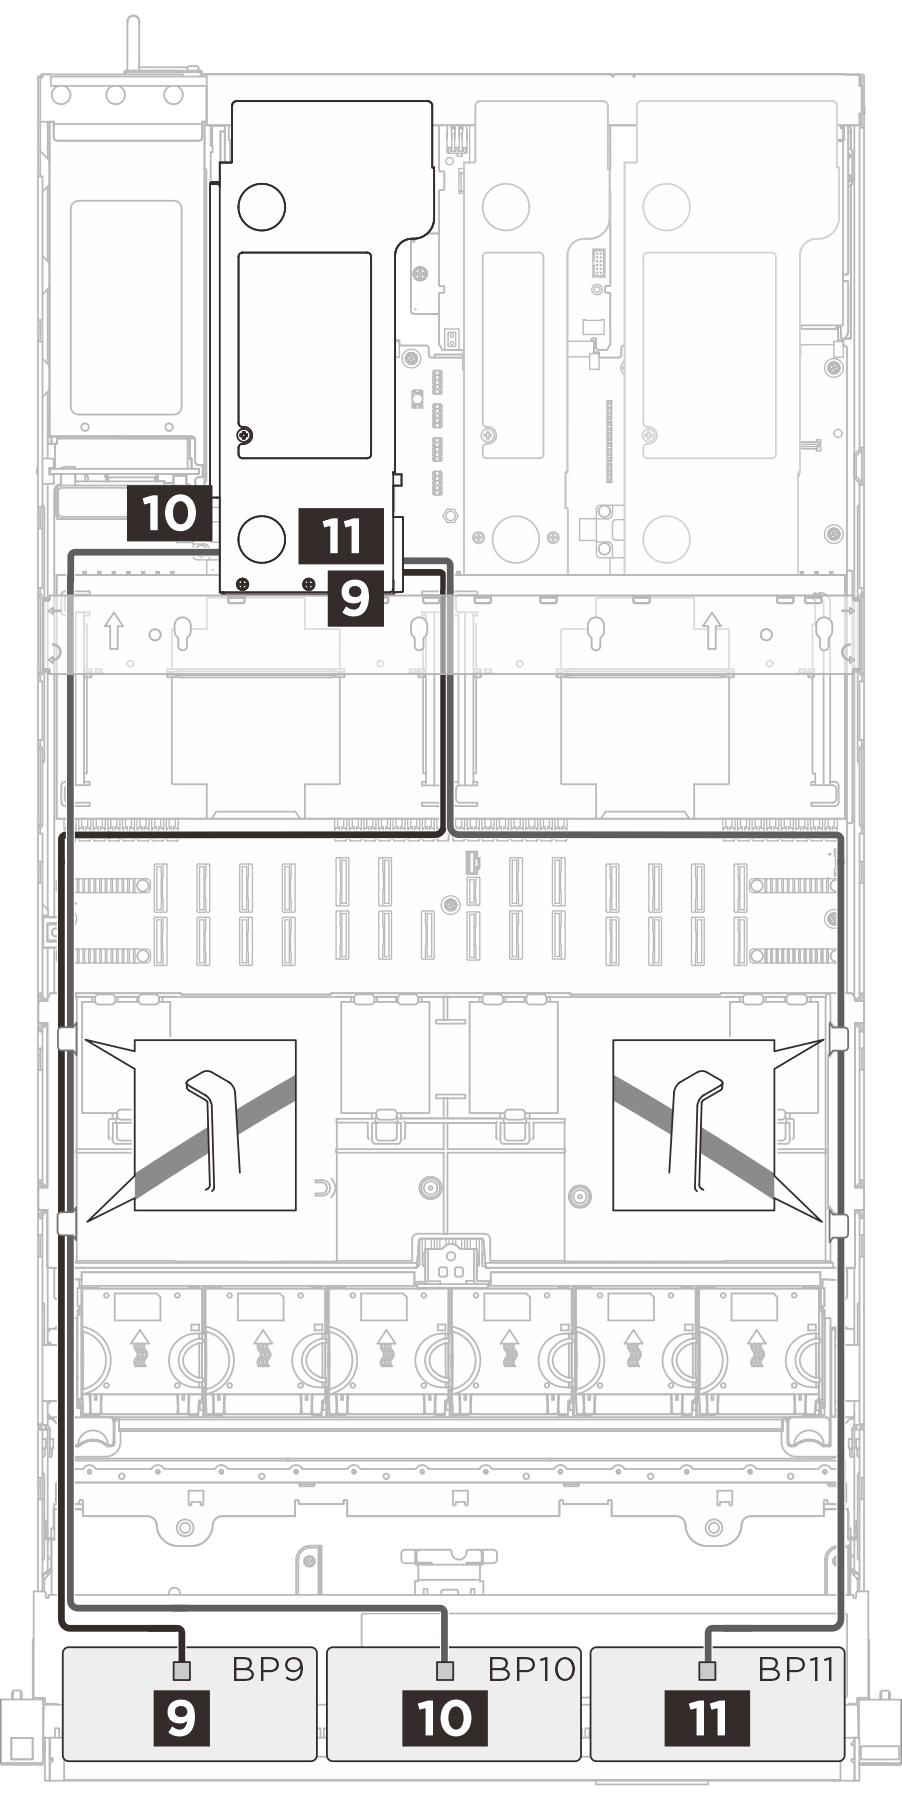 | 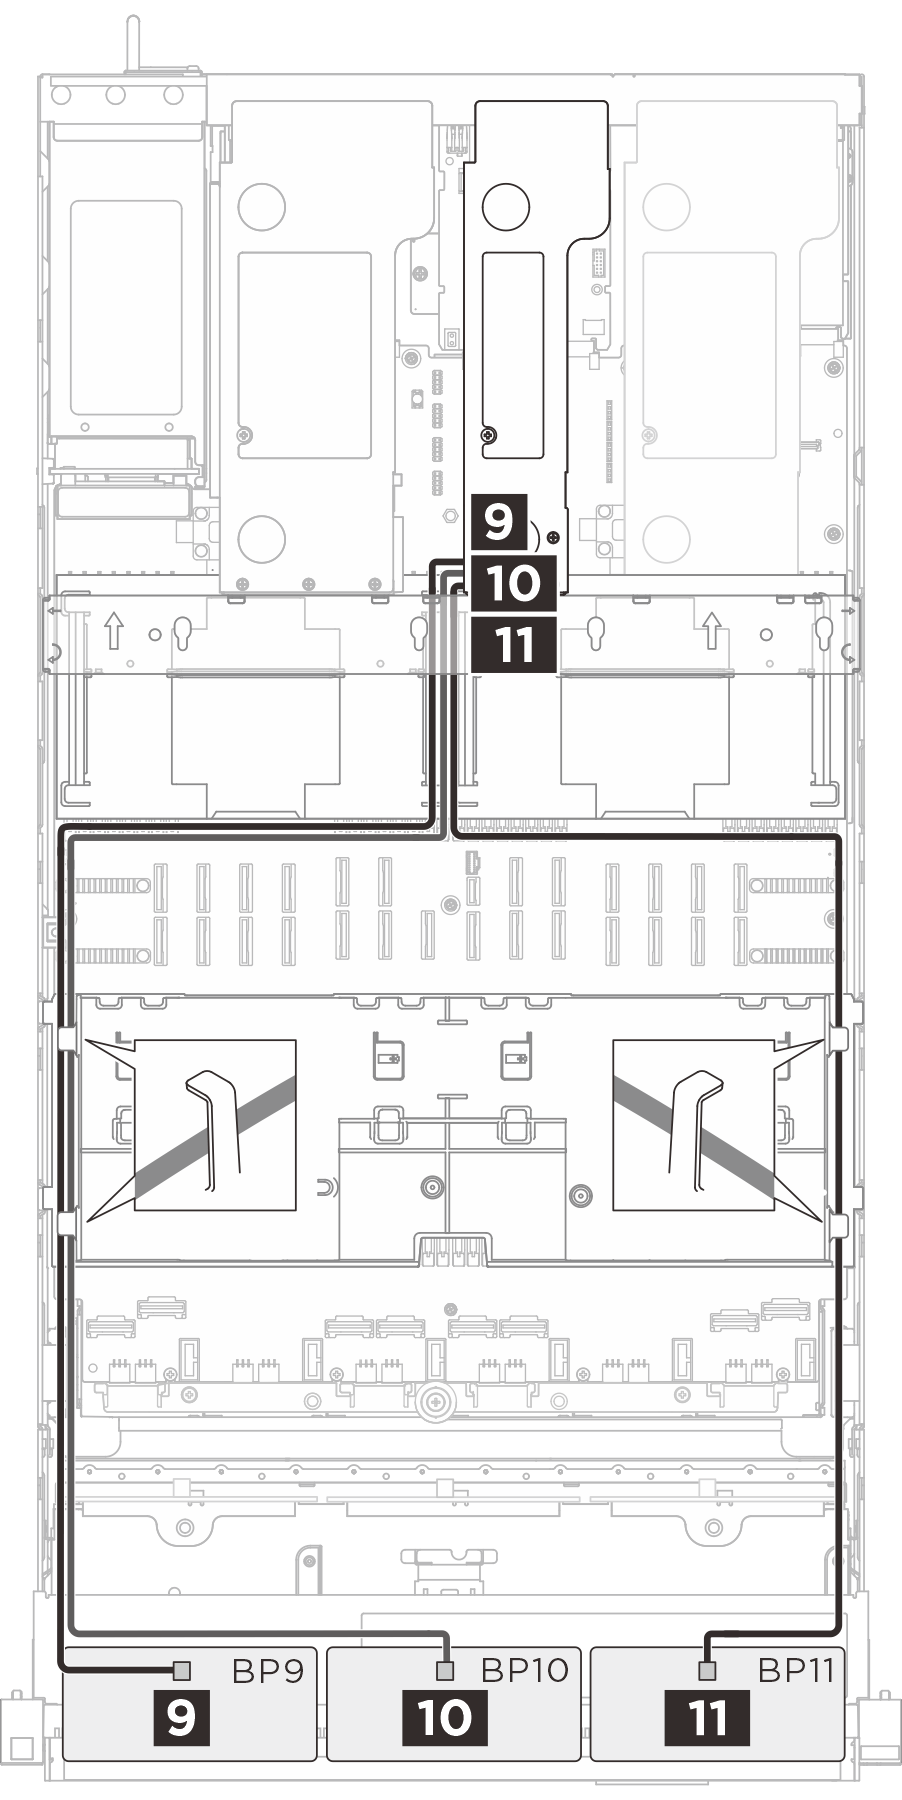 | 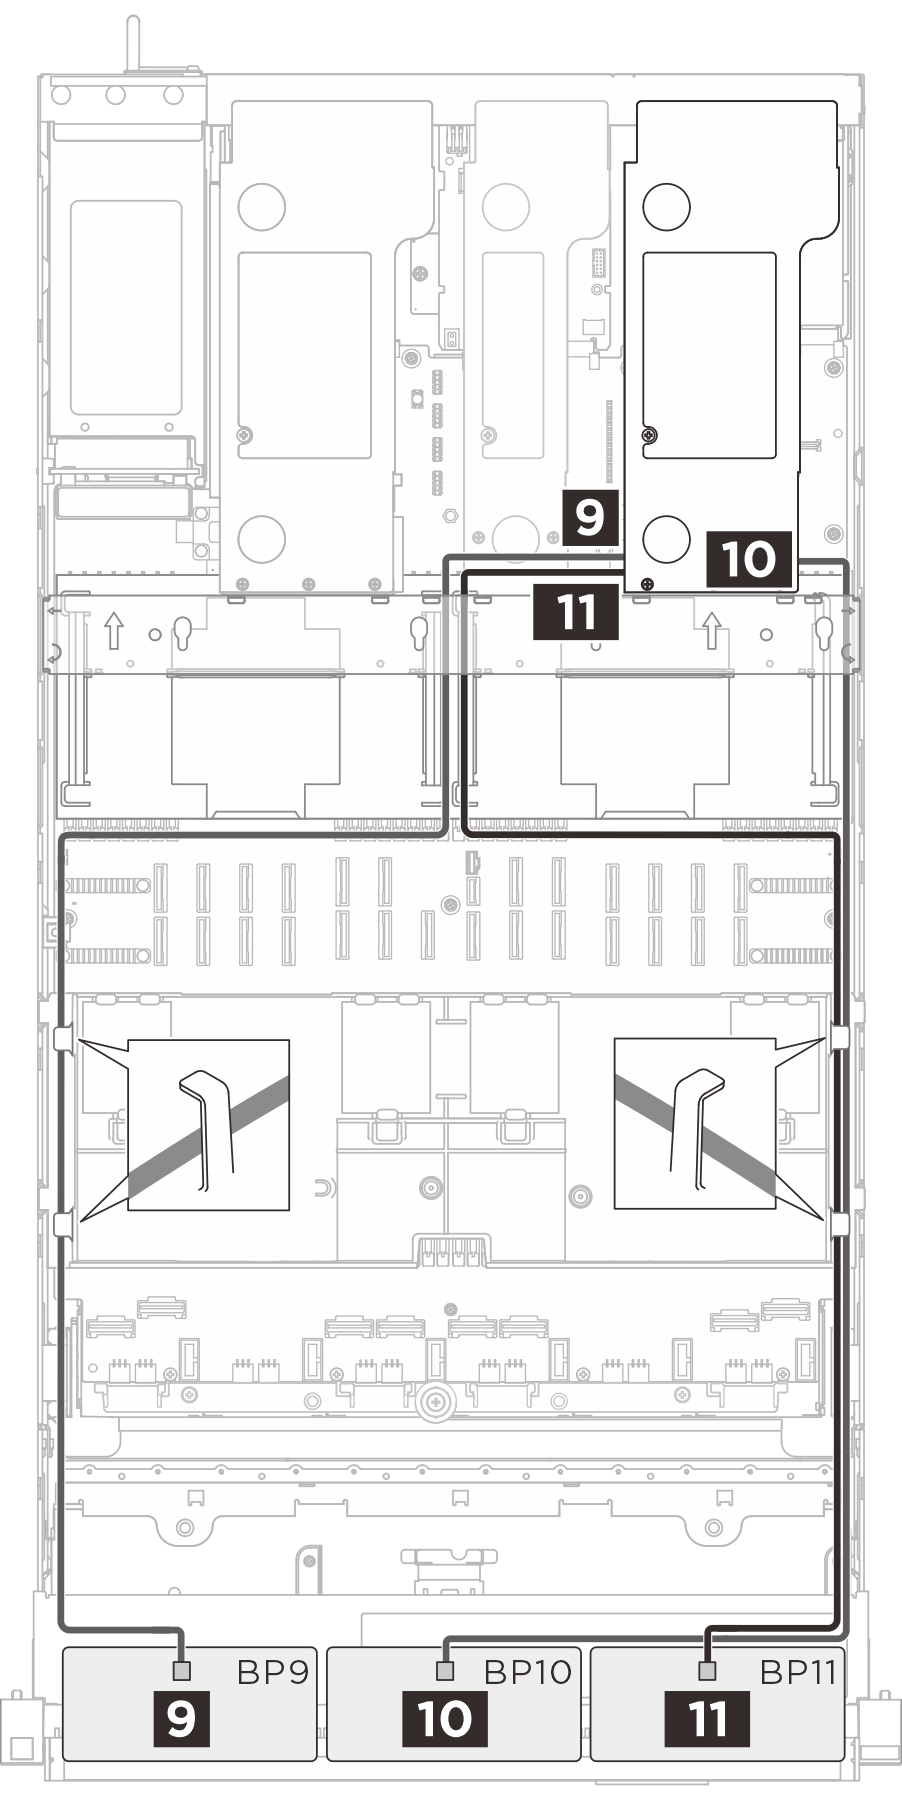 |
| Kabel | Von (Rückwandplatine) | Zu (RAID/HBA-Adapter) |
|---|---|---|
| SlimSAS x8 to SlimSAS x8 (1020 mm) | 9 BP 9: SAS | 9 RAID/HBA 8i/16i |
| SlimSAS x8 to SlimSAS x8 (1020 mm) | 10 BP 10: SAS | 10 RAID/HBA 8i/16i |
| SlimSAS x8 to SlimSAS x8 (1020 mm) | 11 BP 11: SAS | 11 RAID/HBA 8i/16i |