
Removing a system fan

Use this information to remove a system fan.

Attention
To ensure proper server operation, if a fan fails, you need to turn off the server first, then replace the fan immediately.

To remove a system fan, first complete the following steps:

  1. Read the safety information that begins in Safety and Installation guidelines.
  2. Turn off the server (see Turning off the server) and all attached peripheral devices. Disconnect all power cords; then, disconnect all external cables from the server.
  3. Remove the server top cover (see Removing the server top cover).
  4. If you have the optional hot-swap rear hard disk drive cage installed, rotate it up (see Rotating the optional hot-swap rear hard disk drive cage up).
  5. Remove the PCI riser-card assembly (see Removing a PCI riser-card assembly).
  6. Remove the air baffle (see Removing the air baffle).
  7. Removing Fan 1A:

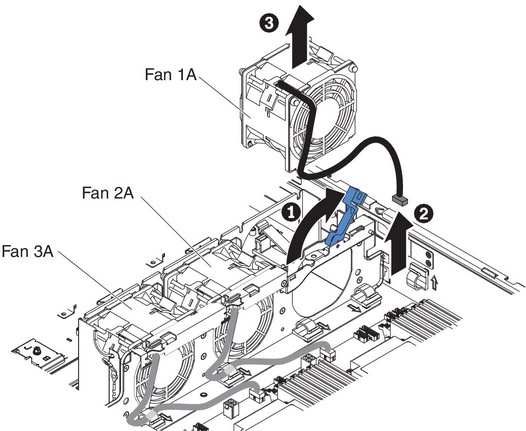
    1. Pull up the blue handle on the system fan cage.
    2. Disconnect the system fan cable from the connector on the system board.
    3. Pull the system fan cable out of the cable retainer clip.
    4. Grasp the top of the fan with your index finger and thumb and slowly lift the fan out of the server.
  8. Removing Fan 2A or Fan 3A
    1. Disconnect the system fan cable from the connector on the fan board.
    2. Pull the system fan cable out of the cable retainer clip.
    3. Grasp the top of the fan with your index finger and thumb and lift the fan out of the server.
  9. If you are instructed to return the fan, follow all packaging instructions, and use any packaging materials for shipping that are supplied to you.