Install the Lenovo Neptune(TM) liquid-to-air (L2A) hybrid cooling module

Follow instructions in this section to install the Lenovo NeptuneTM liquid-to-air (L2A) hybrid cooling module. The procedure must be executed by a trained technician.

About this task

Attention
  • Read Installation Guidelines and Safety inspection checklist to ensure that you work safely.
  • Touch the static-protective package that contains the component to any unpainted metal surface on the server; then, remove it from the package and place it on a static-protective surface.
CAUTION
Do not touch the radiator fins. Touching the radiator fins might damage the L2A.

Note
Make sure you have the required tools listed below available to properly replace the component:
  • Phillips #1 head screwdriver
  • Torx T15 head screwdriver
  • Alcohol cleaning pad
  • SXM5 PCM Kit
  • SR675 V3 water loop putty pad kit
  • SR675 V3 water loop service kit
Important
Putty pad/phase change material (PCM) replacement guidelines
  • Before replacing the putty pad/PCM, gently clean the hardware surface with an alcohol cleaning pad.
  • Hold the putty pad/PCM carefully to avoid deformation. Make sure no screw hole or opening is blocked by the putty pad/PCM.
  • Do not use expired putty pad/PCM. Check the expiry date on putty pad/PCM package. If the putty pads/PCM are expired, acquire new ones to properly replace them.

Procedure

  1. Make sure the SXM5 GPU board assembly is installed in the GPU tray. See Install the SXM5 GPU board assembly.
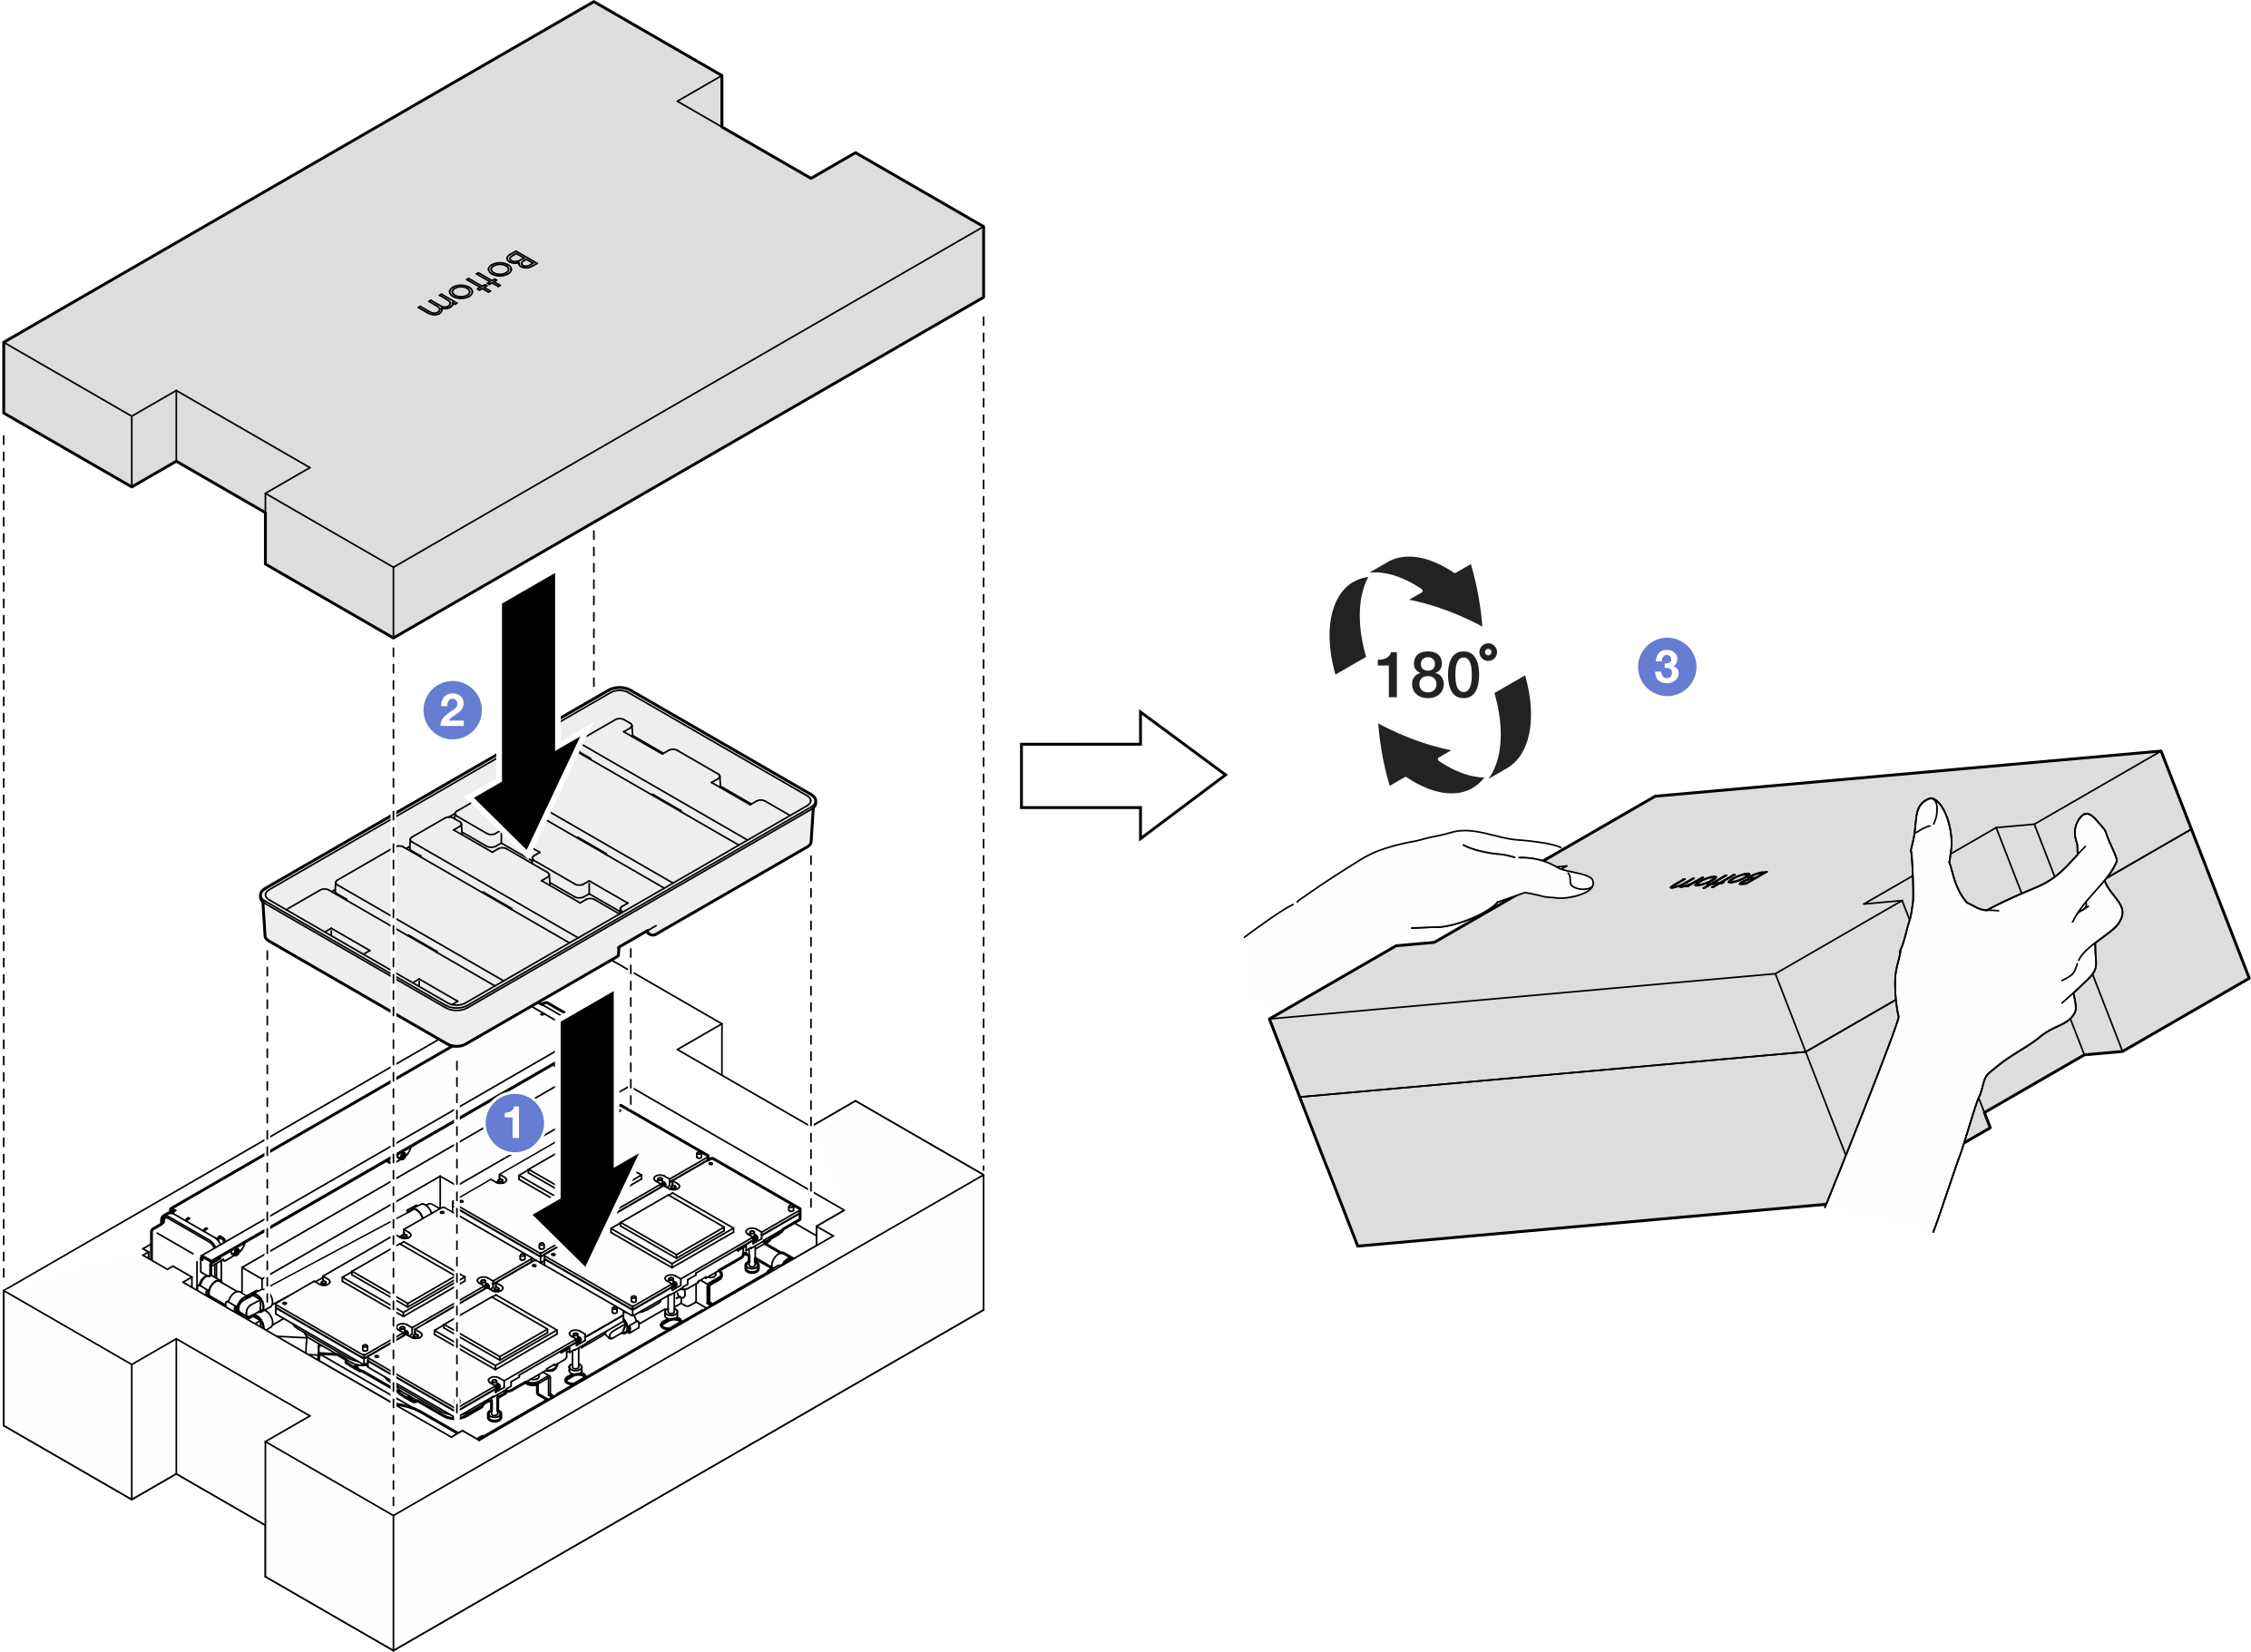
  2. Turn the L2A upside down.
    Note
    If the L2A is already in the shipping box, skip to step 2c.
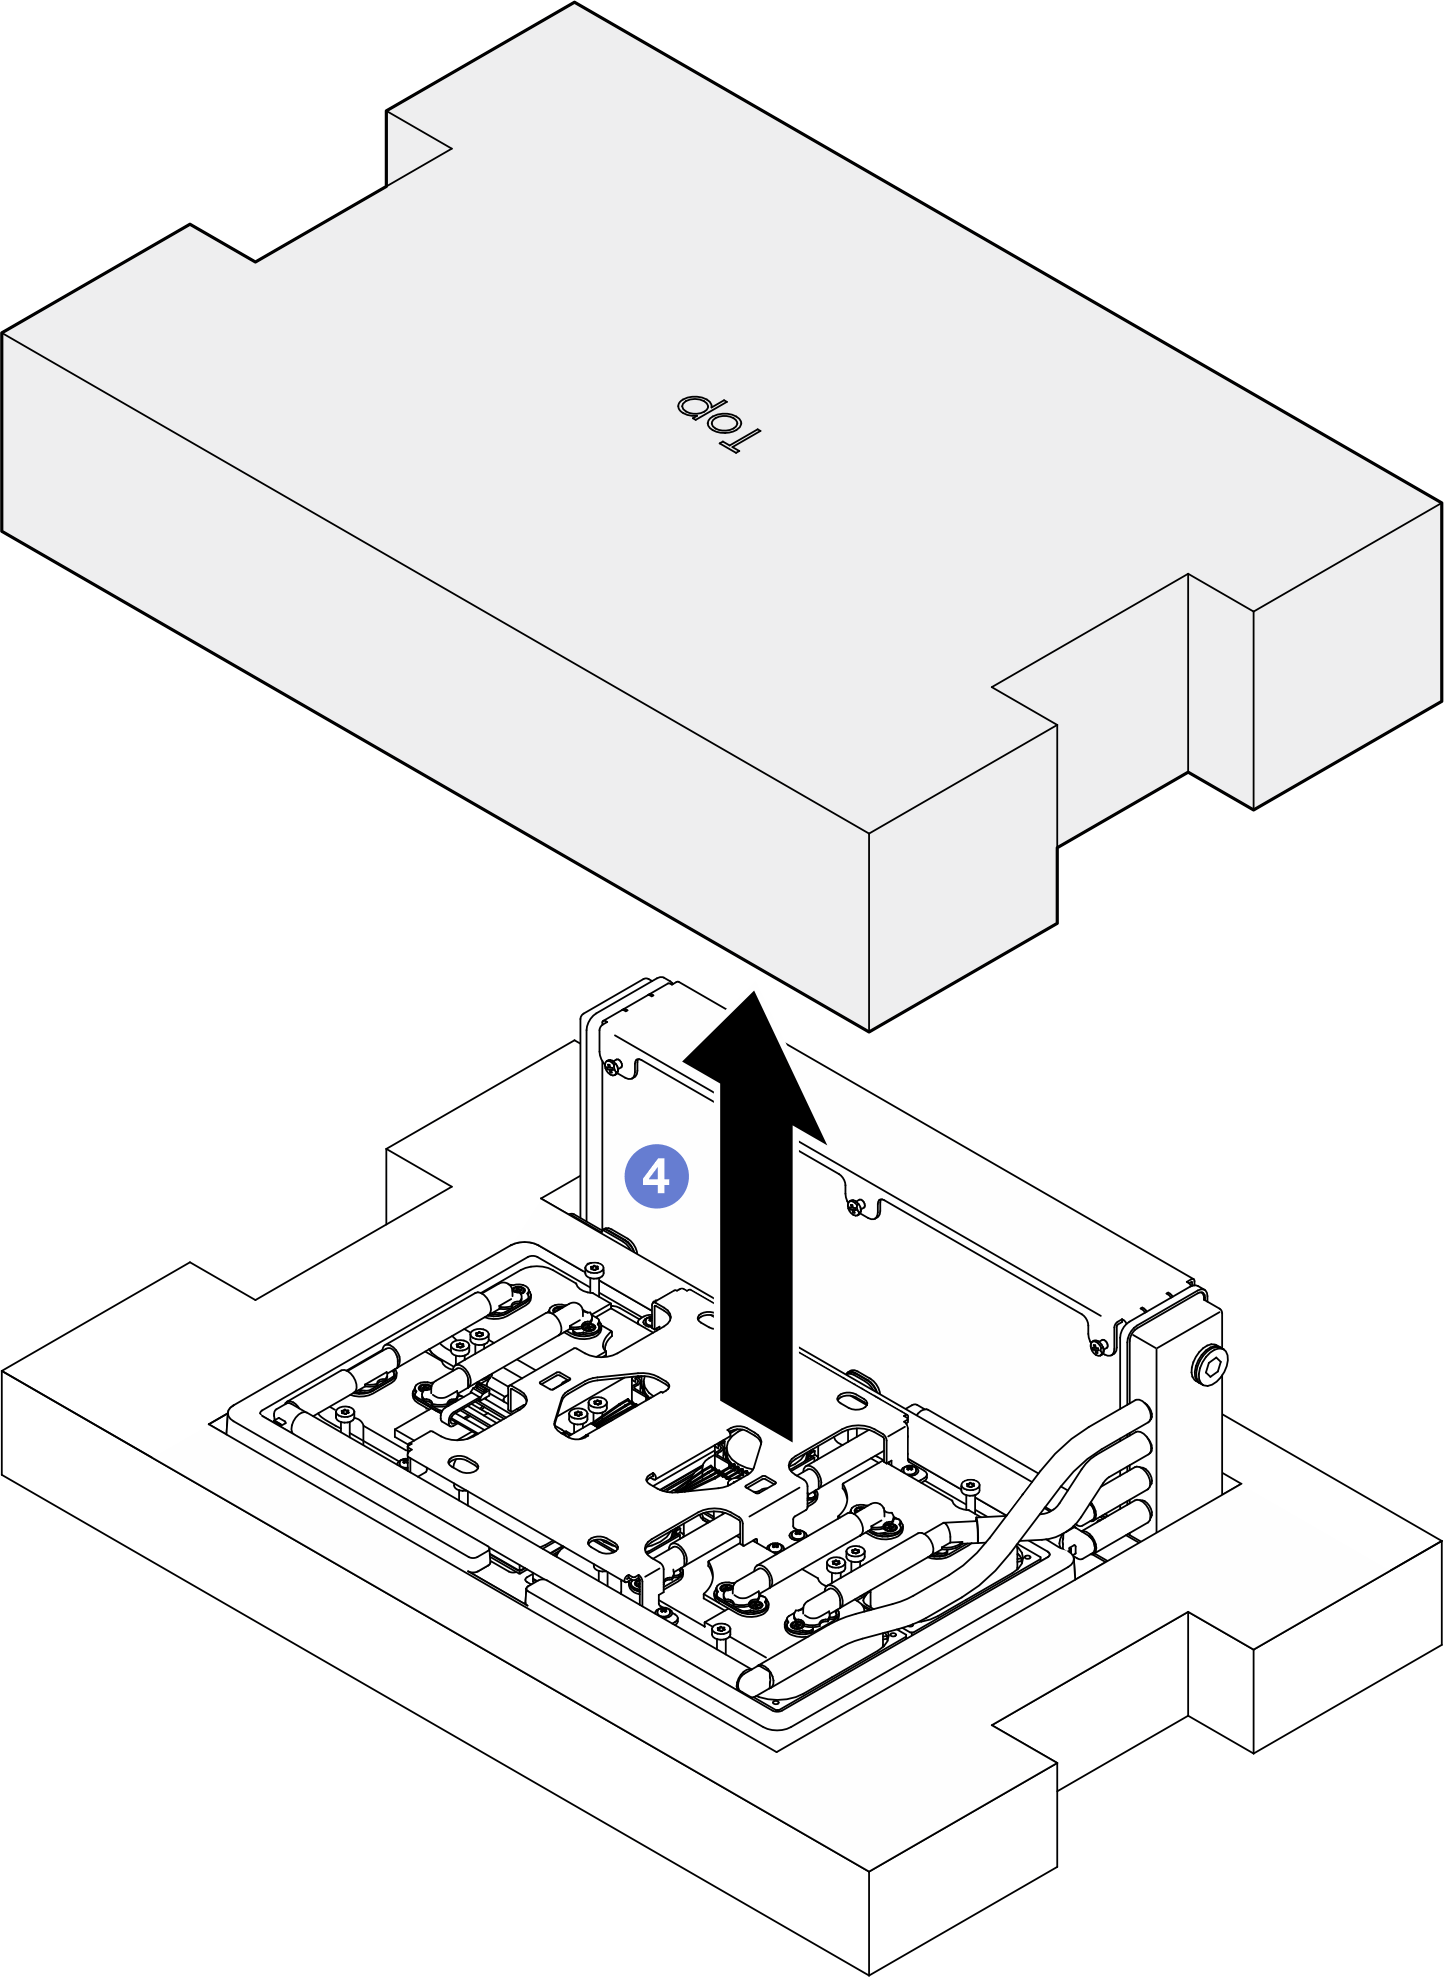
    1. Hold the radiator by its upper edge and hold the cold plate assembly by its lifting handle; then, put the L2A into the shipping box.
    2. Place the top cover of the shipping box on top of the L2A and ensure it is firmly seated.
    3. Hold the shipping box and carefully turn it upside down.
    4. Remove the bottom cover of the shipping box.
    5. Remove the plastic tray and the bottom of the cold plate assembly is facing up.
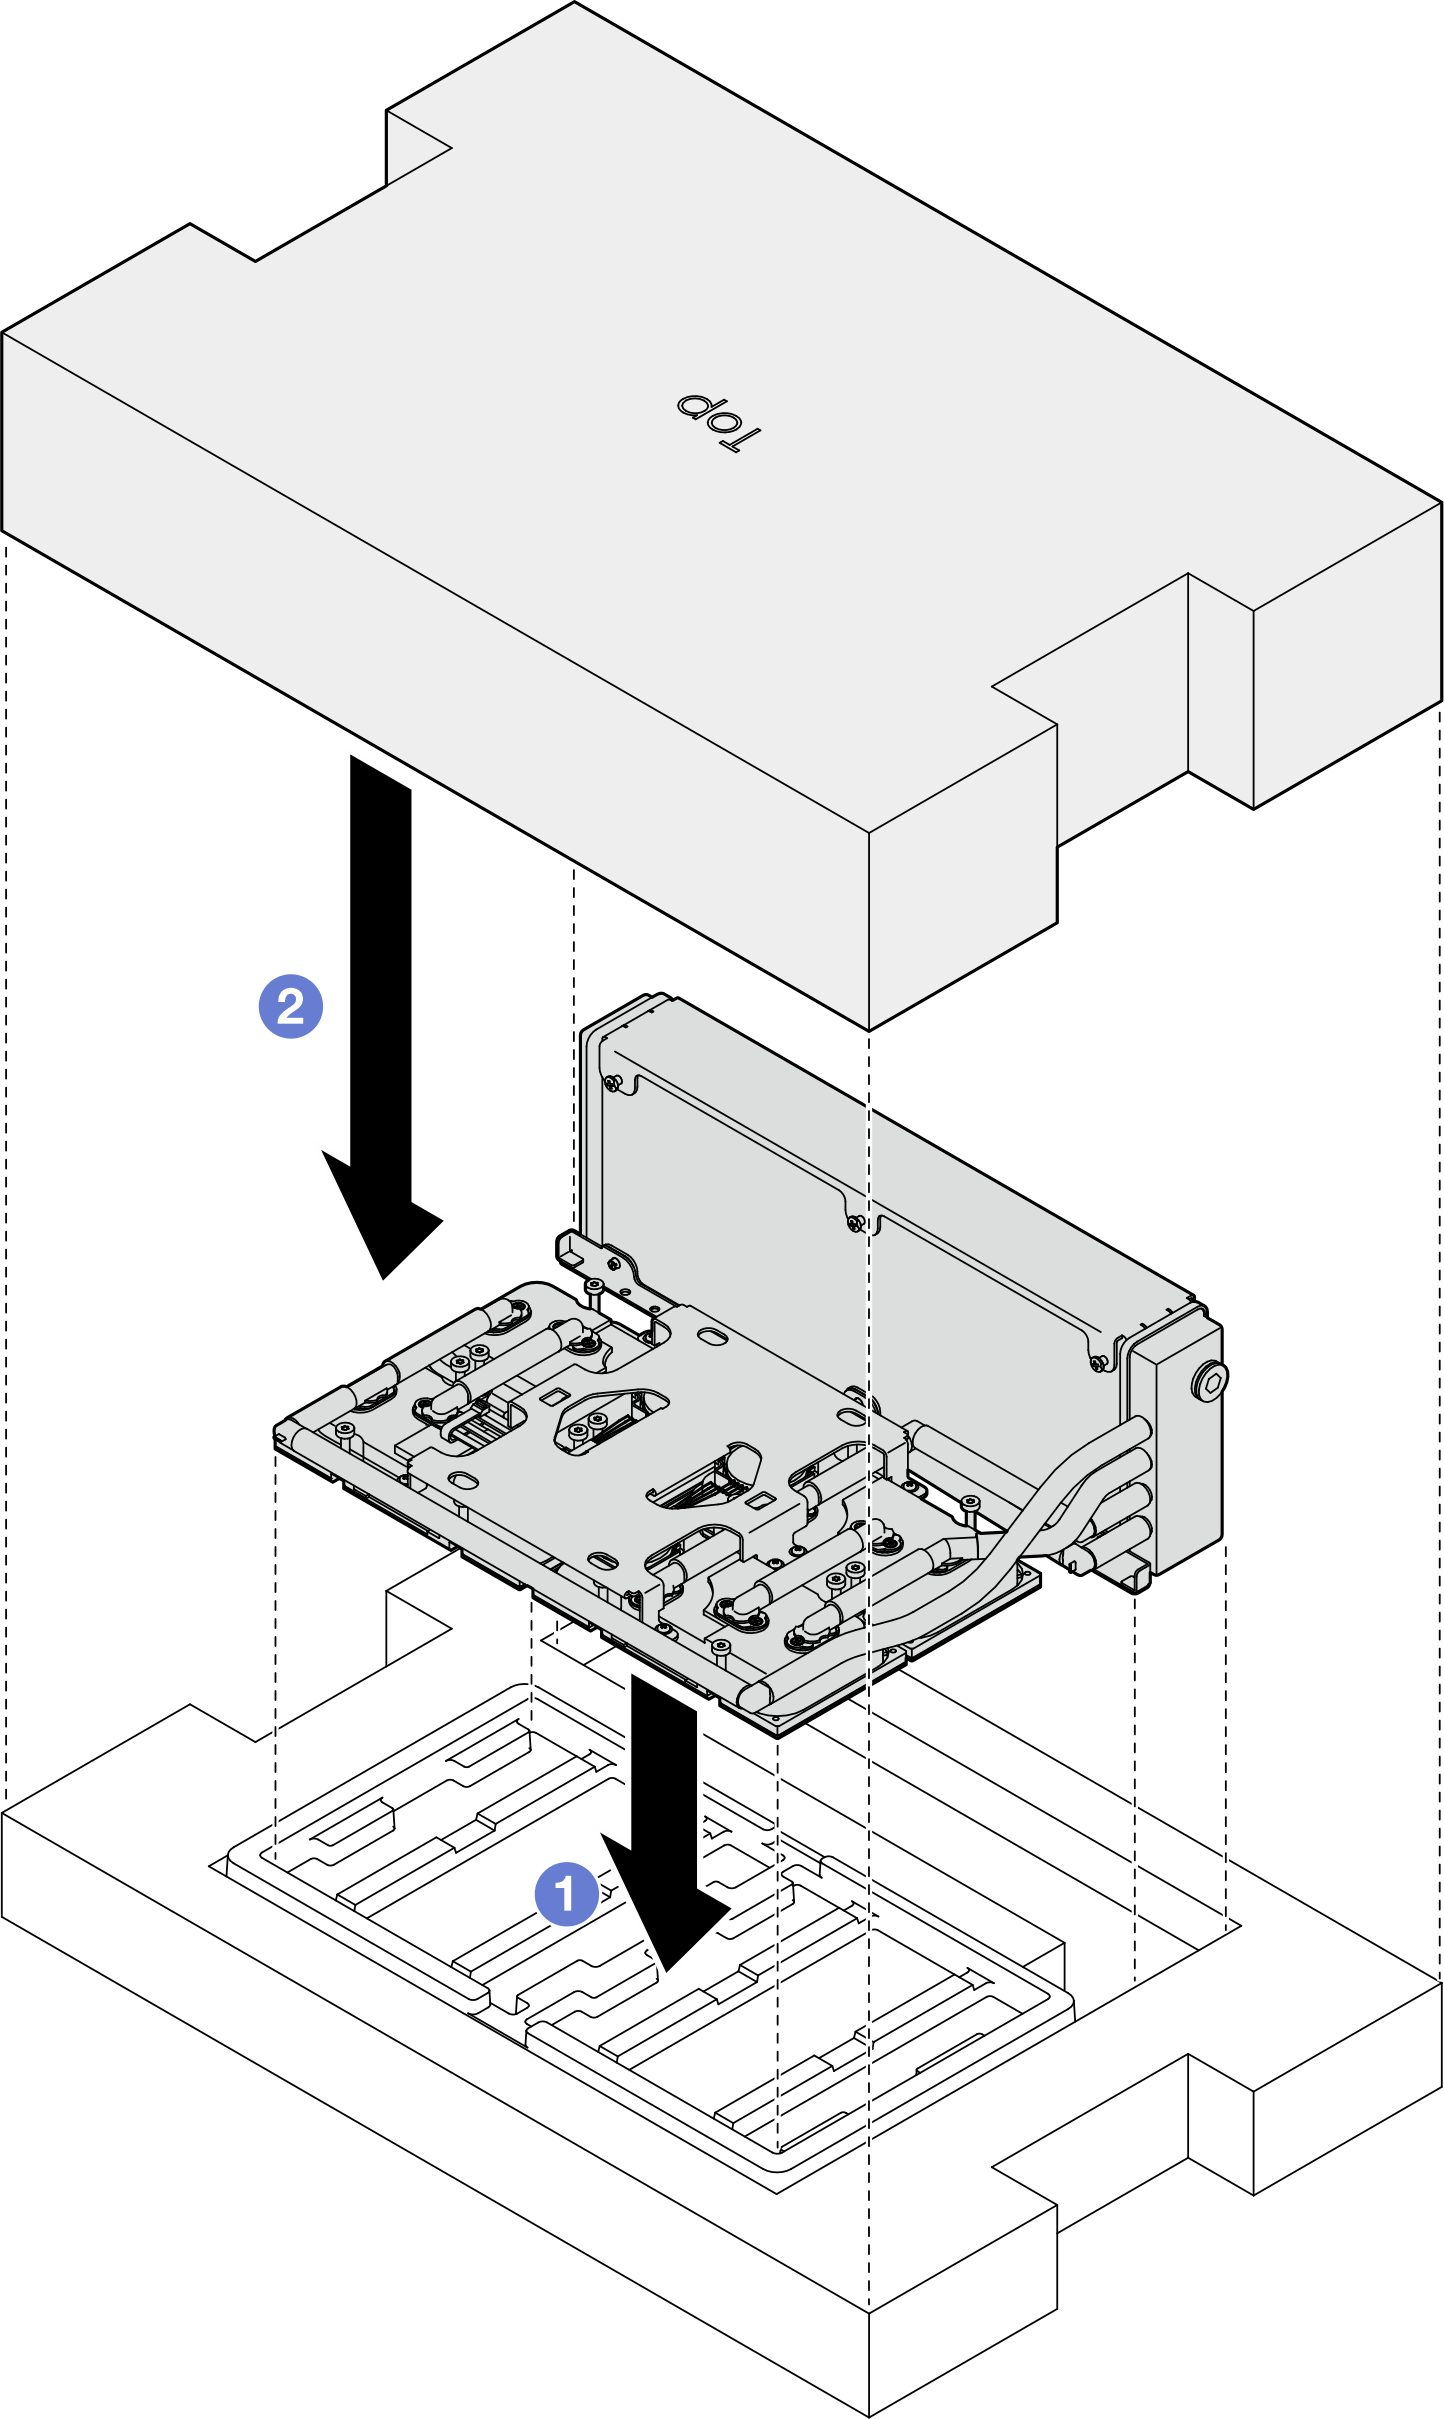
      Figure 1. Turning the L2A upside down
      Turning the L2A upside down

      Turning the L2A upside down
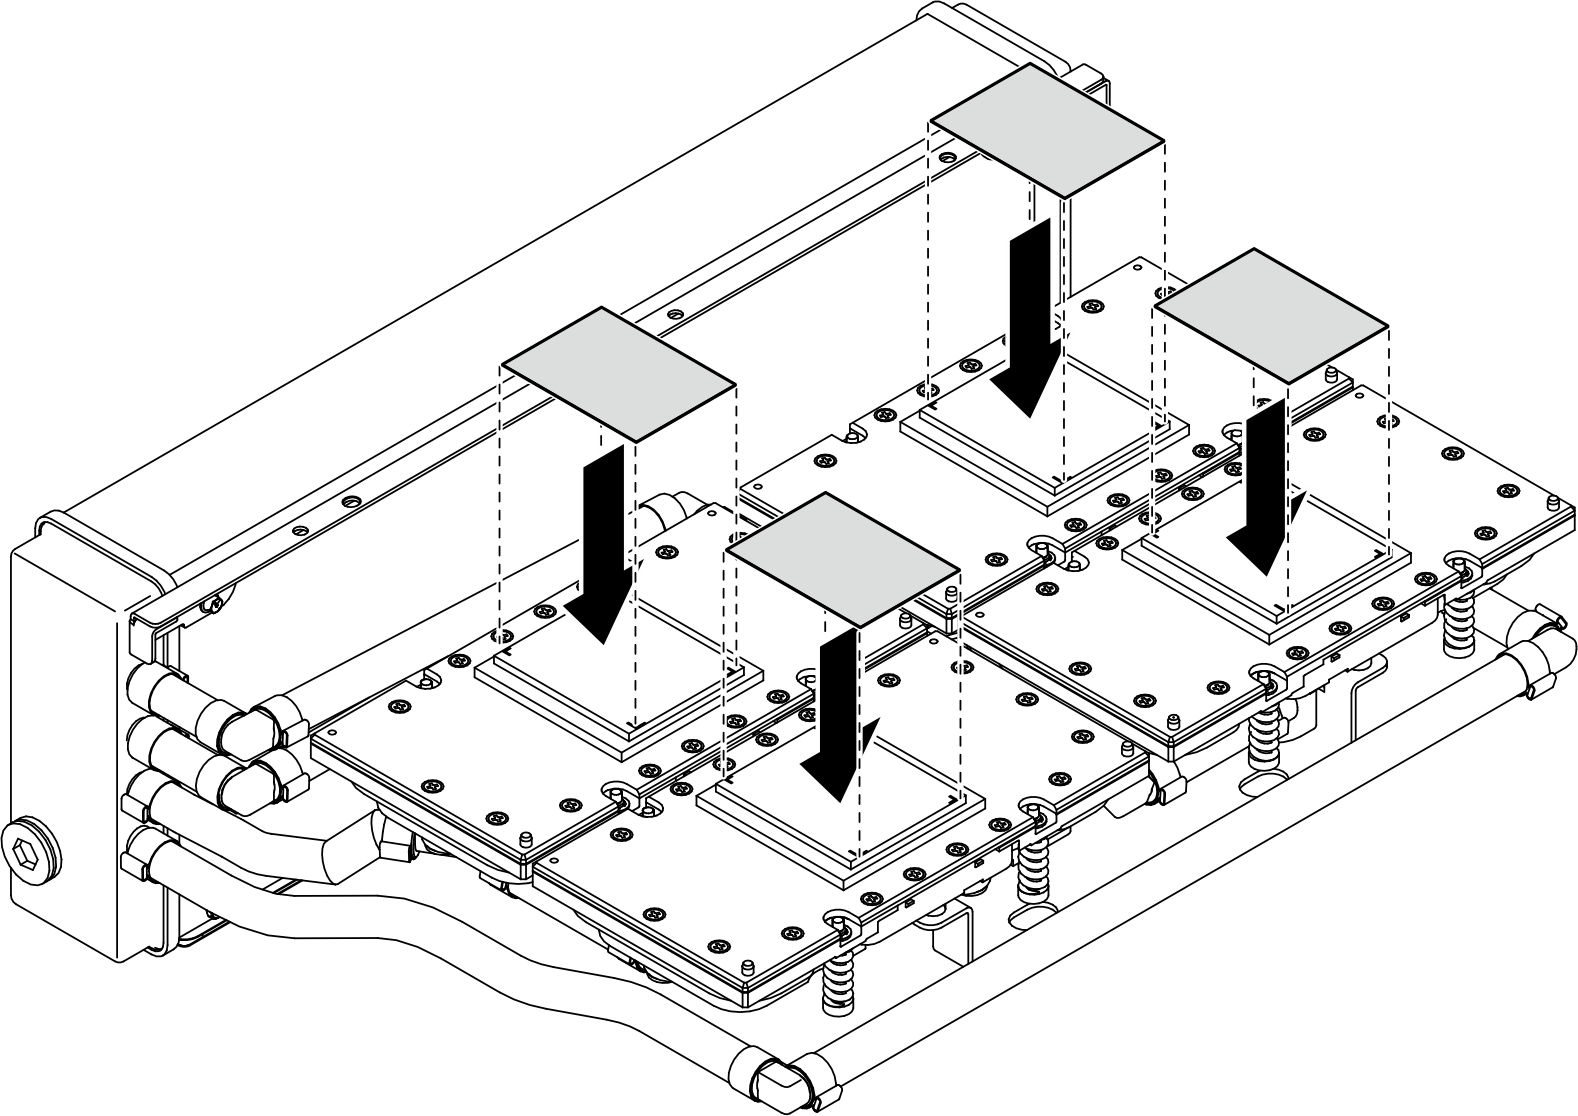
  3. Replace the PCM to the cold plates.
    1. Align the PCM with the marking on the bottom of the cold plate, and place it onto the cold plate; then, apply pressure on the PCM and hold it for three to five seconds until it is firmly attached.
    2. Repeat to replace the PCM on the four cold plates.
      Attention
      After PCM is replaced, there is an expected short duration of throttling before the GPU returns to normal operation. This is due to the PCM requiring a break-in period after being replaced.
      Figure 2. PCM application
      PCM application
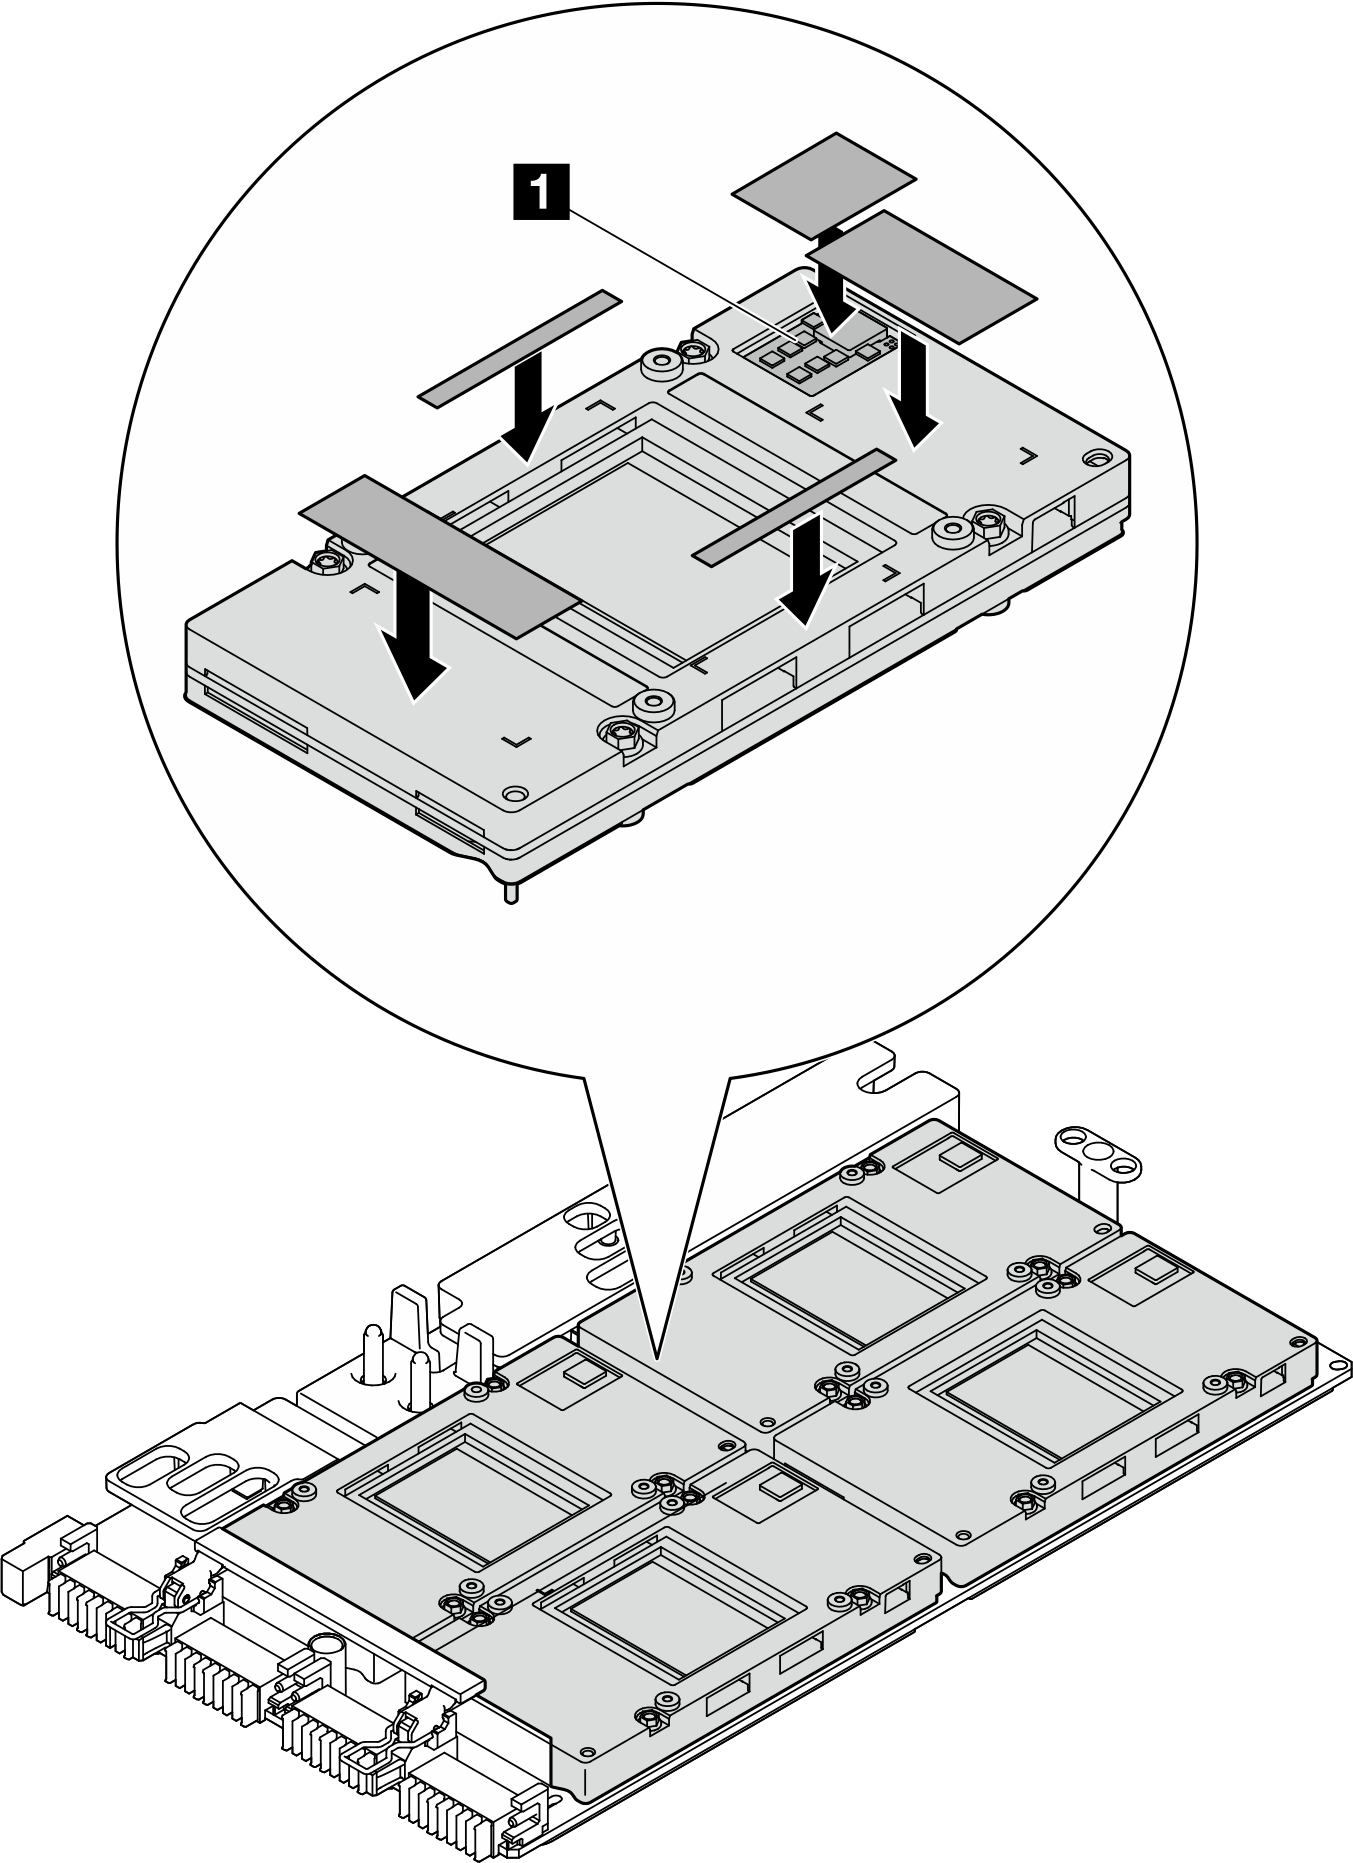
  4. Replace the putty pads to the SXM5 GPUs.
    1. Align the five putty pads with the GPU VR (1) and the markings on the GPU, and attach them to the GPU.
    2. Repeat to replace all putty pads on the four GPUs.
      Figure 3. Putty pad application
      Putty pad application
      1 GPU VR (Cover the GPU VR with putty pad)
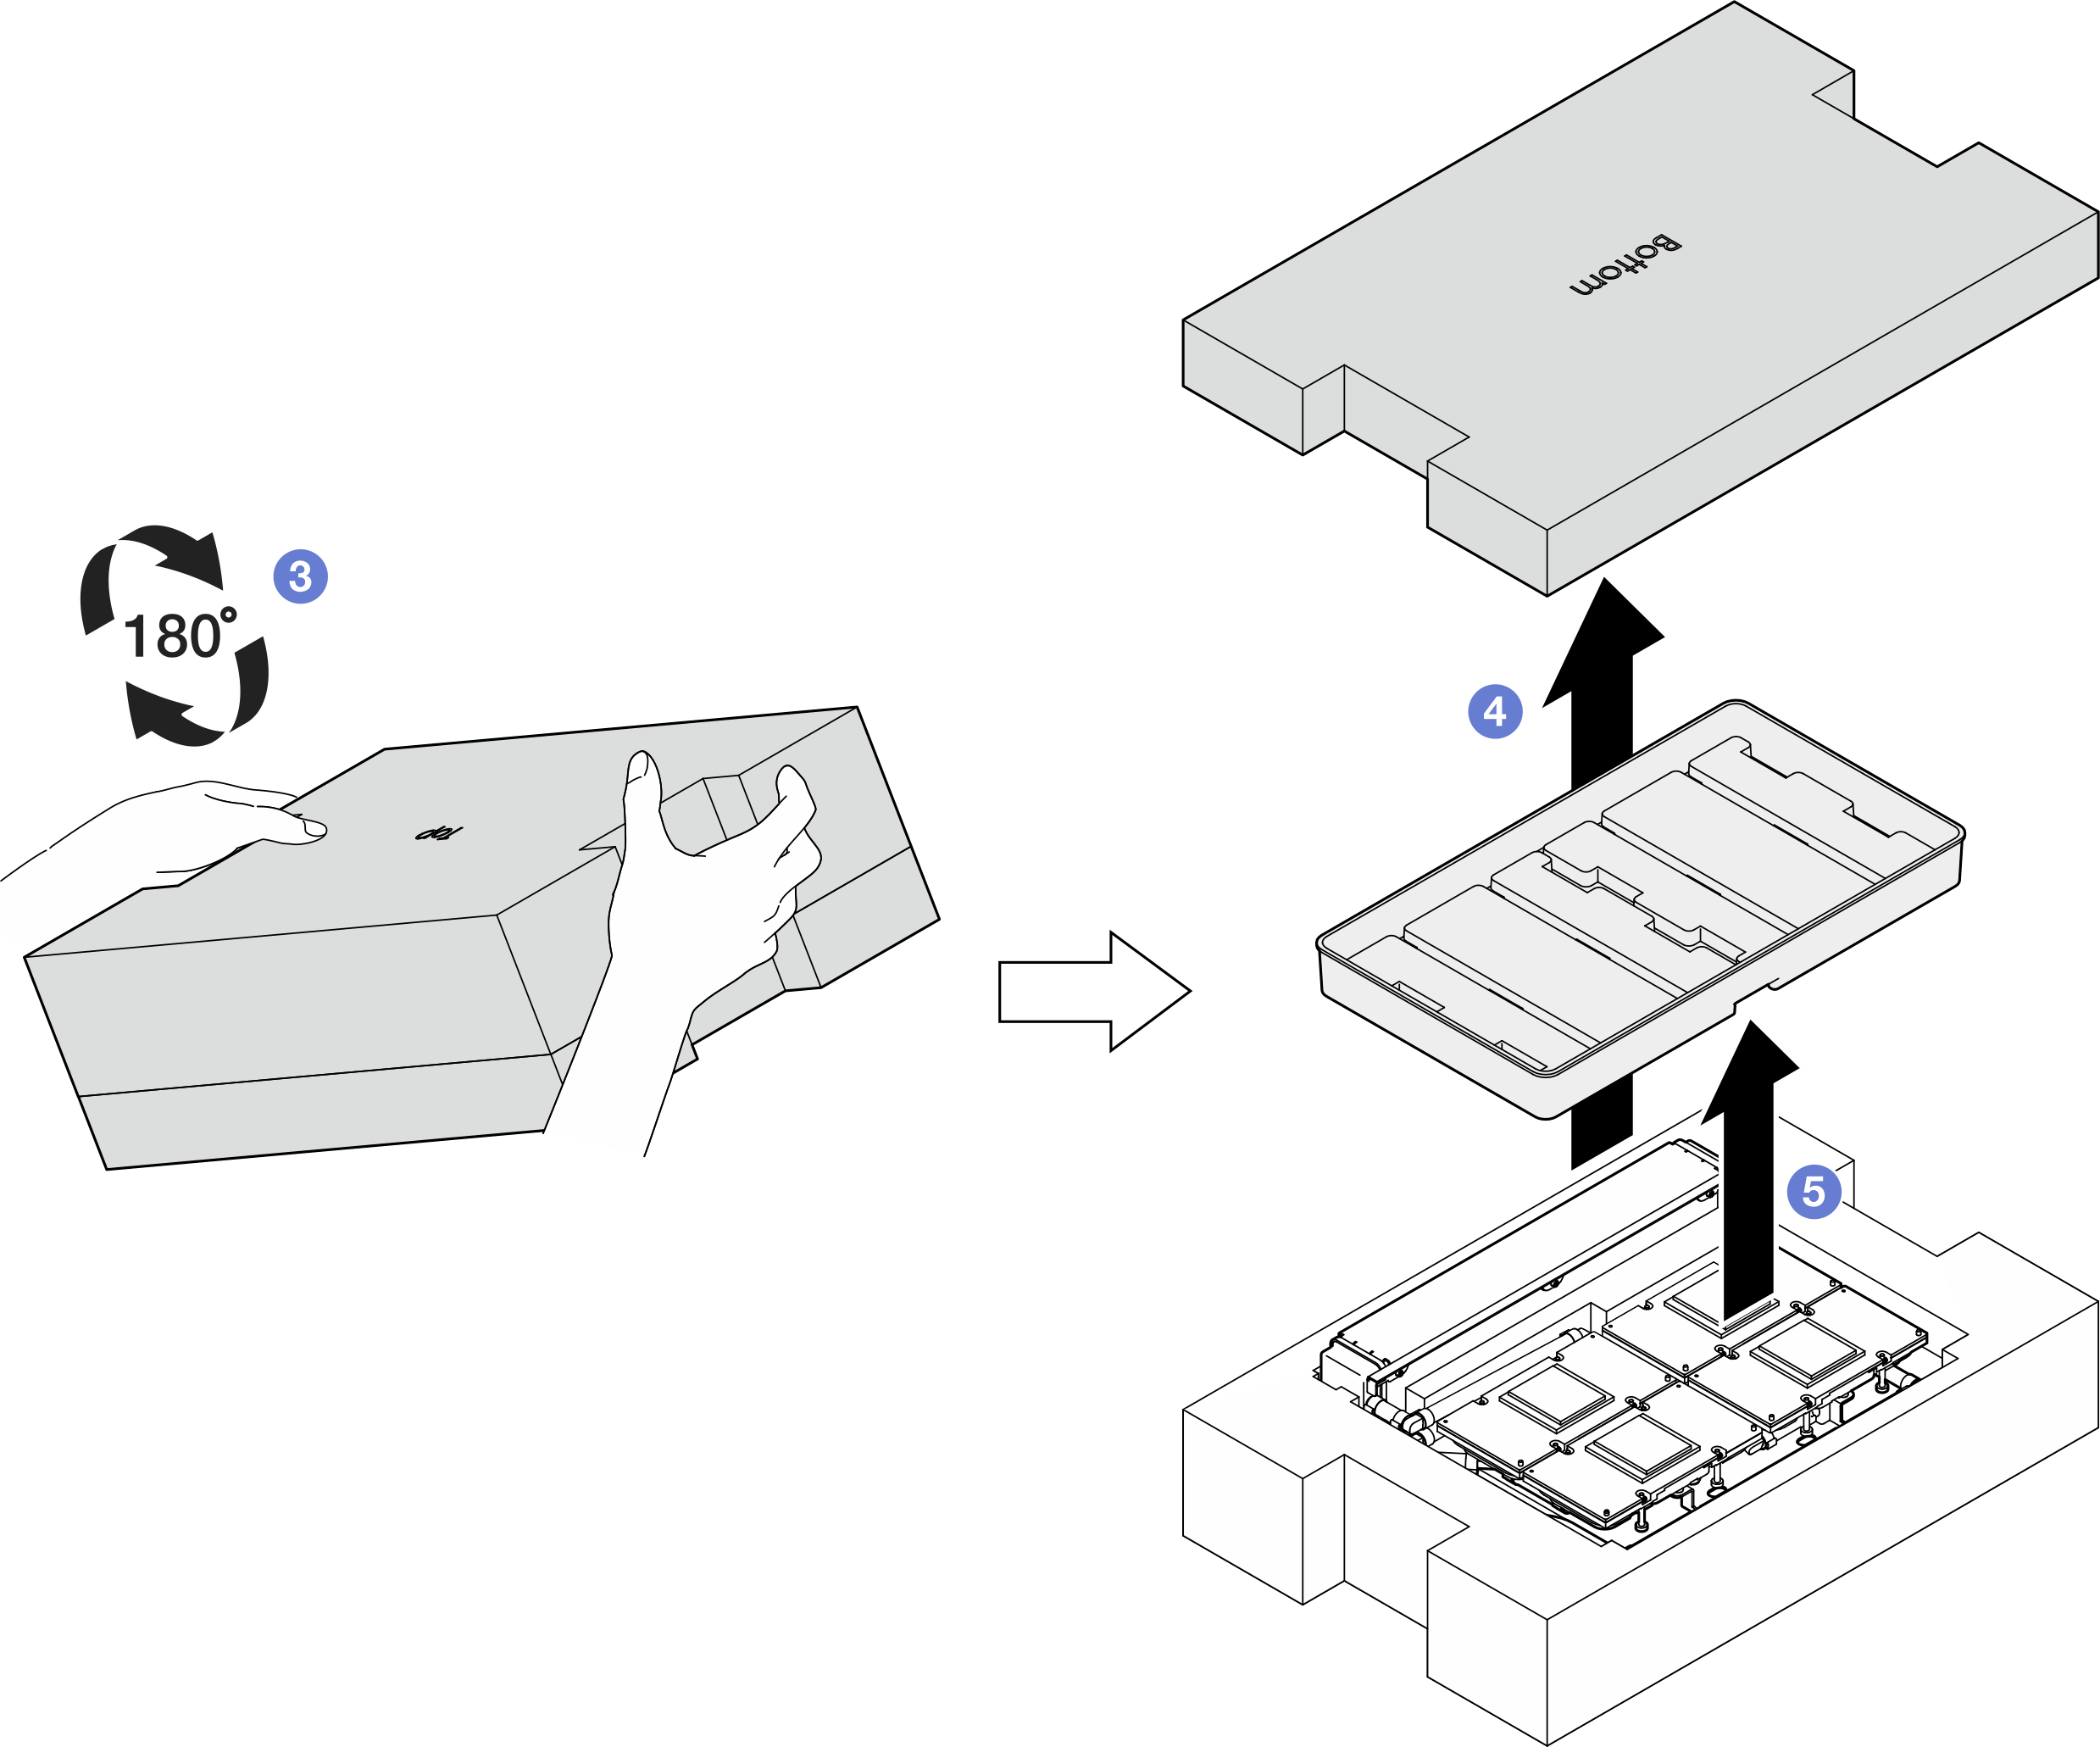
  5. Turn the L2A right-side up.
    1. Place the plastic tray on top of the L2A to secure the L2A in place.
    2. Place the bottom cover of the shipping box on top of the plastic tray and ensure it is firmly seated.
    3. Hold the shipping box and carefully turn it right-side up.
    4. Remove the top cover of the shipping box and the cold plate assembly lifting handle is facing up.
      Figure 4. Turning the L2A right-side up
      Turning the L2A right-side up

      Turning the L2A right side up
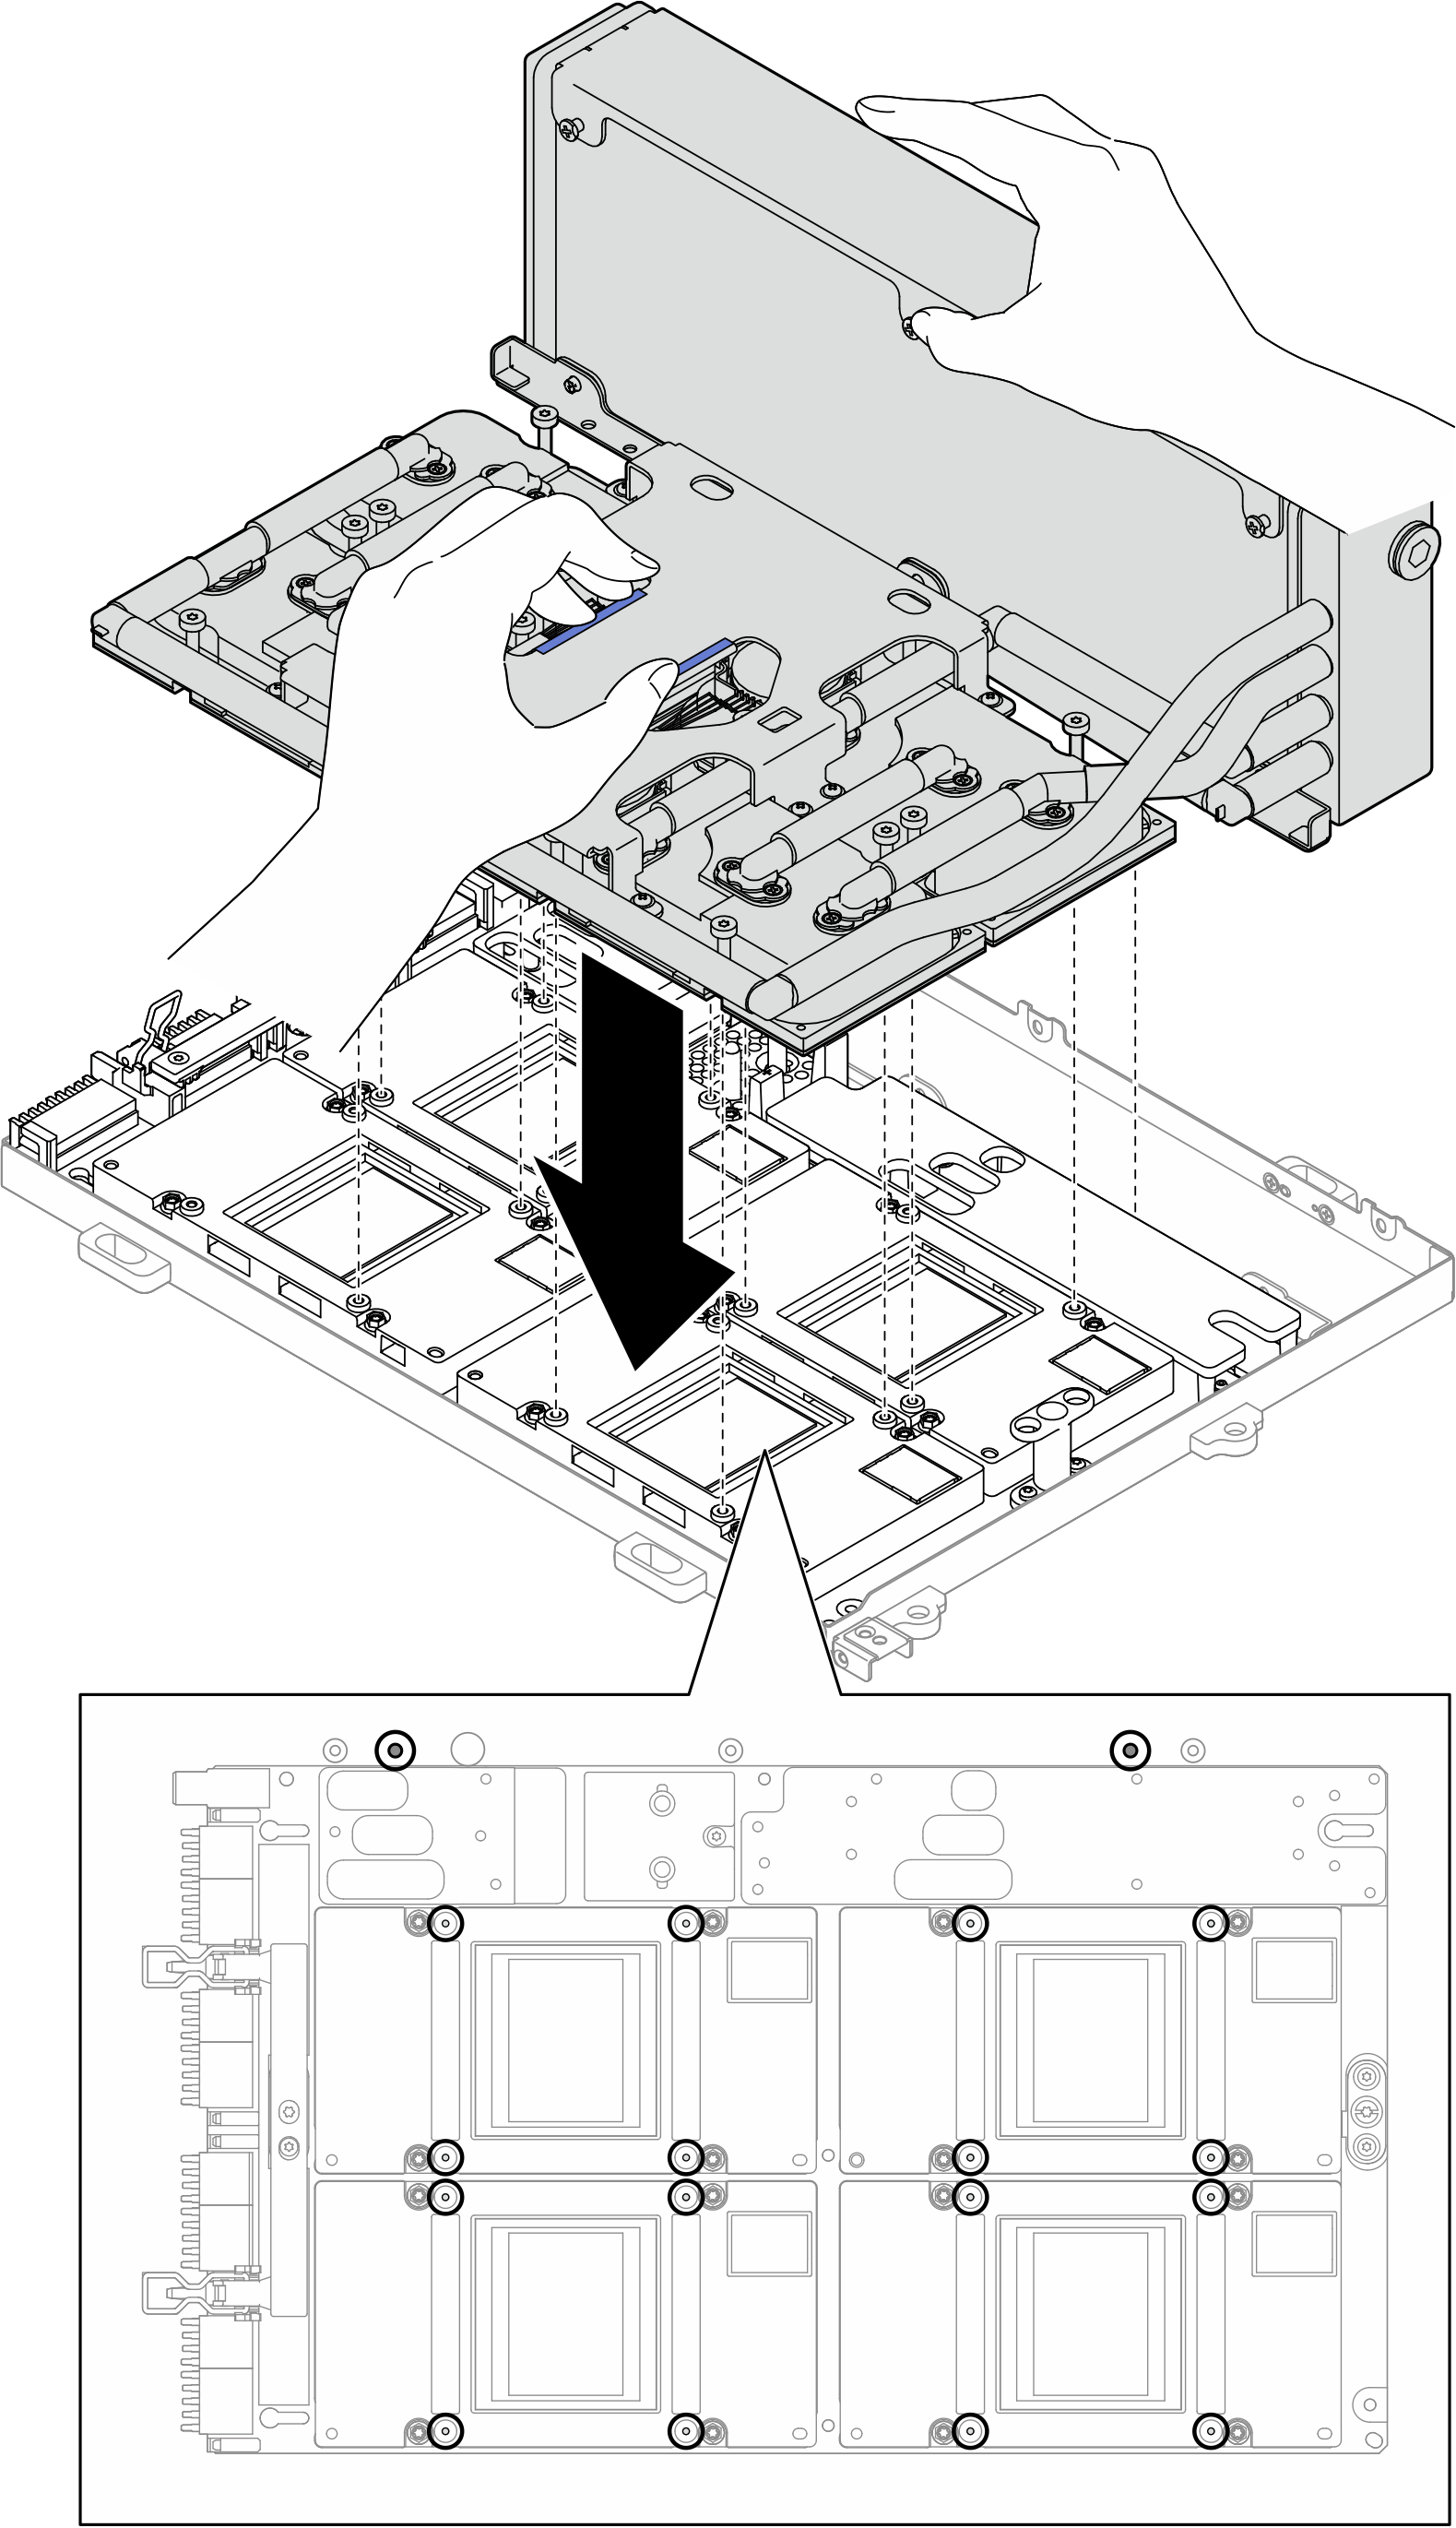
  6. Hold the radiator by its upper edge and hold the cold plate assembly by its lifting handle to remove the L2A out of the shipping box; then, align the L2A with the sixteen screw holes on the SXM5 GPU board assembly and the two guide pins on the GPU tray, and gently place the L2A onto the SXM5 GPU board assembly.
    Figure 5. L2A installation
    L2A installation
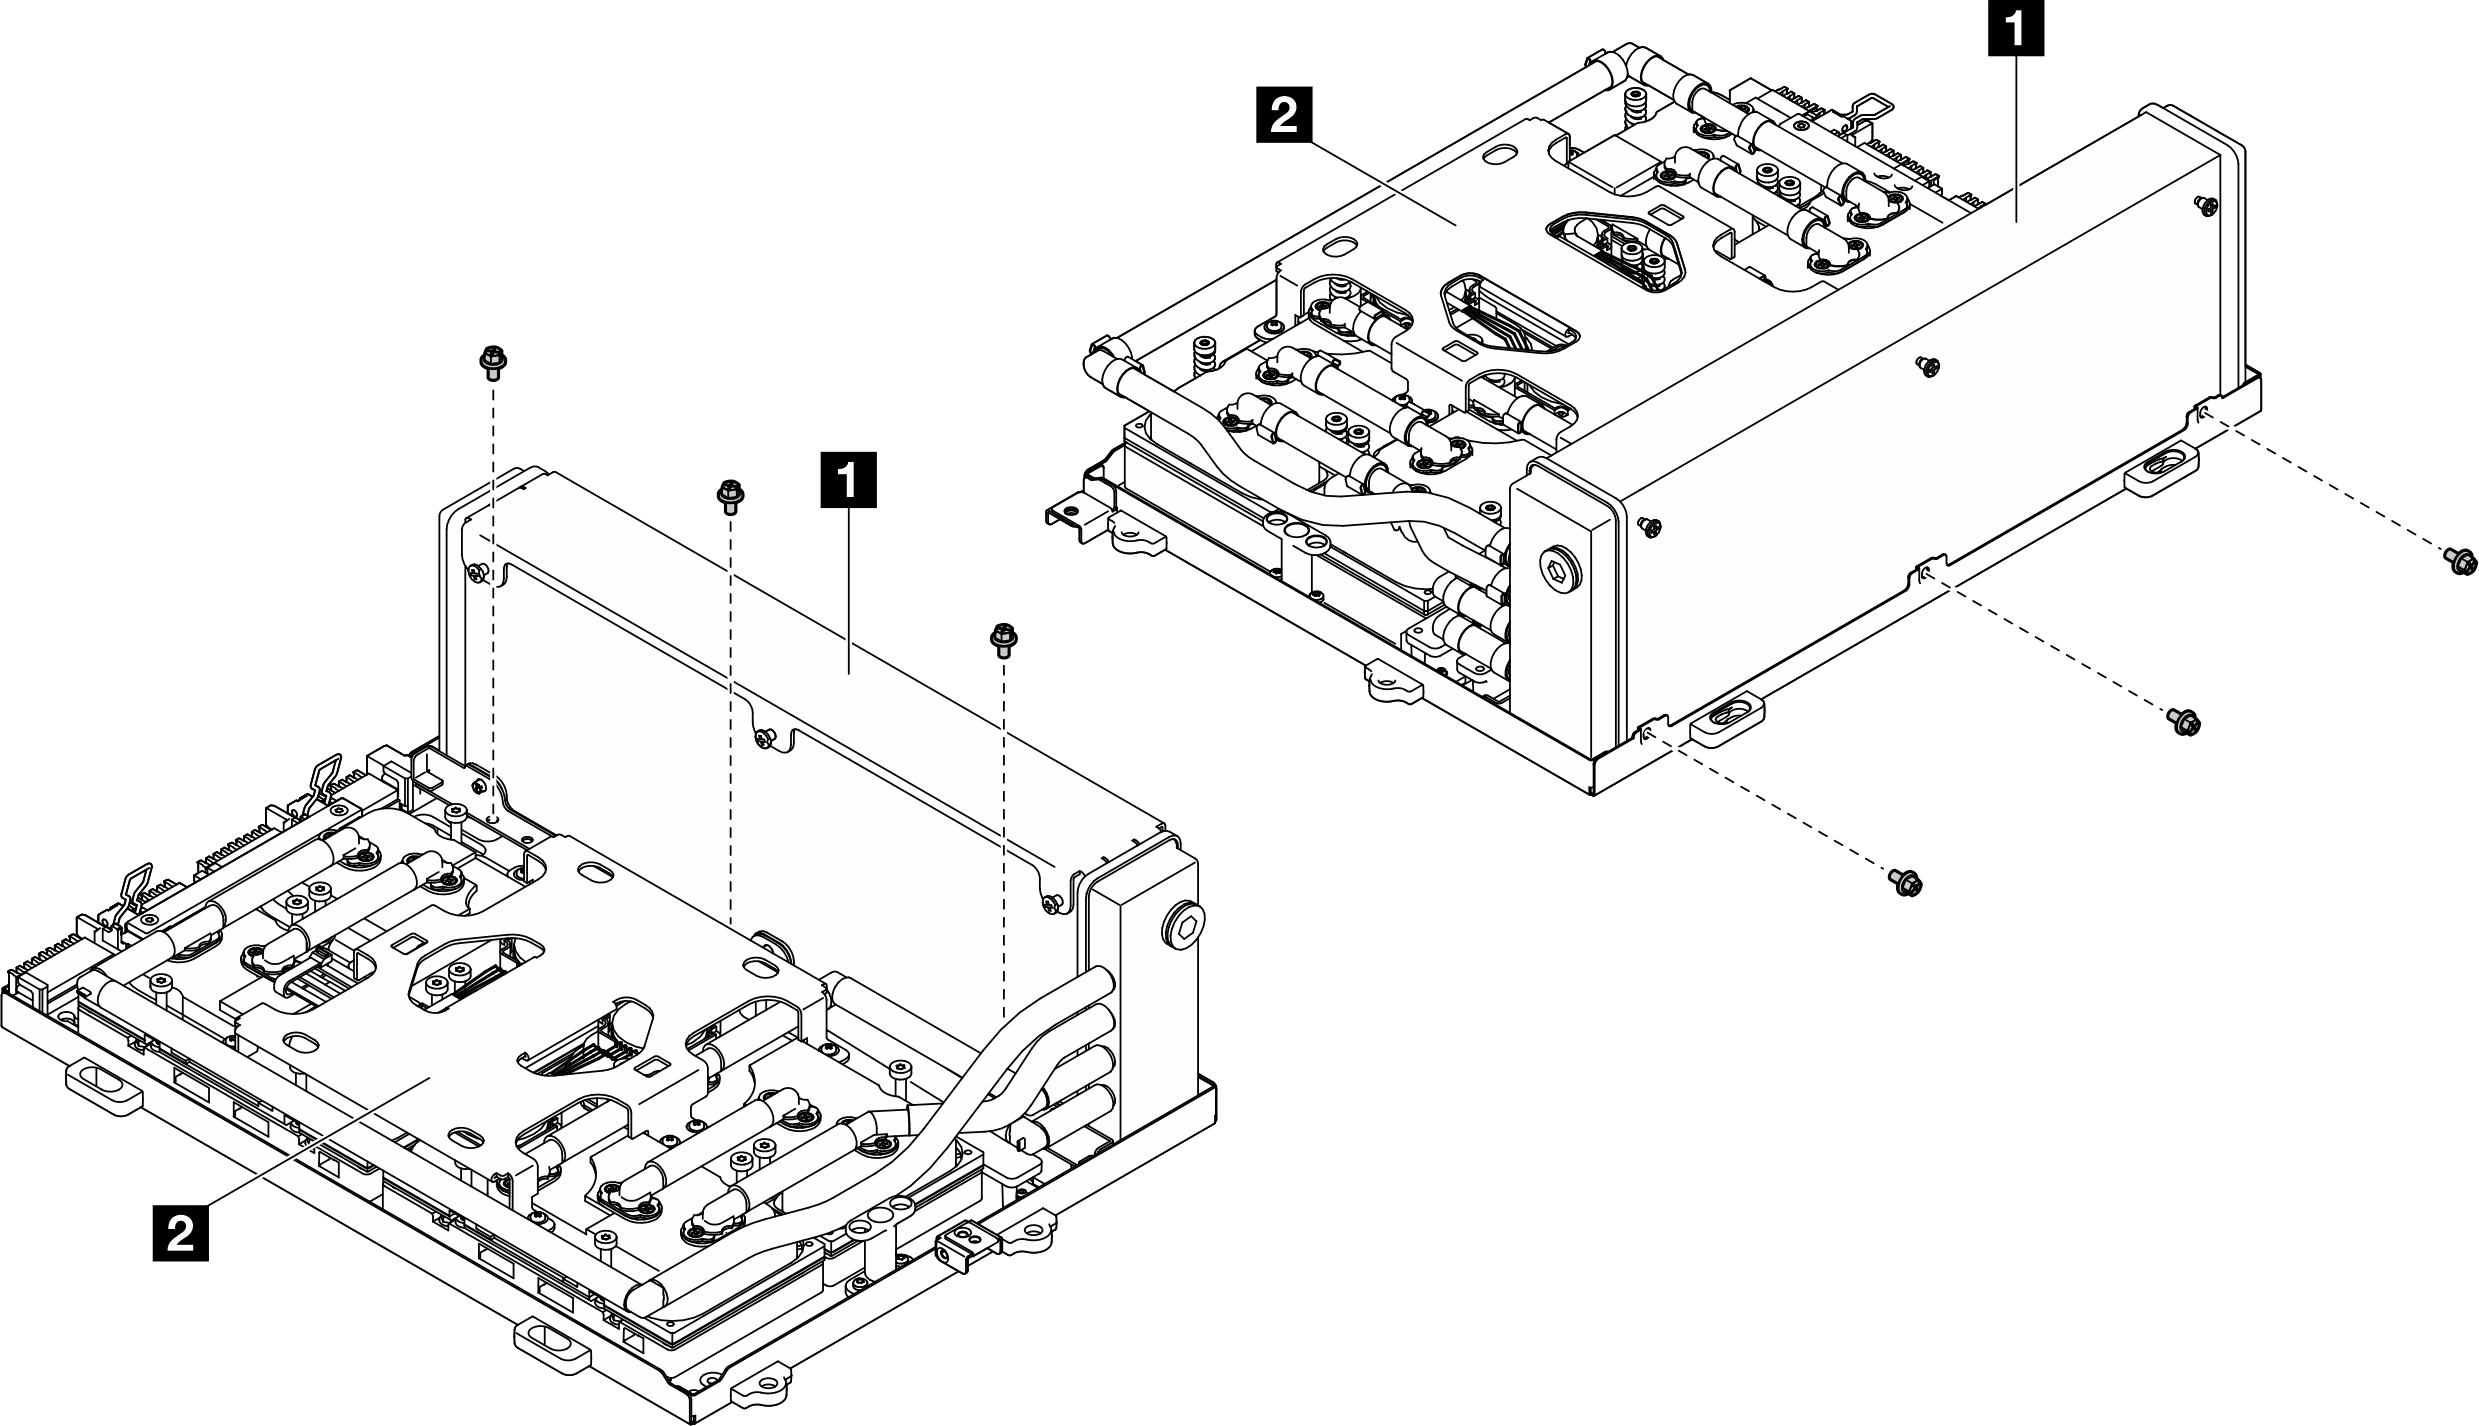
  7. Install the six Phillips #1 screws (M3 x 5 mm) to secure the radiator to the GPU tray.
    Note
    Loosen or tighten the screws with a torque screwdriver set to the proper torque. For reference, the torque required for the screws to be fully loosen or tighten is 0.3±0.03 newton-meter, 2.7±0.27 pound-inch
    Figure 6. Phillips #1 screw installation
    Phillips #1 screw installation
    1 Radiator2 Cold plate assembly
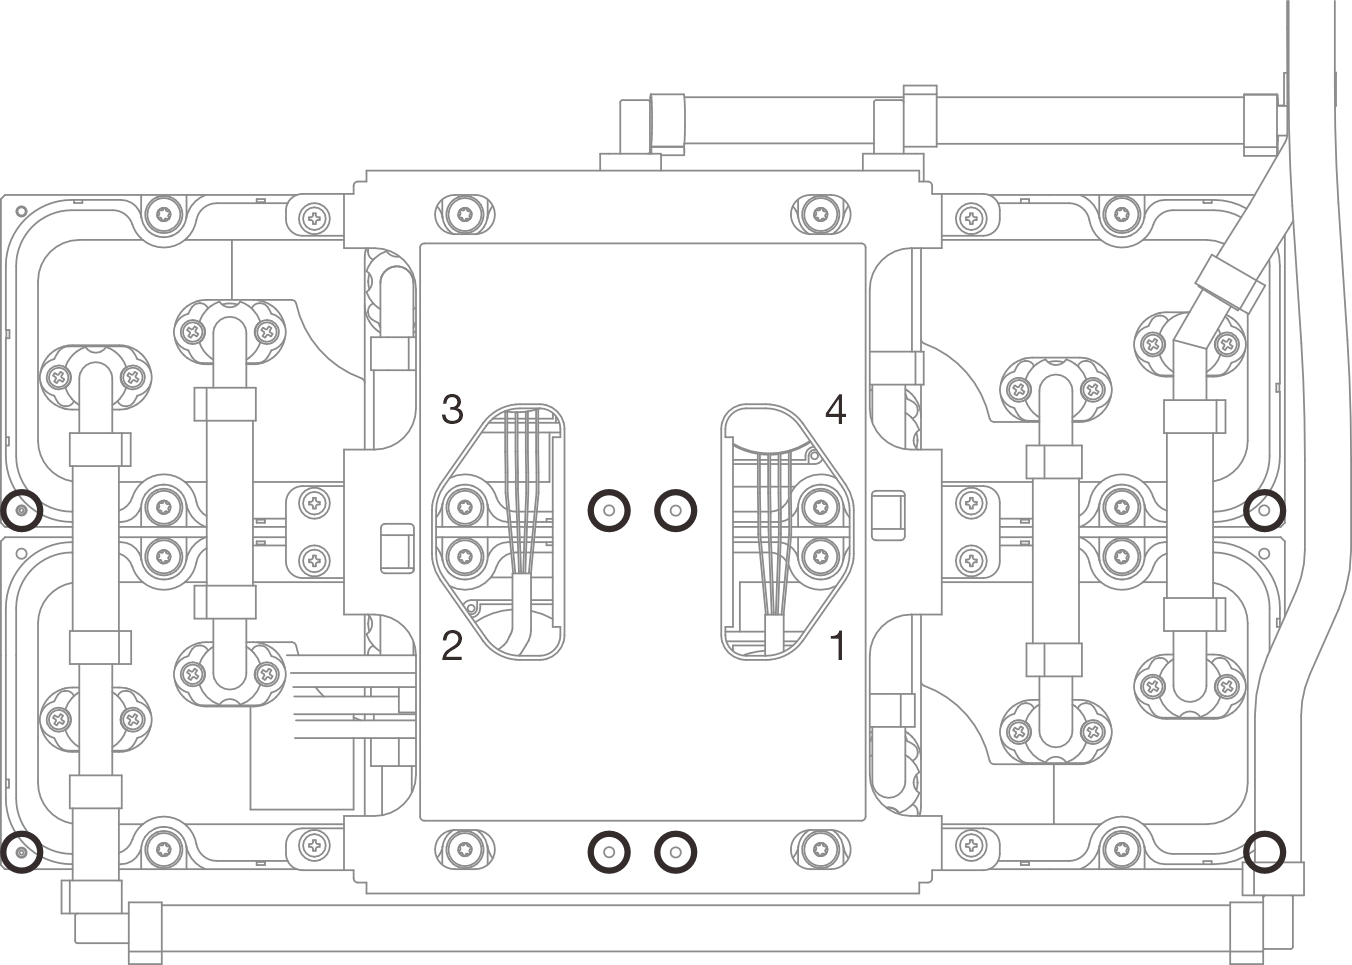
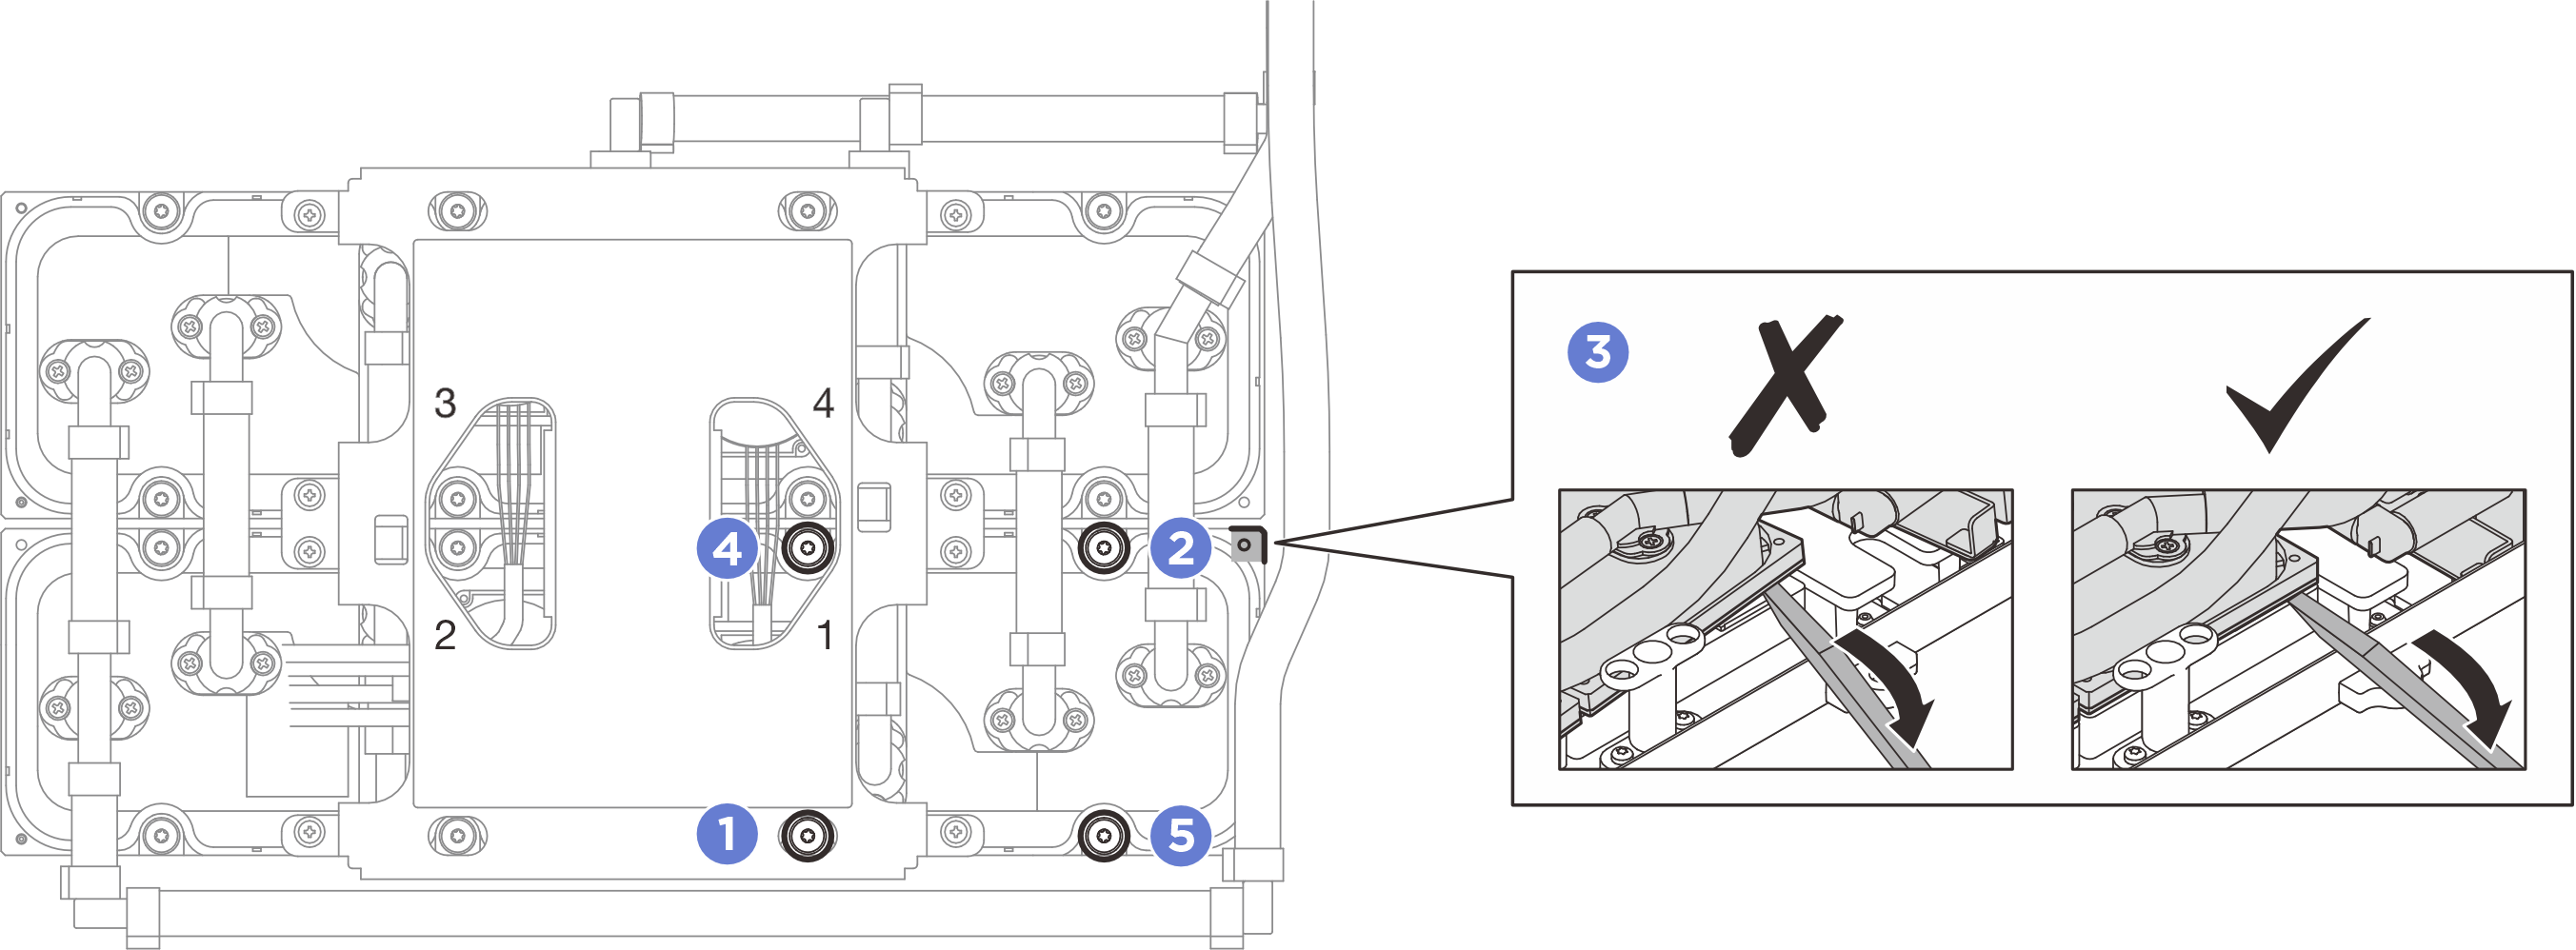
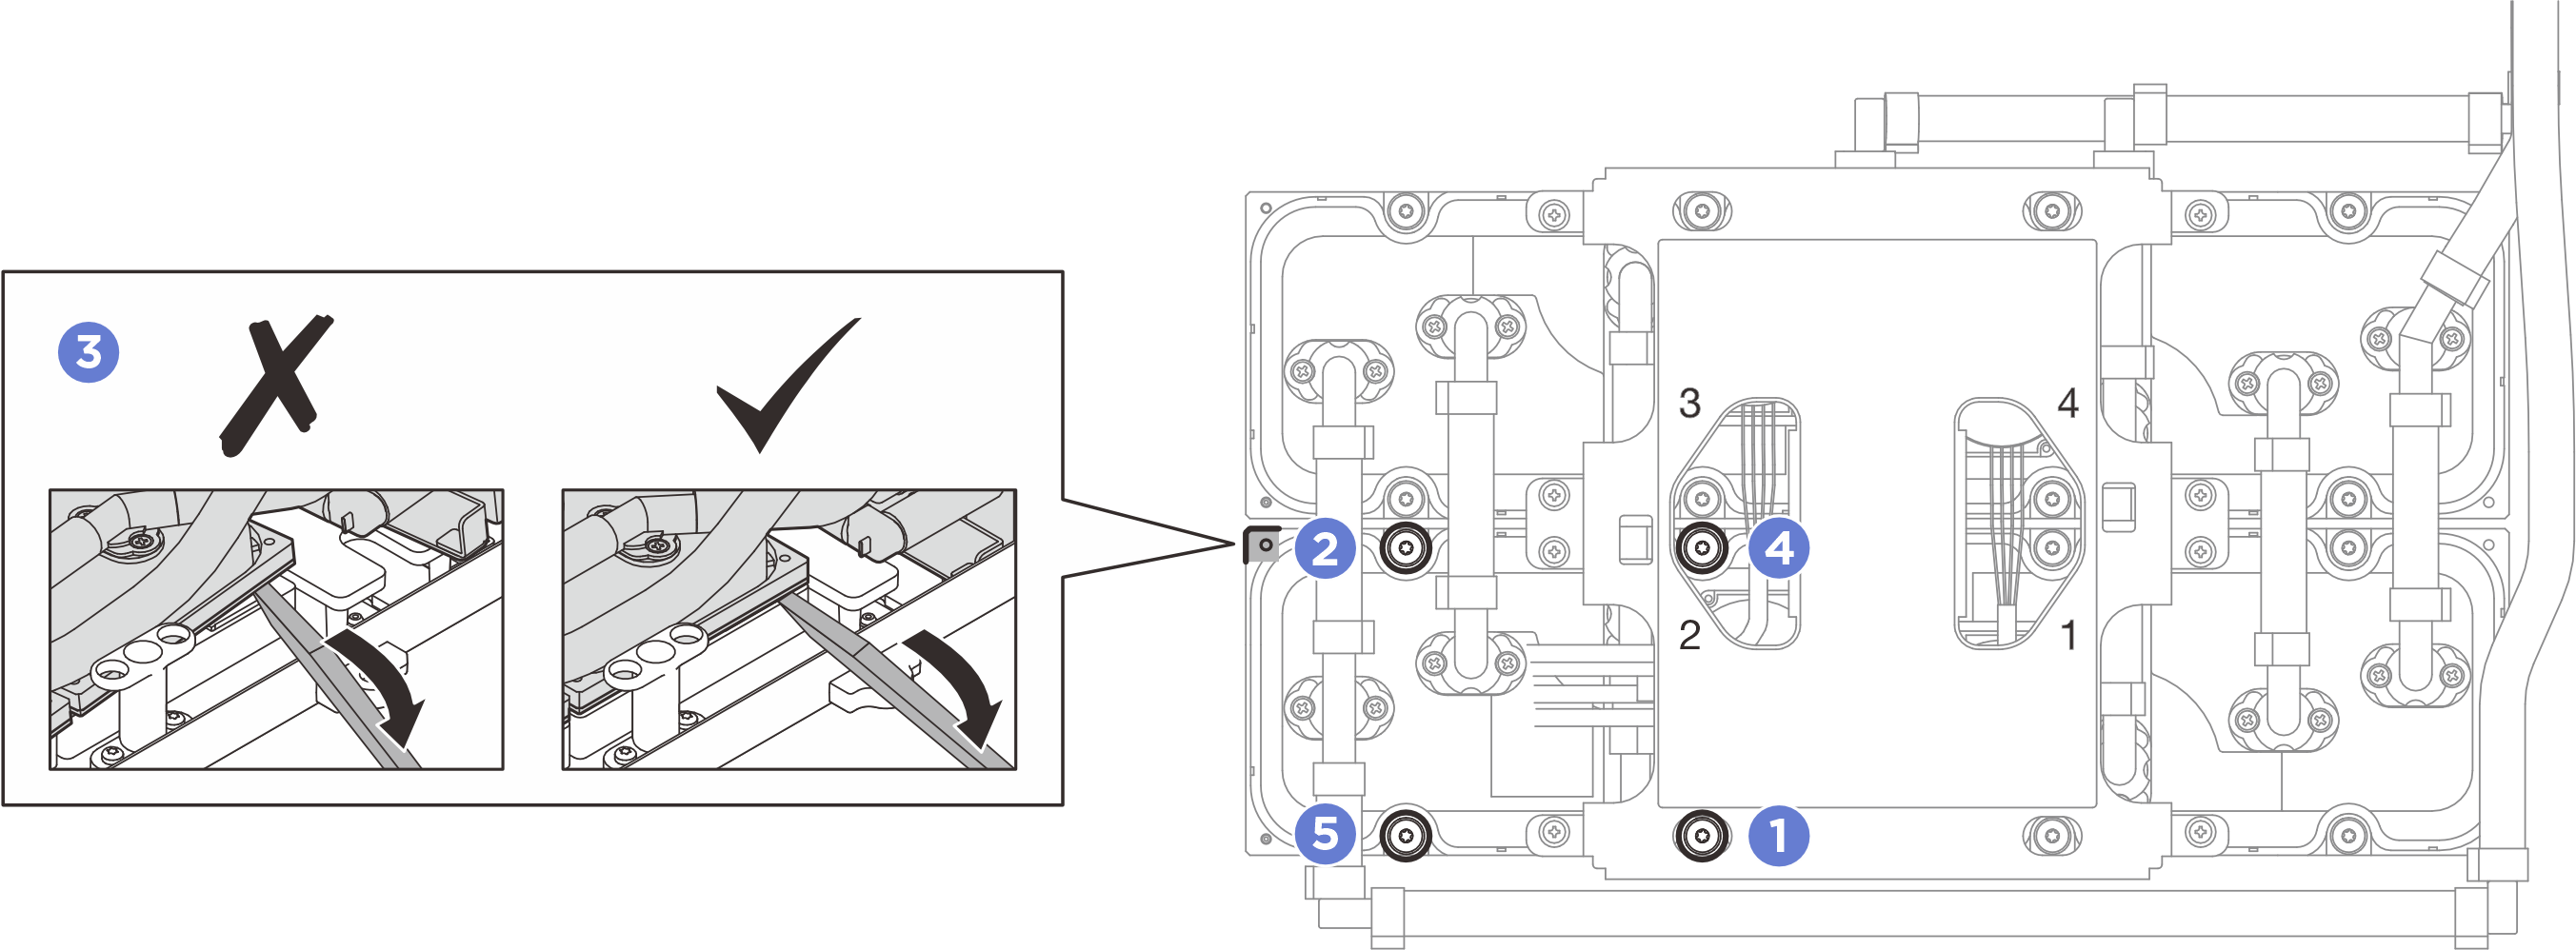
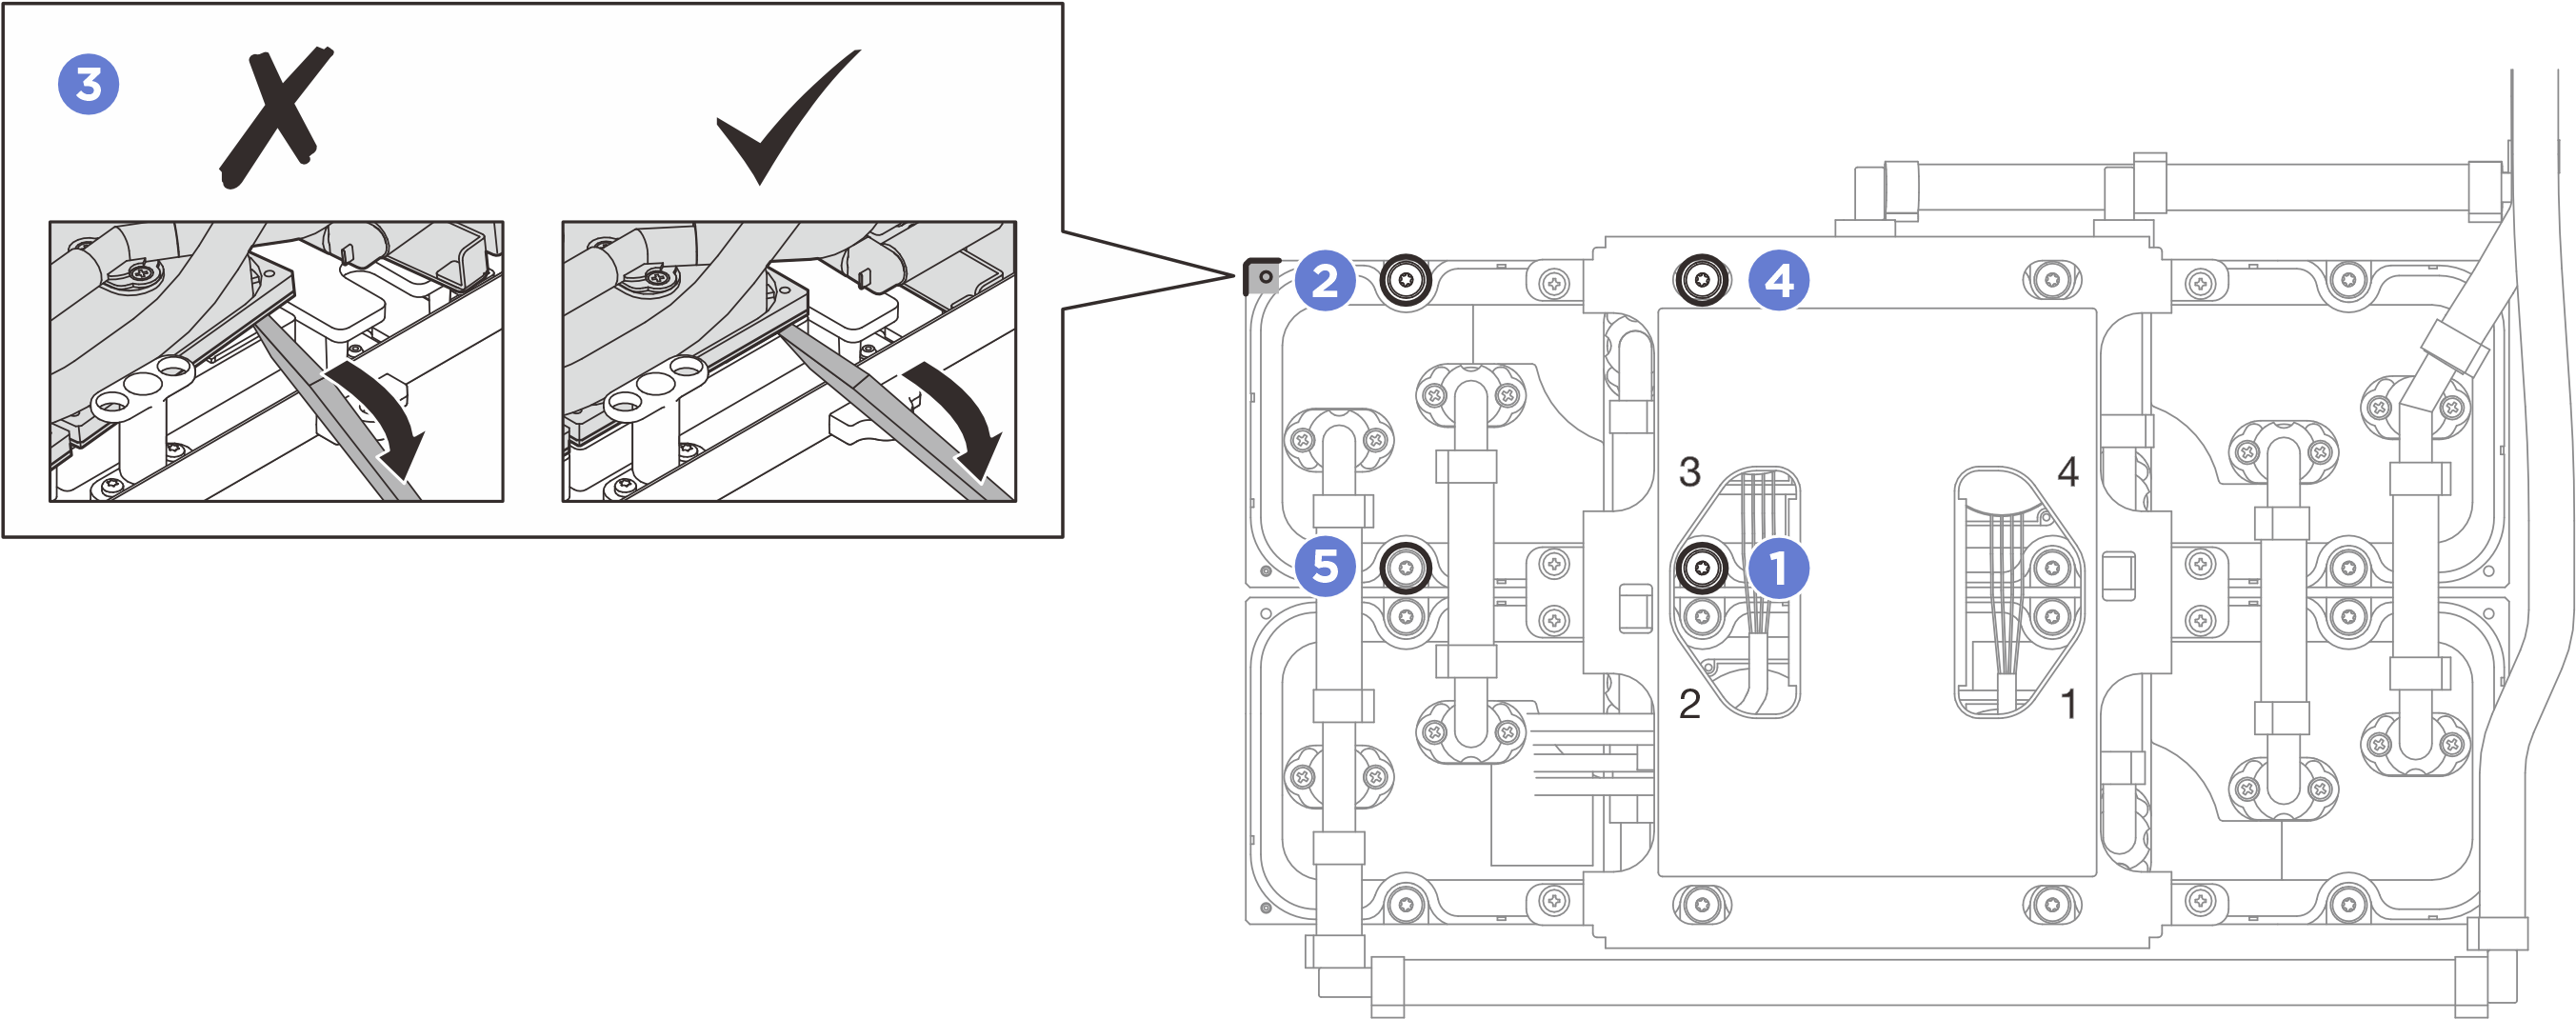
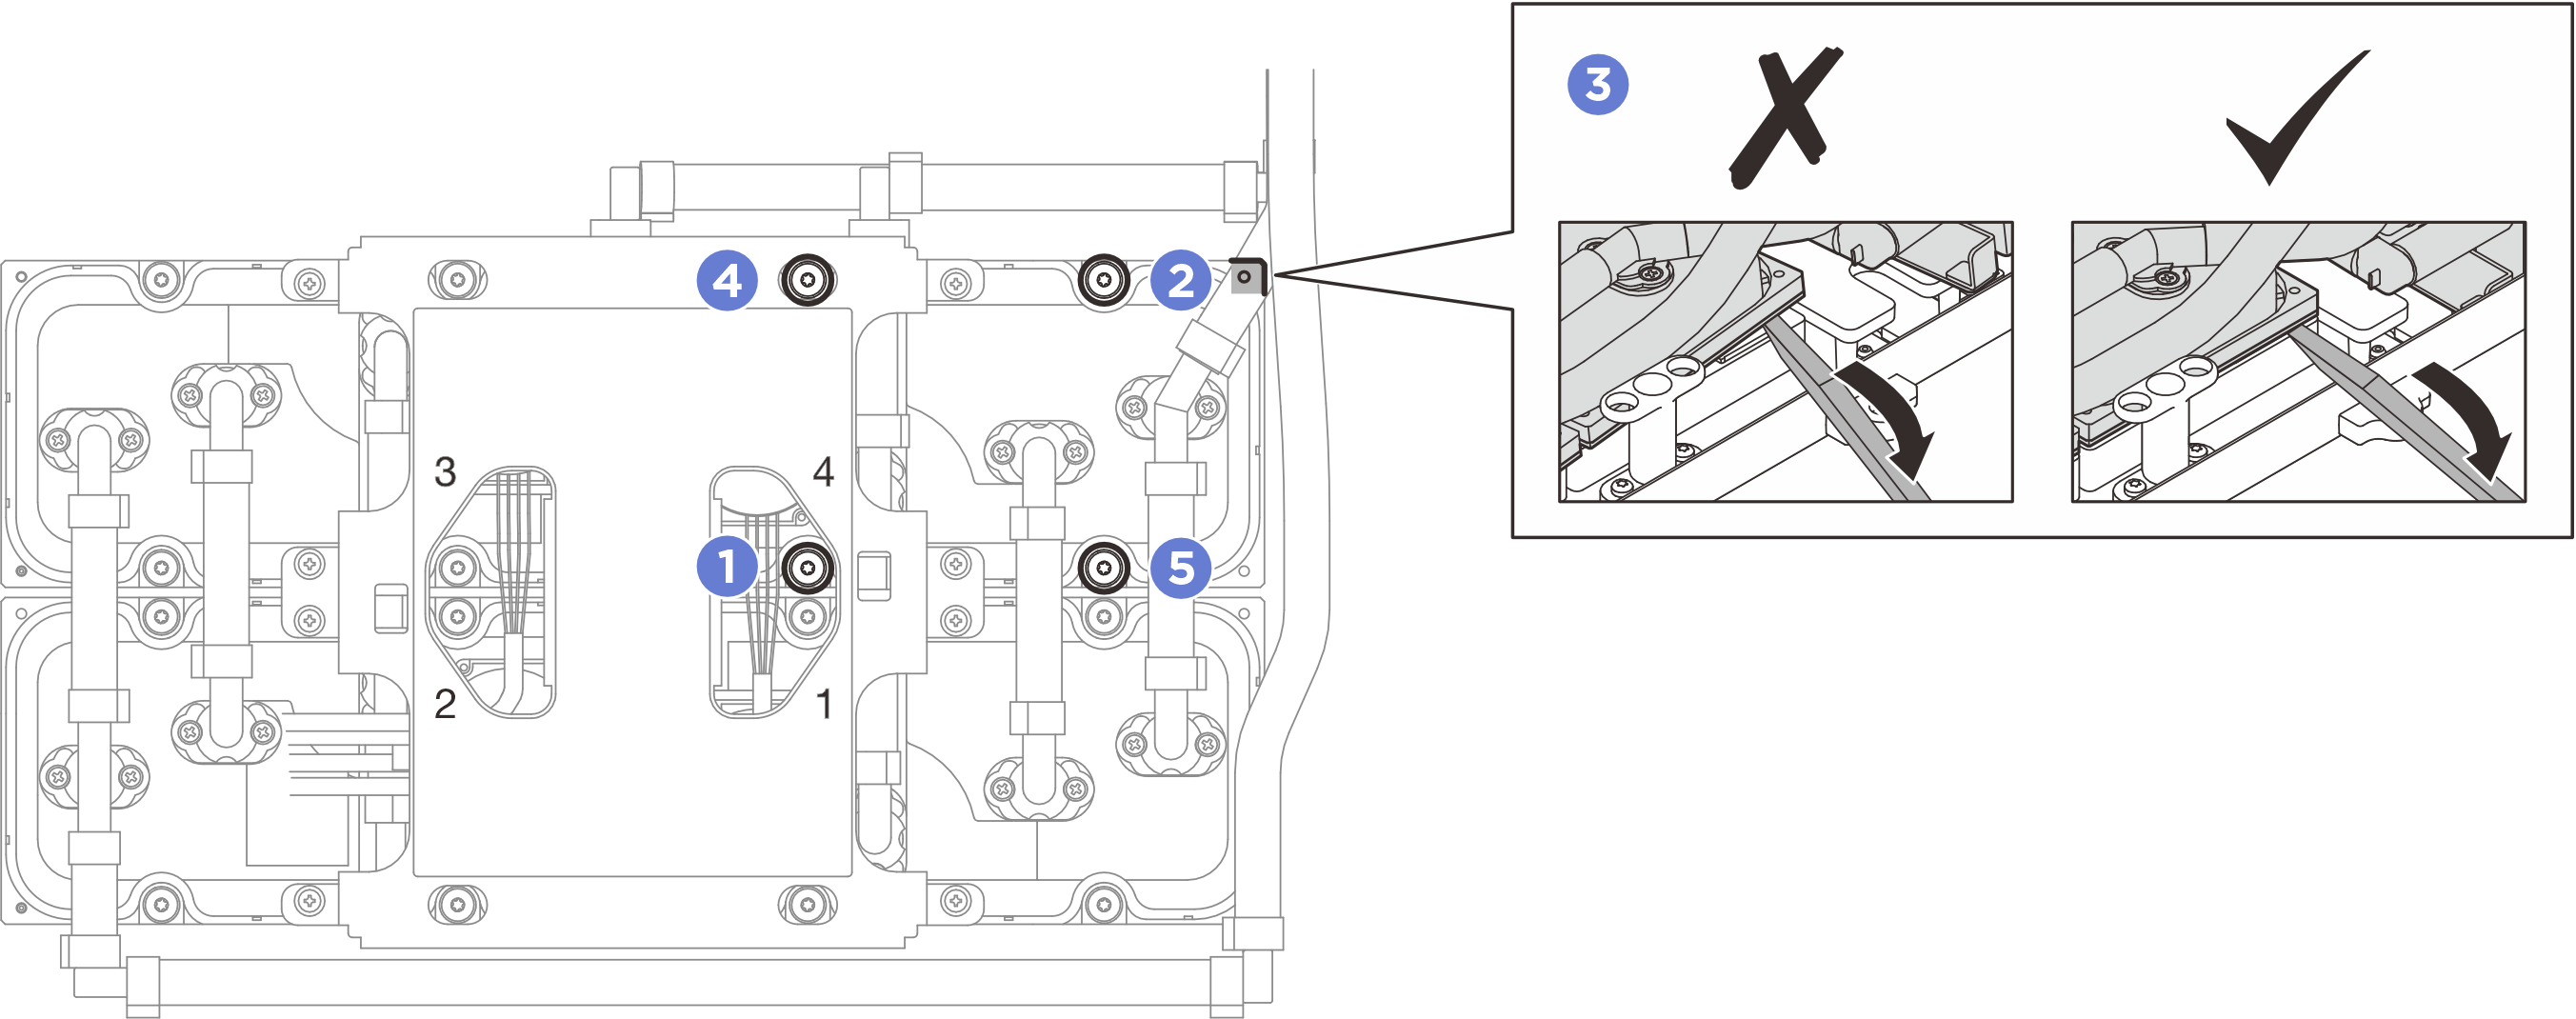
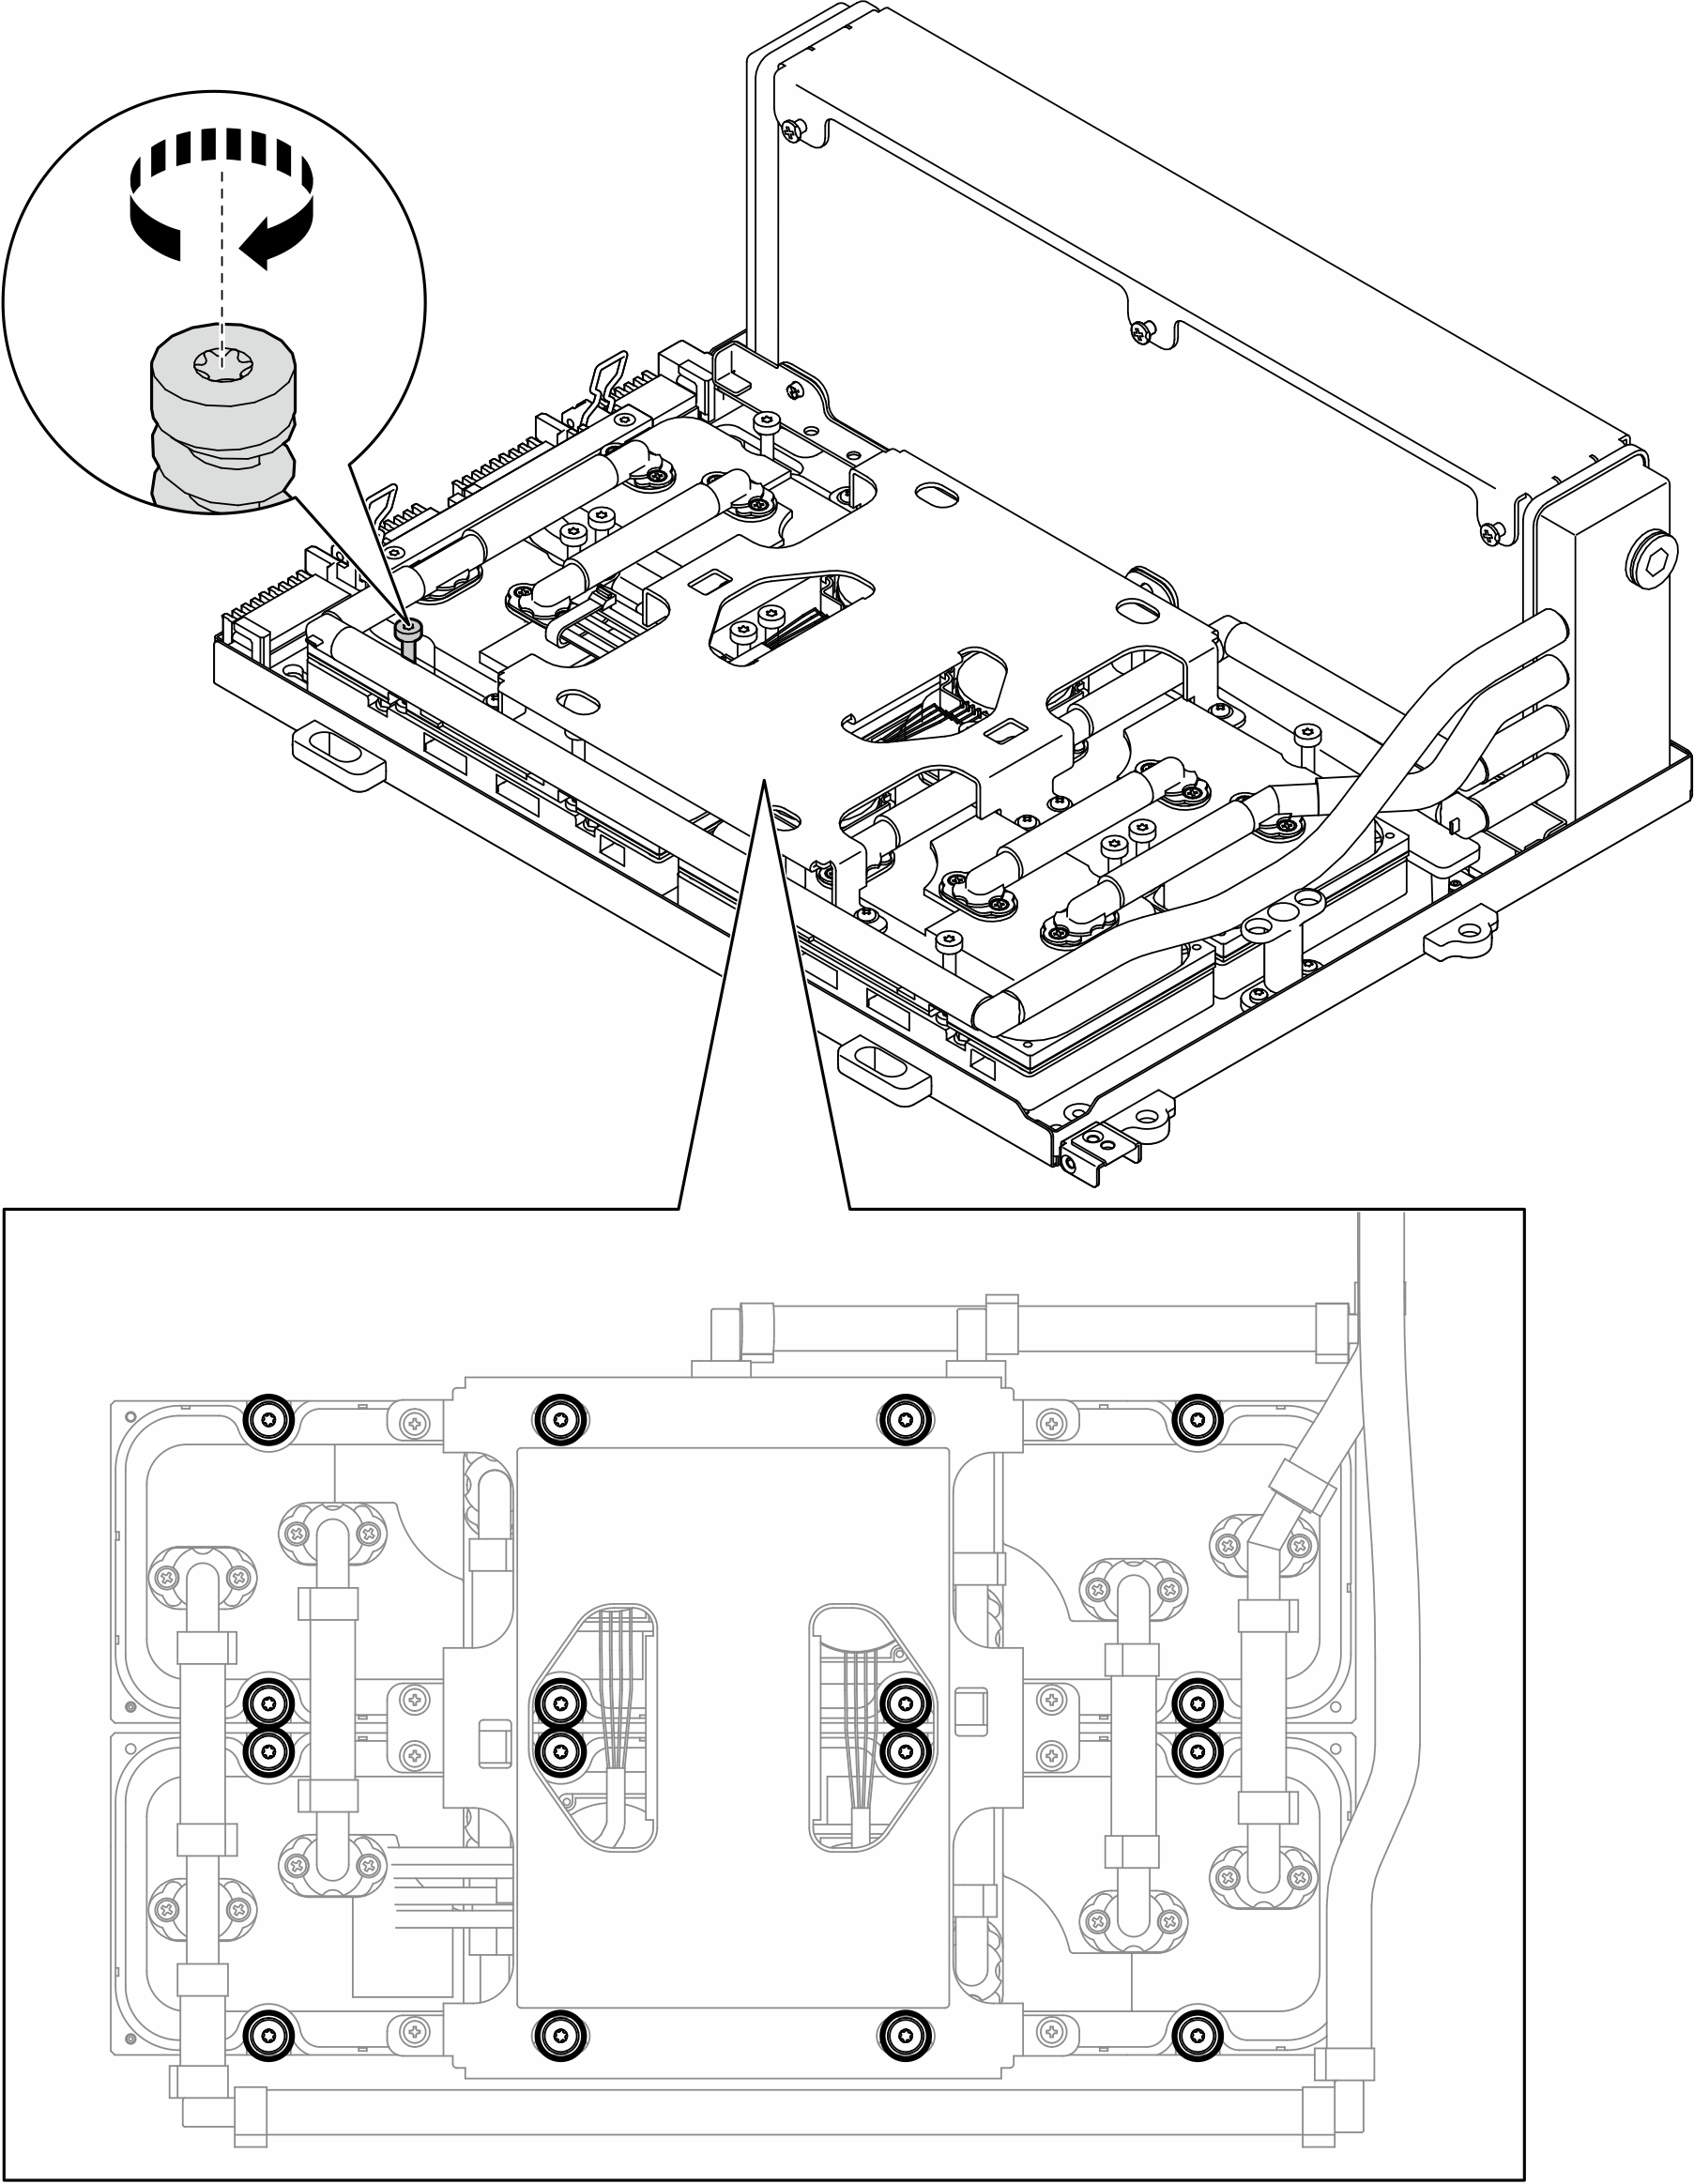
  8. With a Torx T15 head screwdriver, follow the sequence (cold plate 1 cold plate 2 cold plate 3 cold plate 4) to install the cold plate assembly.
    Important
    To prevent potential thermal issues, make sure to complete the following steps.
    1. Follow the screw sequence specified on the cold plate label, and fasten the sixteen Torx T15 screws for 720 degrees.
      Note
      Make sure to follow screw installation sequence to prevent cold plate tilting.
    2. Follow the screw sequence specified on the cold plate label, and repeat to fully tighten the sixteen Torx T15 screws.
      Note
      Loosen or tighten the screws with a torque screwdriver set to the proper torque. For reference, the torque required for the screws to be fully loosen or tighten is 0.4±0.05 newton-meter, 3.5±0.5 pound-inch.
      Figure 7. Torx T15 screw installation
      Torx T15 screw installation
  9. Remove the interposer card from the chassis. See Remove the interposer card.
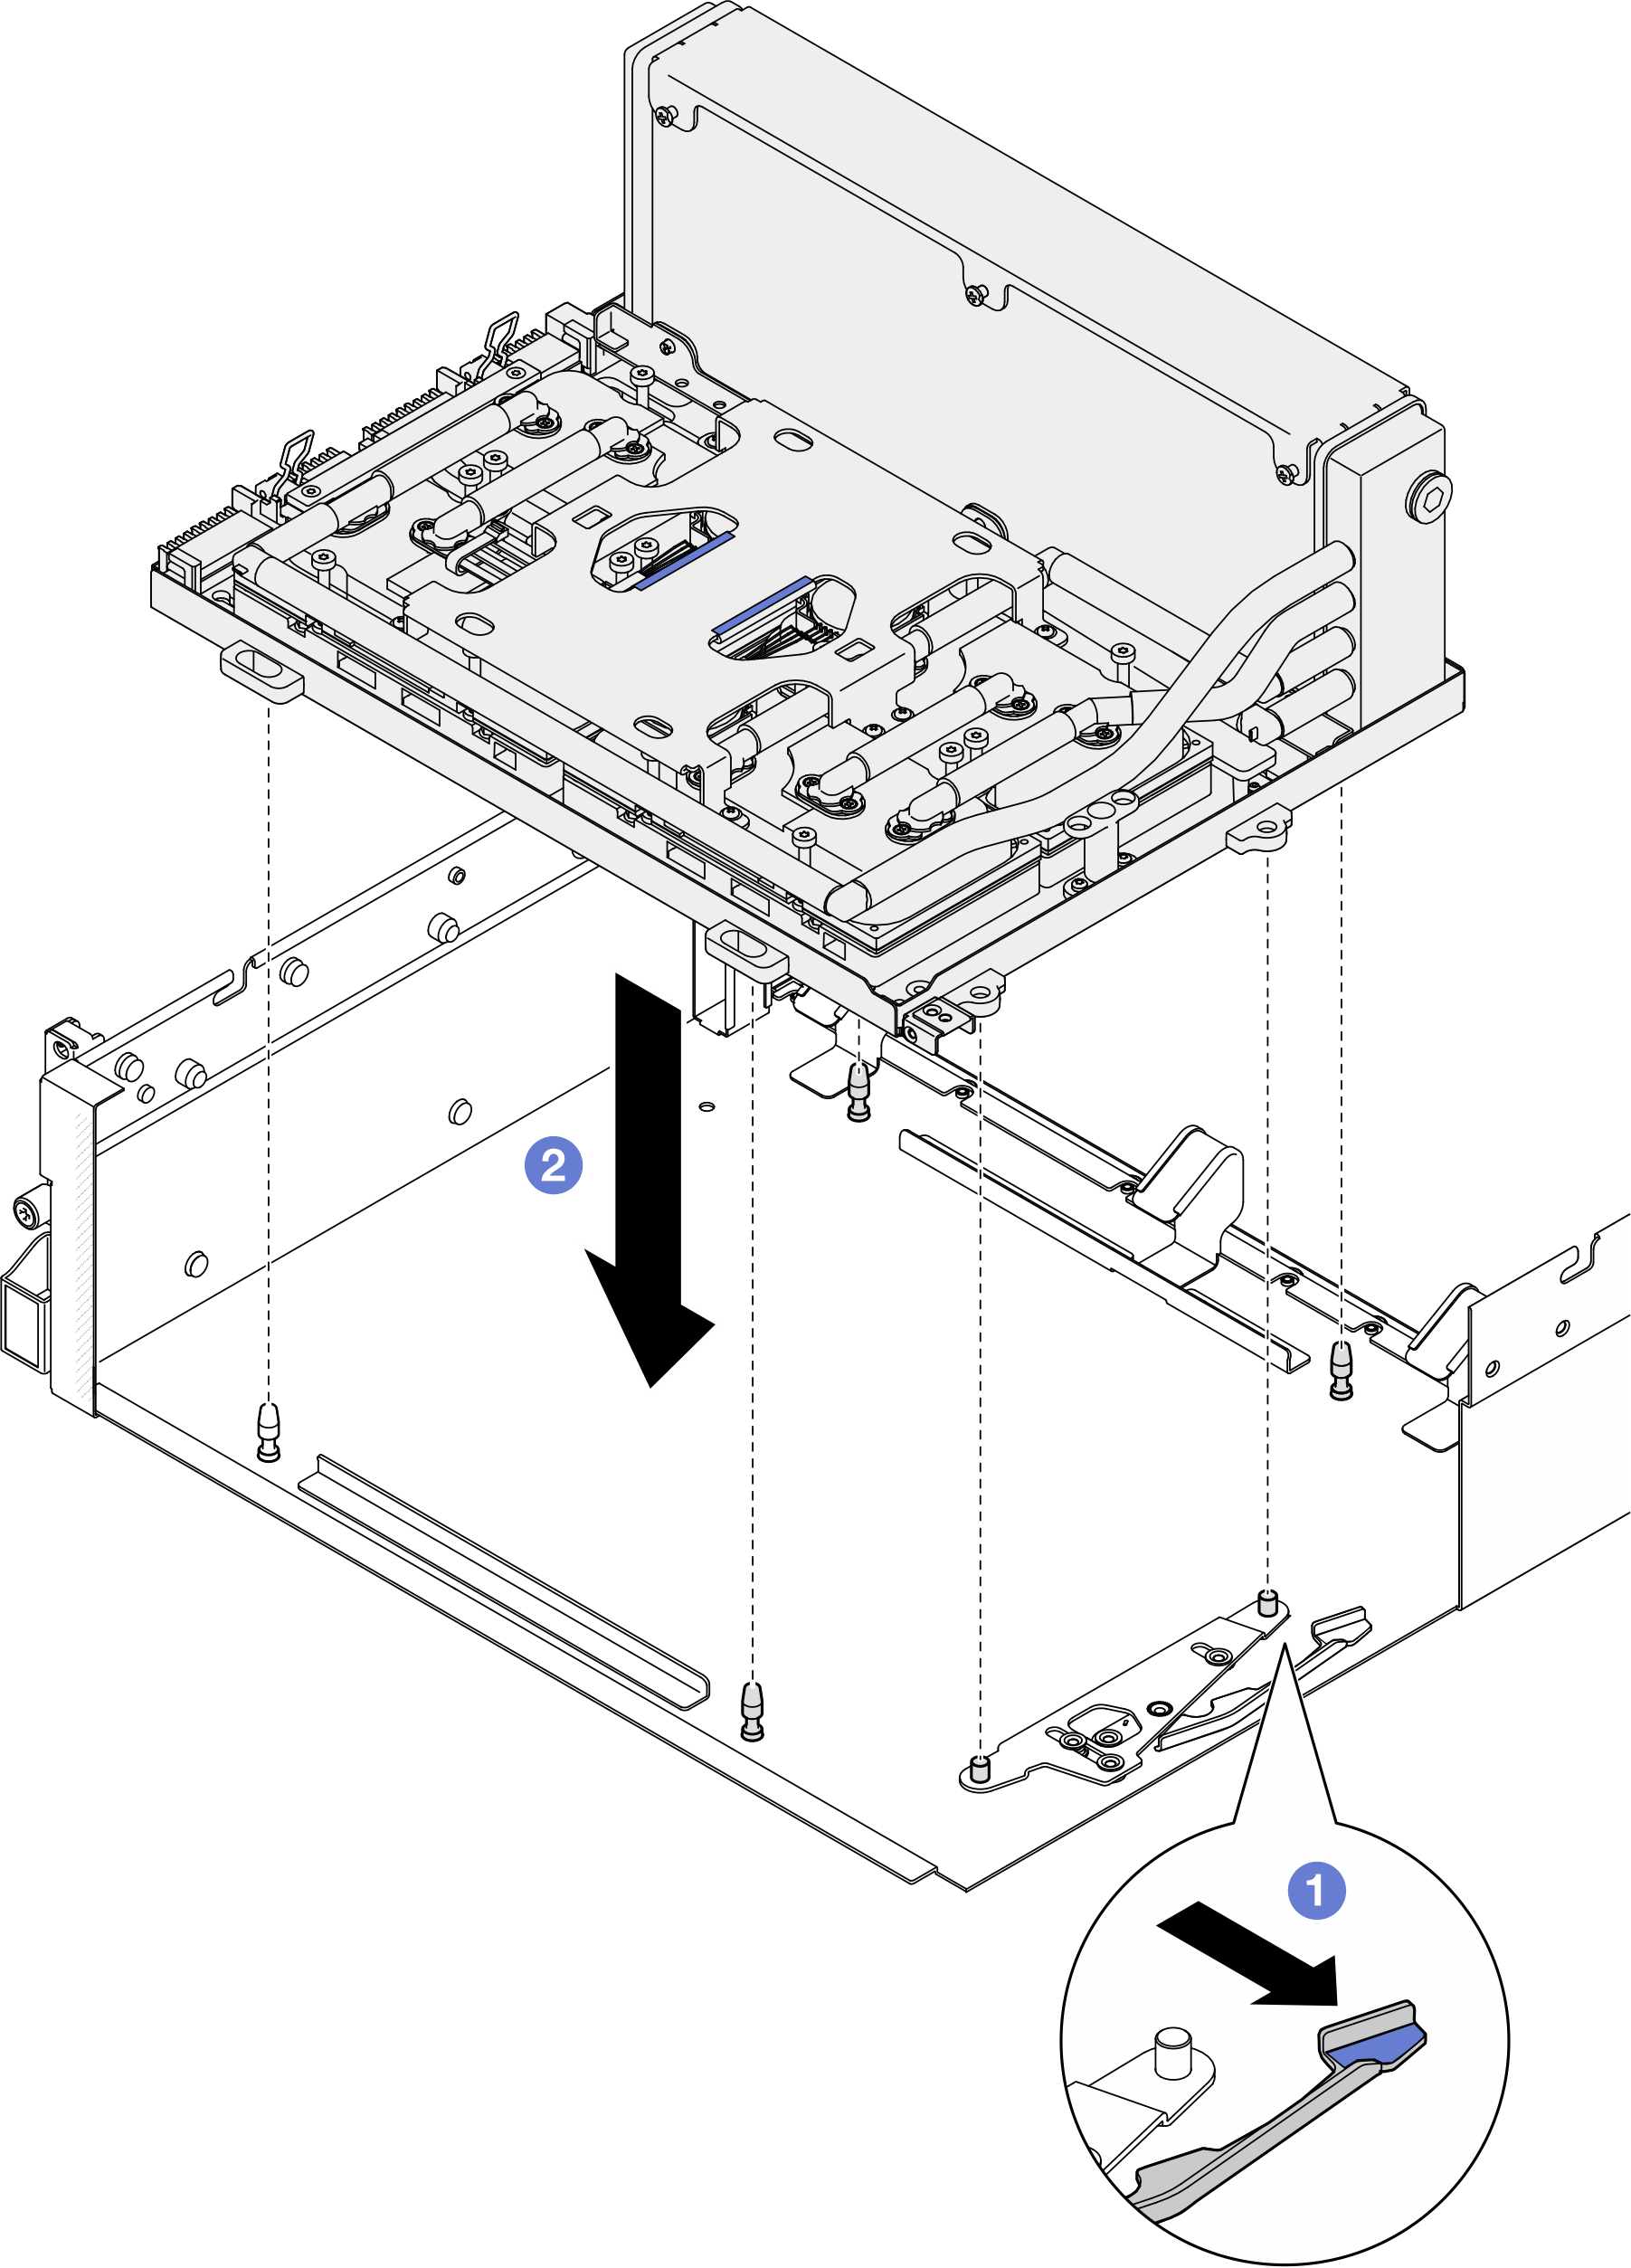
  10. Install the GPU-L2A assembly.
    1. Pull the SXM5 GPU board assembly latch outward until it stops.
    2. Hold the radiator by its upper edge and hold the cold plate assembly by its lifting handle; then, align the GPU-L2A assembly with the six guide pins on the chassis, and gently place the GPU-L2A assembly into the chassis.
      Figure 8. GPU-L2A assembly installation
      GPU-L2A assembly installation
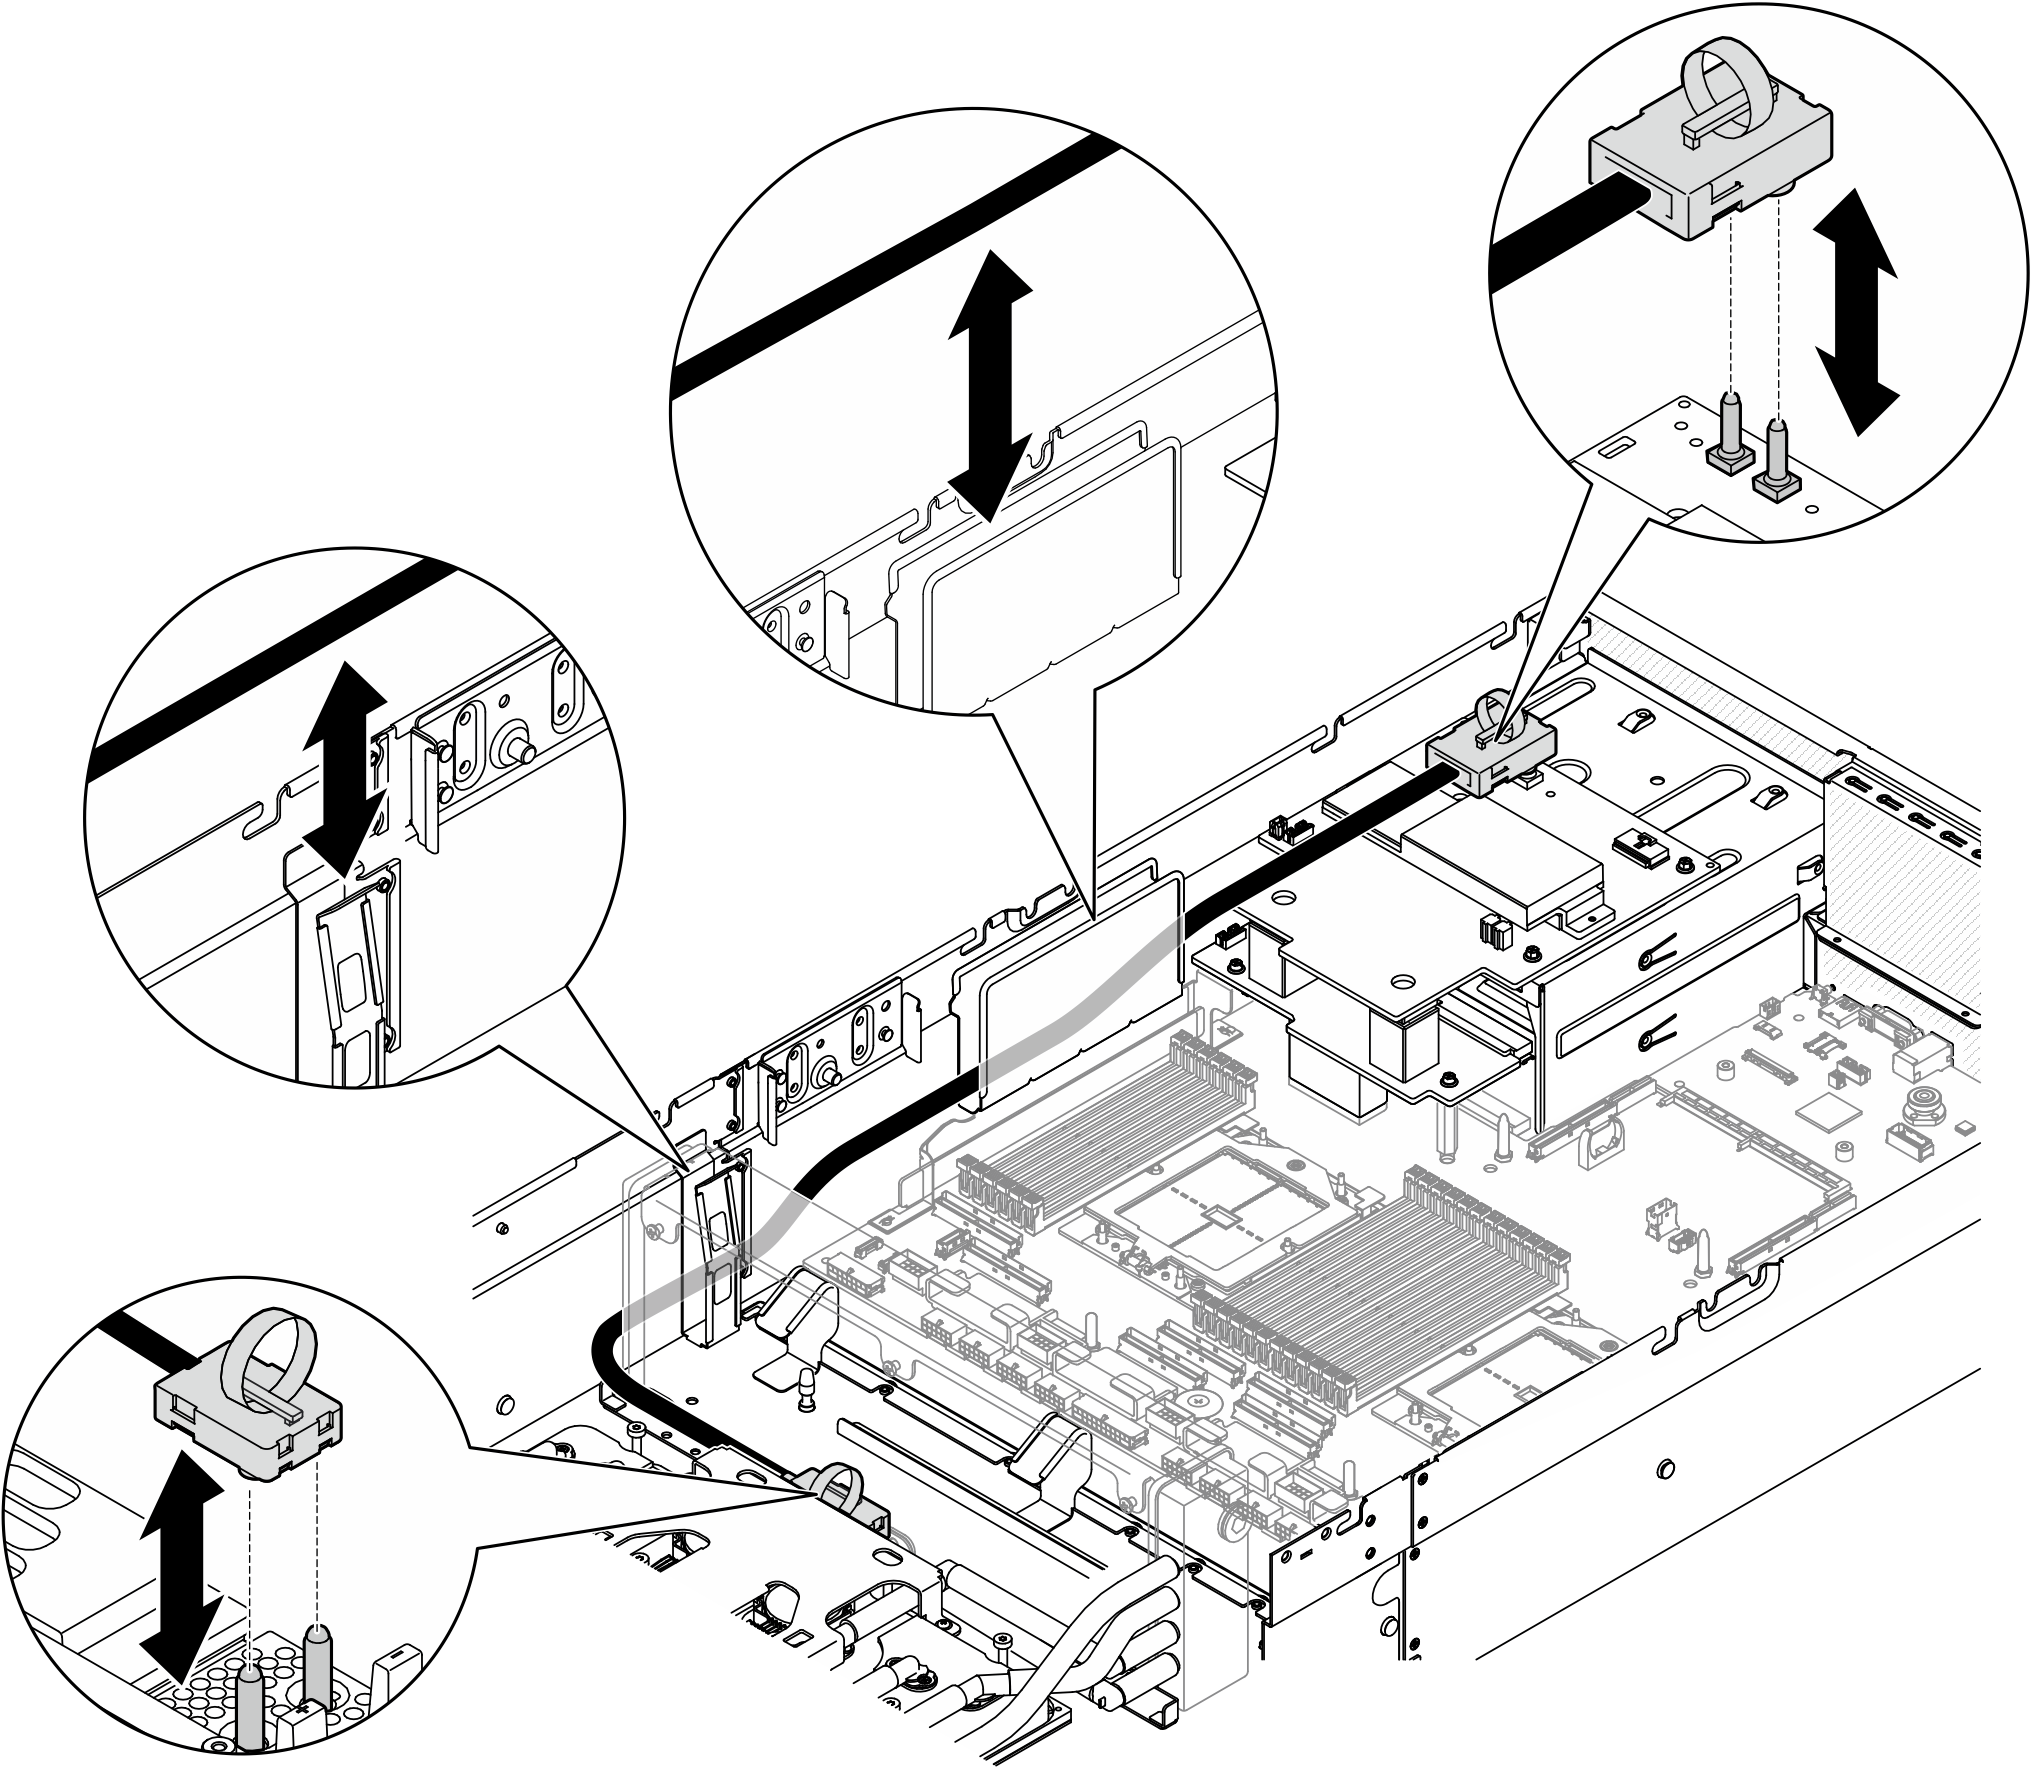
  11. Route the SXM5 GPU board assembly power cable through the cable clip and cable guide, and connect it to the SXM5 GPU board assembly and the SXM5 GPU power distribution board in the rear of the chassis.
    Figure 9. SXM5 GPU board assembly power cable connection

    SXM5 GPU board assembly power cable connection

After you finish

  1. Reinstall the interposer card. See Install the interposer card.
  2. Depending on the configuration, reinstall the front I/O expansion board carrier or the front I/O expansion board module. See Install the front I/O expansion board carrier or Install the front I/O expansion board module.
  3. Reinstall the front drive tray. See Install the front drive tray.
  4. Depending on the configuration, reinstall the CX-7 assembly or the SXM5 PCIe switch board. See Install the CX-7 assembly or Install the SXM5 PCIe switch board.
  5. Depending on the configuration, reinstall the 2.5-inch drive cage or the E3.S drive cage assembly. See Install the 2.5-inch drive cage or Install the E3.S drive cage assembly.
  6. Depending on the configuration, reconnect the power and signal cables to the 2.5-inch drive backplane or the E3.S dive backplane. See 2.5-inch drive backplane cable routing or E3.S drive backplane cable routing for more information.
  7. Depending on the configuration, reinstall the 2.5-inch hot-swap drives and the drive bay fillers (if any) or E3.S hot-swap drives and the drive bay fillers (if any). See Install a 2.5-inch hot-swap drive or Install an E3.S hot-swap drive
  8. Reconnect the following cables to the system board assembly.
    • Front I/O module cables
    • Front operator panel cable
  9. Depending on the configuration, reinstall the front PCIe adapter(s) or the OSFP port card. See Install a front PCIe adapter or Install the OSFP port card.
  10. Equally divide the cables that go through the right side of the front drive tray into two bundles, and secure them with the two cable ties.
    Figure 10. Securing cables with cable ties
    Securing cables with cable ties
  11. Reinstall the fan cage. See Install the fan cage.
  12. Reinstall the fans. See Install a fan.
  13. Complete the parts replacement. See Complete the parts replacement.

Demo video

Watch the procedure on YouTube